Joining granny squares with the flat braid join method results in a seamless join with a decorative touch. I’ve tried other methods of joining squares (slip stitch together, running stitch, whip stitch) and none of them worked well for me. Either the squares didn’t line up properly, or they didn’t lay flat, or both.
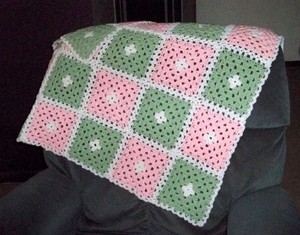
An online friend shared a YouTube video of the flat braid joining method and I was hooked – literally. The granny squares are attached by working a few stitches on one square, then picking up stitches on the adjoining square, and going back to the first square, which results in a braided look. The braided portion of the finished join is fairly wide, so take that into consideration when choosing the type of granny square you’ll be making, i.e., how many rounds and what colors, etc. See photos here for various pieces I’ve completed using the flat braid join method.
Since seeing that video, I’ve made probably hundreds of granny squares and joined each of them with the flat braid join method and doubt I’ll ever use another method. There are four videos in the series, and I admit that it looks difficult at first, but if you have a finished granny square in your lap to work on while watching the video, it’ll be much easier. Once you join two or three of them, you won’t need the video to finish joining your squares. It’s like following a written pattern – in the beginning it may look confusing, but once your fingers are actually doing the work, it all falls into place.
The video gives you a great visual on how to join the squares, but my written instructions below may be helpful to refer back to. I started using the method shown in the video (ch 3, sc, ch 3) but later found that substituting a slip stitch in place of the sc at each point made for a cleaner, less bumpy look, in my opinion. For the corners, I choose to ch 4 instead of ch 3, and substitute the slip stitch for the sc there as well.
Written Instructions for the Flat Braid Join
For your first square, start by attaching your yarn in any corner, ch 4 then slip stitch into same corner space, *ch 3, skip 2 stitches, slip stitch in next space, repeating from * until reaching the corner. Slip stitch in corner, ch 4, slip stitch in same space. Repeat on all four sides and finish by joining with slip stitch to first corner.
Align your second square below the first square and start the second square the same way but only complete two sides, ending with a ch 3 at the second corner. Remove your hook from the stitch, put the hook down through the corresponding corner of finished square #1, pick up the stitch from square #2 and pull through, ch 1 and join with a slip stitch to same corner in square #2. Ch 2, remove hook from the stitch, put the hook through the loop made by the next ch 3 space in finished square #1, pick up the stitch from square #2 and pull through, ch 1; skip 2 stitches and join with slip stitch to square #2. Repeat until reaching the end of where the two squares are adjoined. After joining the corner, go down the fourth side of square #2 and finish in the same manner as you did initially with square #1.
If you want to work in rows, align square #3 beneath square #2 and join each subsequent square in that row in the same manner. If you want to work from the center of your piece working outward, place square #3 to the left of square #2 (which will be catty-corner to square #1) and continue attaching in the same manner.
It’s difficult to explain in text what to do when you’re at the juncture with the corner of three different squares to join, so please refer to the video for that step.
Sources:
Personal experience
Video of Flat Braid Join