When you purchase a pre-stamped embroidery kit, or you use the iron-on transfers on blank cloth, there are a variety of stitches you may wish to use in your embroidery. This article will cover five commonly used stitches.
Each stitch will provide you with a link to an online page showing you the stitch itself with specific instructions for its execution. I varied the pages to give you some great embroidery sites for learning. In addition to the links, I provide tips I use with my own embroidery and specific ways to end your embroidery for each stitch.
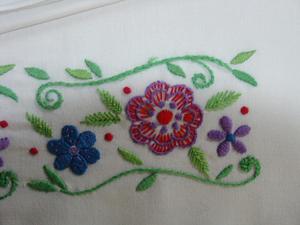
1. The Satin Stitch – The Satin Stitch is an embroidery stitch used between outlines to fill in areas completely with thread. Because the threads are placed closely together, all running in the same direction, it appears smooth like satin on both the front and the back of your embroidery.
Satin Stitch Tips:
– Satin Stitches look much nicer when your thread is smooth and not all twisted up. When you notice your thread is starting to twist (roll up on itself) dangle your needle and thread to take out the curl or twist your needle in the opposite direction of the twist in the thread. The article, “Embroidery Tutorial: Getting Started”, mentions thread separation as a way to eliminate some of this twist.
– When executing the Satin Stitch, the threads should be pulled tight enough to be secure and flat but not so tight that the fabric puckers or you see big holes where your needle went through the fabric.
– Satin stitches lie immediately next to each other, close enough to cover the background with no fabric showing through and far enough apart so that your threads don’t bunch up.
Ending the Satin stitch:
– Run your thread under the satin stitches on the wrong side of your embroidery and cut the thread.
2. The Stem stitch – This stitch is used to outline areas either already filled in or to embroider lines like stems or vines. It forms a smooth rolled line and can be used around other stitches to provide more definition. I often substitute this stitch for the back stitch, the difference showing on the back of the work.
Stem Stitch Tips:
– When you bring your needle up at your halfway point, be very consistent as to which side of the previous thread you come up on.
– When working around an outside curve, bring your needle up on the outside of the previous stitch. This will keep the thread on the outside of your outline. Reverse this for an inside curve.
– The stem stitch should have a swirl in it as one stitch almost seems to flow from under the previous stitch.
Ending the Stem stitch:
– Weave your thread in and out of the stem stitch on the wrong side of your embroidery for at least two inches or run your thread under a nearby satin stitch.
3. The Lazy Daisy Stitch– The lazy daisy is similar to a Chain Stitch. This is commonly used for small leaves or petals and consists of a tear drop shape with a little stitch on the loop to hold it fast. The only difference between the two stitches is the lazy daisy creates a stand alone stitch of it’s own, while the chain stitch loops into the next stitch.
Lazy Daisy Stitch Tips:
– When you loop your thread, hold it with your other hand while you are making your catch stitch. This helps you to know how tight to pull your thread.
– When making your catch stitch, make sure it is in the exact middle of the daisy loop or your stitch will not be as full.
Ending the Lazy Daisy stitch:
– For lazy daisy stitches you need to backtrack on the wrong side until you get to either a satin or stem stitch where you can anchor the thread. There is not enough on the back of the lazy daisy stitch to give you a good anchor.
4. The French knot – The French knot appears like a little polka-dot in your embroidery. This can be used for the center of flowers, holly berries and even leaves on trees in some cross-stitch pieces. When bunched together they can make raised rosettes. The French knot takes some practice but once you get the hang of it, you’ll find it quite easy to do.
French knot Stitch Tips:
– The illustration given for this stitch is not the general one I use but I really liked how they do the stitch. My personal way is to bring my needle up where I want the stitch to be, twist the thread twice around my needle and then bring my needle back down into the hole I came up in. While I am drawing the thread, I hold the twists in place with my fingers until the thread catches.
– The more twists around the needle, the larger and longer the knot will be. Twisting three or four times creates what is called the Bullion Stitch. Bullion Stitches often have the needle entering back into the fabric a short distance away from where you came out. This creates a little roll of thread on the fabric.
Ending the French knot stitch:
– Like the Lazy Daisy, you must end this by running your thread around another secure stitch area like a satin stitch or stem stitch.
5. The Fishbone Stitch – This stitch is commonly used to fill in larger leaf shapes as it resembles the veins of a leaf. This stitch appears complicated but it is really quite easy and looks fantastic: very delicate in appearance.
Fishbone Stitch Tips:
– The smaller the initial stitch and closer together the additional steps are, the more satiny the fishbone will appear.
– Varying the spacing between the stitches will show more or less of the background giving completely different effects.
– The center stitches create the “backbone” or in the case of leaves, the center prominent vein.
Ending the Fishbone stitch:
– One the back of the work, run your thread directly up the center of the fishbone, just to the left or right of the “backbone”, similar to the satin stitch. If doing a fishbone with larger spacing between the veins, you may need to run the needle in the opposite direction once you have run it through once. This changing direction will insure the security of your threads.