This guide offers a brief introduction to creating spin art, with an emphasis on spin paintings. You will learn about the art supplies and equipment needed and how to get started. You don’t need to be an artist to achieve good results with spin art; this art form is so simple that anyone can do it!
Equipment and Supplies Needed:
Spinning device
Adhesive
Paints of your choice
Either of the following: squirt bottles, OR a variety of paintbrushes and sponge brushes
Paper, canvas, or any other paintable surface
Preparation:
Be sure to wear old clothes. If you have long hair, tie it back. Be warned that glasses may get splattered with paint; if you have the option of putting contacts in, do it. I prefer to paint outside. If you don’t, be advised that you risk getting paint everywhere. At the very least, use a drop cloth to protect your work area.
Spinning Devices:
Spin art toys are probably the easiest spinning devices to obtain. If you plan to make a career out of spin art, you can purchase a large turntable. You could also make your own turntable. My husband made the turntable that I use for spin painting. He put it together using a combination of stuff he had in the garage and parts purchased at Home Depot.
You could also improvise using a potter’s wheel or other similar device if you have one available.
I imagine that an old record player could also be used, although I haven’t tried it. I wouldn’t recommend it unless you don’t mind getting paint all over it and possibly ruining it. If I were going to try that, I’d get an old scratched up record I didn’t care about, punch a hole in the center of the paper, attach the paper to the record player, spin and paint. Then when the spin art is finished, you’ll have to put a round sticker, piece of chipboard, die cut, punch, or other embellishment over the hole in the center.
Paper, Canvas, and Other Surfaces For Spin Art:
You can try spin painting on any surface you like, but some surfaces are going to work better than others. I’ve had the best results with hefty papers like Strathmore Bristol Board. I’ve also created many lovely spin paintings on canvas. I’ve tried both canvas boards and gallery-wrapped stretch canvas; both work well.
I have attached art journals to my turntable and painted those, but they were a hassle.
I have ideas for other surfaces I’d like to try. I would love to spin paint some fabrics; I would stretch the fabric in an embroidery hoop before painting. I would also like to attempt some spin paintings on clear acrylic backgrounds.
Paintbrushes For Creating Spin Art:
I use sponge brushes and paintbrushes for creating my spin art. Sponge brushes can be purchased inexpensively at Home Depot or craft stores. Paintbrushes should not be the expensive kind, because they will get destroyed pretty quickly if you use them for spin art. Use inexpensive craft quality brushes.
Squirt Bottles:
Some artists prefer to use squirt bottles instead of paintbrushes for creating their spin art. I am not all that familiar with their technique for doing so, but it is an option if you’d rather use bottles than paint brushes.
Paints For Spin Art:
Acrylic paints work well for spin art. Lumiere metallic paint is one of my favorite paints for creating spin art. I also enjoy using Winsor Newton gouache paints, Tsukineko walnut inks, and Pearl-Ex.
It is helpful to mix up a color palette before you begin painting. Choose colors carefully, since the colors are a critical component of the finished spin art.
Painting Backgrounds:
If you are painting on canvas, you’ll want to paint a background onto the canvas before you begin spin painting. This is because, ideally, the entire canvas should be covered in paint. I’ve had better results laying down a background first and then spin painting. If you prefer, you can skip the background and create the entire painting using the turntable; it might take more time and effort, depending on several factors, including the paintbrushes and paint used for the job.
If you don’t mind the spirals and circles blending into the background, you don’t need to wait for the background to dry. If you want your circles / spirals to be distinct from the background, you should wait for the background to dry before you do the spin painting.
If you are painting on canvas but you want a white background, I recommend that you paint a layer of white paint onto the canvas. Let it dry before you create the spin painting.
If you create your spin art on paper or other surfaces, the background isn’t as critical for archival purposes. You might still want to create one for aesthetic purposes.
Attaching Your Surface to the Turntable:
You are going to have to attach your surface securely to your turntable before painting. I experimented quite a bit before figuring out the best ways to secure my surface. I had success using the following adhesives:
I tried quite a few other things that didn’t work.
If you are using a spin art toy, it will probably have some sort of mechanism for attaching the paper to the turntable. Refer to the manufacturer’s instructions for the particular model you are using.
Painting:
Spin painting is easy! You just turn on the turntable, and let it spin. While it is spinning, apply your paint to your chosen surface.
If you are using a paintbrush, dip your paintbrush into your paint and touch the surface of your paper or canvas with the paintbrush. As you move the paintbrush over the surface, the result will be perfect spirals and circles. You can change colors as often as you like.
If you are using squirt bottles, squeeze paint onto the paper or canvas.
Splatter Effects:
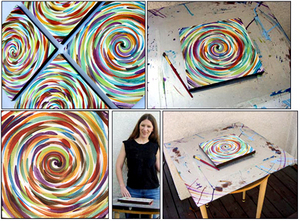
The effects you get will vary based on the quality of paint you use, the paint placement, and the speed at which your spinning device spins. If your spinning device spins very quickly, your paint will splatter, creating interesting effects. I use a larger custom made turntable that does not spin very quickly, which means that my spin art is usually not very splatter-y. I have painted quite a few paintings that have splatters, but those were done on improvised spinning devices. At one point my husband and I concocted a plan to use his drill as our spinning device. The second photo that accompanies this article is one of our resulting paintings.
We created some lovely paintings that day, but in the end, we concluded that using the drill for spin art was not really an efficient or recommended method. We haven’t repeated the experience. For one thing, it took both of us to do it, and for another thing we got paint all over his drill and nearly ruined it.
Overpainting:
When you are finished the spin painting, you can paint other things on top of the spirals if you like. I’ve created quite a few paintings in this way. One of my favorites is called “Koi Ballet”. Using my turntable, I created a blue spiral resembling ripples of water. Then I let it dry and overpainted several koi fish on top of the spirals.
Possible Uses For Spin Art:
Spin art is popular for wall art. There are many other interesting things that can be done with it, as well. I use spin art to create scrapbooking embellishments, handmade greeting cards, collages, art trading cards, and lots of other craft projects. Spin art techniques could also be used for fiber art, surface design, and fabric painting.
Spin Art For Kids:
Kids love spin art! The technique is so easy that even a child can do it. If you are going to let your kids try spin painting, be sure that you are using non-toxic, kid-friendly paints.
Conclusion:
I hope this brief introduction has given you a better understanding of how to create spin art, and some of the possible uses for it. If you decide to give it a try, I hope you’ll have fun and enjoy the process. Feel free to leave a comment if you have questions, tips or additional insight to offer. If you’d like to see more of my spin art, please visit my art and crafts blog. Thanks so much for your interest!