Chemical relaxing is a very stressful process on the hair. If done improperly, chemical relaxing can result in follicle damage, thinning, breakage and permanent hair loss. Despite the risk, nearly 70% of the African American female population regularly relaxes their hair. Today, chemically relaxing the hair seems to be the premier style of choice for women of the black diaspora. This article will teach you how to safely chemically relax your hair.
Applying your own chemical relaxer is perhaps the epitome of taking your hair care into your own hands. However, I would be remiss if I did not mention the fact that self-relaxing is NOT for everyone. It takes time, patience, and concentration to get it right. While it is generally recommended that you see a professional stylist for your chemical relaxer applications, in the real world, this is not always possible. You should only enter the decision to relax your own hair after much careful thought and consideration. For an enterprising few, self-relaxing is indeed the way to go.
Pre-Relaxer Considerations
When you’re ready to begin the chemical relaxing process, please take time to consider the following questions:
1.) How straight should my hair be? How far should I go?
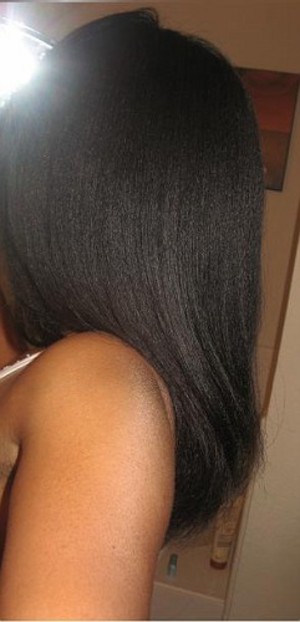
The obvious answer is as straight as possible right? Wrong! Do not rely on a chemical relaxer to take you to a 100% degree of straightness. Remember, you can always flat iron your hair for a bone straight look anytime without compromising the inner structure of your hair. I recommend that you relax your hair only to about an 80-90% degree of straightness, where some natural texture remains. Relaxing the hair bone straight increases your odds of hair thinning and loss over time.
The degree of sulfur and protein bond breakage determines how straight your hair gets. The more broken bonds the straighter, and sadly, the weaker your hair is. The higher level of bond breakage in bone straight hair causes this type of relaxed hair to be the most fragile. Bone straight, chemically relaxed hair is one step away from being overprocessed, and it usually does not have the required elasticity left within the strand to resist breakage easily. Your hair will hold moisture better and maintain much of its natural strength if you do not relax your hair bone straight.
2.) Can I Lessen the harsh effects of my chemical relaxer?
Chemical relaxers contain very harsh ingredients, but you can reduce the aggressiveness of your chemical relaxer. To reduce the harsh effects of your relaxer, simply add ¼ of a cup of your favorite oil or conditioner to the creme. This additional material will help to condition your hair. It will also buy you valuable application time during your self-relaxing process by slowing the processing of the relaxer. Any oil or lightweight conditioner will do! I use almond oil in my chemical relaxer creme.
3.) Is there any way that I can practice this before I take the Plunge?
Practice Makes Perfect! For those who are self relaxing for the first time, I recommend that you practice with your favorite conditioner before you ever try it with actual chemicals. This way if you mess up, overlap, or take longer than you are supposed to–your hair won’t suffer at all. In fact, your hair will actually benefit from the lengthy conditioning.
Now that you’ve considered those three issues, it is time to begin the first stage of the chemical relaxer process.
STAGE 1: Prep Hair and Gather your Materials:
You Will Need:
Gloves-To protect your hands from harsh relaxer chemicals.
Relaxer chemicals can irritate your hands and weaken or discolor fingernails which, like your hair, are composed of protein.
Base/Oil-To protect your hair and scalp.
Be sure to coat the entire length of hair to protect previously chemically relaxed portions from further damage.
Relaxer- Choose your relaxer based on your own hair type and desired turnout.
Applicator Brush – Optional. For use if you do not wish to apply chemical relaxer creme with your gloved fingers.
Towels- 1 Small hand towel for your face, 1 large towel to drape over your shoulders during relaxer application, 1 towel to drape during the rinsing stage, 1 towel to dry the hair, an extra clean towel just in case!
Timer/Clock-To keep track of time
Comb (optional): After your initial four corner partings, a comb is optional. A comb can inadvertently scratch or irritate your scalp during relaxer application so I personally do not use one. I allow my fingers to part my newgrowth.
Neutralizing Shampoo: Select a neutralizing shampoo with a color alarm or indicator.
Mild Protein Conditioning Treatment- for mid-relaxer protein conditioning step (optional). Aphogee 2 Minute Keratin reconstructor, Motions CPR, and Organic Root Stimulator Replenishing Pacs are good protein conditioning treatments to use.
Deep Moisturizing Conditioner: Select a thick, creamy moisturizing conditioner for following up your relaxer application. (See regimen builder)
4 clips/holders: To keep loose hair controlled while you section and apply relaxer to your hair.
Be sure to gather your materials well before you actually begin the relaxer application. Having everything you need beforehand will enhance efficiency and save precious time.
STAGE 2: APPLY THE CHEMICAL RELAXER
IMPORTANT! Before you start your chemical relaxer application, make sure that you have properly prepared your hair to undergo this process by following the 4 critical steps in this article.
Application Methods
A.) Gloved Finger Method (Basic Method of Relaxer Application)- Hands are gloved and chemical relaxer is smoothed onto sections with the fingers or the back of a comb. This method offers less control for applying the relaxer neatly.
B.) Applicator Paintbrush Method- Very similar to basic method of relaxer application. The hair is parted and relaxer is “painted” or smoothed onto the newgrowth with the applicator brush. This method also gives the user more control of the relaxer application and best prevents overlapping.
Application Steps
Step 1.) Divide your hair into 4 sections, parting your hair from ear to ear and then right down the middle. This will give you 2 sections in the front and 2 in the back.
Step 2.) Work with one section of hair at a time. Use your clips to tie back the other sections of hair while you concentrate on the section you are working on. Begin working on the most resistant section of the four you have created, saving your edges and nape for last. You should either start an inch or two up from the neck line, or an inch or two back from the front hairline in the sections you are working on.
.
Step 3.) Make ½ inch partings* in the section you are working on and apply the relaxer to the curly newgrowth. Take care not to overlap the crème onto the previously relaxed areas, and keep the relaxer away from your scalp. (Hopefully you will have already based your scalp so that if you do touch your scalp-you’ll have a buffer to prevent damage). When you complete this section, unpin another and repeat.
*Do not attempt to part through your hair perfectly with a comb, especially if you are several weeks post relaxer. This is unnecessary manipulation. Finger parting will work just as well. You want to part, lift, and apply to both sides. Be sure that you coat both sides of the hair strand with your mixture!
Switch it Up!
It is good to alternate your starting point with subsequent relaxer applications if you do not have any painfully resistant areas. For instance, if you begin with the back left section each and every time you relax, relax this section last the next time around. If you consistently relax a section first each time, this section of your hair becomes compromised because it is always exposed to chemicals for the longest periods of time. Years and years of relaxing this section first may begin to thin it out. Switch up your starting point from time to time, so that particular sections are not over exposed time and time again.
Step 4.) Your relaxer should be processing your hair at this point and starting to break down your disulfide bonds. It is now your job to do the actual “straightening.” Gently smooth and work the relaxer creme into the hair, making sure that you are not overlapping the chemical relaxer creme onto previously relaxed sections. Work the relaxer in a downward motion, making sure that you are keeping the cuticle layers pointing downward at all times. Your fingers should be smoothing the hair in ONE downward direction. Do not work the relaxer “against the grain,” past the newgrowth, or down the shaft. DO NOT COMB THE RELAXER THROUGH THE HAIR.
Keep your eye on the clock. Chemical relaxer timing depends on the texture, porosity, and condition of your hair in addition to the look you want to achieve. You should follow the time frame instructions for the relaxer you are planning to use. Speed is the key to a successful application. Do NOT wait until the relaxer begins to tingle or burn your scalp!
Help! I’m on FIRE!
Many of us have been raised to believe that the relaxer is “working” when it begins to tingle. This is far from the truth! The chemical relaxer is indeed working, but working on eating through your scalp and hair making it weaker by the second! Relaxers should never burn. Ever! You should never allow your hair to even reach the point of tingling. A tingling/burning relaxer is a sign that:
a.) The chemical has been in contact with the scalp for entirely too long and
b.) The relaxer has breached the protective base barrier that was placed on the scalp and is now working on breaking down the hair even further.
By this point, you’ve waited too long to rinse and usually you can expect some scabbing, watering, or oozing of the scalp in the affected areas several days after the relaxer. These chemical relaxer burns are not “the cost of doing business.” They should not be taking place period. Scabbing is a sure sign of improper relaxer application, and if you, a stylist, or someone else is applying your relaxers only to result in scabs later, drop them. LET THEM GO! They are causing you much more harm than good.
Step 5: Thoroughly rinse the chemical relaxer crème from your hair with warm water. Ensure that all physical traces of relaxer have been rinsed. Your hair is still extremely vulnerable to relaxer damage due to the unstable, high pH pf the hair and your swollen, lifted cuticle layers. Handle your hair with extreme care!
STAGE 3: The Mid-Relaxer Conditioning Protein Step
Several relaxer formulations come with a mid-relaxer protein conditioning step that involves the application of a mild protein treatment between the relaxer rinsing and neutralizing stages of the chemical relaxer process. This five minute step is done essentially to restore protein stores lost or compromised during the relaxer application. The great thing about this mid-relaxer protein conditioning step is that it can be safely performed with any chemical relaxer brand that you like and with any mild protein conditioner that you like! The steps are simple. Thoroughly rinse the relaxer crème from your hair with warm water after processing. Apply your mild protein conditioning treatment to your hair for three to five minutes. Rinse thoroughly and proceed with the rest of your neutralizing procedure.
**Some people like to start washing out their relaxer 3-5 minutes earlier than normal to accommodate this step. This is optional. You can still safely fully process your hair with the relaxer for the normal, recommended time and incorporate this beneficial step.
The Benefits
The main benefit of this mid-relaxer protein procedure is the maximum penetration of the protein molecules deep into the hair shaft that it permits. As you have read, relaxers disturb and destroy the protein bonding structure of our hair. This is the same structure that is responsible for our hair’s strength and elasticity. The point after the relaxer is rinsed, and right before the neutralizing phase is the most critical point in the relaxing process for the hair shaft. It is here that the hair cuticle is most open and receptive to treatments.
Yet another benefit of this mid-relaxer protein conditioning step is the increased body, strength, and volume it gives the hair following a chemical relaxer. The hair does not exhibit that limp, thin lifeless look that it typically has after a fresh relaxer. This mid protein step actually increases the body and thickness of the hair shaft!
Why this works
Because of the relaxer’s high pH, the cuticle layer is the most open it will ever be. Introducing the protein at this phase allows for maximum protein penetration and replacement due to the extreme lifting of the cuticle layer following the relaxing process.
But Will the relaxer still continue to process my hair?
The relaxing process is a chemical reaction that is not compatible at low pHs. Relaxers work in the 10-14 pH range. It is the low pH of the neutralizer that stops the neutralizing process, nothing special. Any and all of the products you apply following the rinsing of the relaxer help to gradually bring the pH of your hair back down to its normal pH of about 4.5 to 5.5.
The water from the initial warm water rinsing of the relaxer has a neutral pH of around 7. The water’s neutral pH helps bring the relaxer pH down a bit from its usual 10 to 14 pH range to a range of about 8 or 9 . The protein conditioner has a low, normalizing pH of 4 to 6 as well so it also brings your hair’s pH down so that your hair isn’t processing at full strength. The neutralizer finishes and seals the process. It typically bears the lowest pH of any product used during the relaxing process, so it helps bring down pH of the hair even more. This step is where the cuticles close back down the tightest. Doing the protein before this happens is the key, however, do not allow the protein treatment to linger on the hair longer than five to seven minutes. You still need to quickly move on to the rest of the neutralizing phase. This five minute protein step is optional, but it works!
STAGE 4: The Neutralizing Rinse
The neutralizing step is the most important, yet surprisingly most misunderstood phase of the relaxing process. Unfortunately, this step is where many relaxer applications go terribly wrong. If the hair is not properly neutralized, the relaxer will continue to work on the bonds within the hair strand. If the amount of relaxer residue still left remaining within the hair strand after you have neutralized and moved on is significant, then permanent hair loss and thinning will result.
Neutralizer should be allowed to sit undisturbed on the hair shaft for 3 to 5 minutes before it is rinsed. It must be given sufficient time to actually penetrate the hair shaft, adjust the hair’s pH, and halt the chemical reactions taking place deep within the hair strand. A few quick latherings and rinses will not get this done satisfactorily.
**Note: During the neutralizing process (mid-protein and neutralizing shampoo steps), you should make sure that you are not roughing up the cuticle layers of the hair in any way. Always work your post relaxer products down the shaft in one direction. No lathering, or scrunching the hair, etc. The straighter you keep your hair during the neutralizing process, the straighter the hair will turn out in the end. As your hair is neutralizing, your hair’s bonds are “freezing” or falling into their final, permanent place. If you direct the hair downward in a straight orientation with care: 1.) You ensure a neat arrangement of bonds in the final turnout and 2.) Reduce permanent damage to the shaft as the cuticles begin closing.
A color indicator is extremely important!
Using a neutralizing shampoo with a color indicator or color alarm will reveal many things to you about the neutralizing process. One is that, relaxer chemicals are not easily removed from the hair shaft. Another is that gentle scalp scrubbing during the neutralizing process will reveal even deeper traces of relaxer. Even with the best basing, some relaxer will breach your protective layer. You must get this deep penetrating relaxer out as soon as possible.
You should insist on using a neutralizing shampoo with a color indicator for all of your relaxer applications. This color alarm acts as a “litmus test ” that reads the pH of a particular chemical and produces a tell-tell color to inform you of any chemical change. Relaxers raise the pH of the hair in order to lift and open the hair cuticle for the straightening process. Neutralizing shampoo enters the raised cuticle to lower the pH of the hair and halt the relaxing process. This litmus test is the only way that you can be 100% sure that the hair’s pH has been restored to normal levels and that the chemical action of the relaxer has truly stopped within the strand.
Relaxers are not surface-acting chemicals that can easily be rinsed away. These chemicals penetrate the hair shaft very deeply, so one or two quick rinses with a neutralizing shampoo is not enough to halt the relaxer action. With a typical neutralizing shampoo it can take anywhere from 15-45 minutes and several vigorous rinses before the color alarm indicates that you have removed all traces of the relaxer from deep within the hair strand.
But what happens to most of us at a salon? The neutralizer is lathered up, we are rinsed maybe 2 or 3 times, conditioned, and then styled. If this is happening to you . . . run!
Do I really need a neutralizing shampoo? Water is good, right?
Relaxers bring the pH of the hair up to as high as 13 or 14– so any product that you use on your hair after that will have some sort of a “neutralizing” effect. Even the water with its neutral pH is considered acidic compared to the alkalinity of the hair after a relaxer. This is why we are able to safely do the mid-relaxer protein conditioning step and why some may be able to get away without a “neutralizing shampoo” altogether.
Unfortunately, the pH of water is often not low enough to bring the pH of the relaxed hair (13-14) back down to the normal 4-6 pH range. Almost all regular shampoos have their pHs formulated within this normal 4-6 hair range, and this is why they are said to be “pH balanced.” But even a shampoo in the 4-6 pH range may not be enough to totally neutralize and return the hair back to its normal pH. In fact, a regular shampoo would only bring the hair down to a pH of 7-9 from the original 13, which is still slightly alkaline. This is where the neutralizing shampoo comes in. Most of them have lower pHs in the 3-5 range which really helps bring the pH of the relaxed hair down to normal.
STAGE 5: Your Post Relaxer Game Plan
It is very important that you do a protein treatment the wash following your relaxer. Relaxing disturbs the protein bonds in hair so you need to be sure to put some protein back via a good protein treatment. This treatment should come no later than 7 days after your relaxer. Follow the protein treatment immediately with a moisturizing deep conditioning treatment. If you do the mid-protein conditioning step during your relaxer, you may elect to skip this third post-relaxer treatment. I would not skip the first pre-relaxer protein treatment.
If you used a heavy protein the first time during your pre-relaxer preparation steps, go for a milder protein treatment for the one AFTER your relaxer. You do not want to over do it with too much protein.
Good luck!
Halal, John (2002). Hair Structure & Chemistry Simplified. Delmar Publishers.

")
")
")
")
")
")