When my children were between the ages of 3-7, one of their favorite craft activities was making costumes from a brown paper bag. With scissors and a little glue, those paper bags magically transformed into cowboys vests, Indian jackets, and space suits that kept them entertained for hours.
Materials needed
For this activity you will need a large paper bag, scissors, ruler, pencil, and felt markers. Optional items can include such things like glue, spray paint, tempera paints, construction paper, buttons, glitter, hole punch, ribbon, and scribble paint.
Before we begin, it help to visualize what a regular purchased-from-the-store fabric vest looks like. Vests are sleeveless garments with two openings for the arms and one for the neck. The torso part of the vest opens from the front. The vests fasten up in several different ways. Some vests have buttons, others can be laced. A few vest jackets have a single toggle, or don’t close at all.
My sample vest laces up the front.
How to make the basic vest
A paper grocery bag has three basic parts. There’s the flap (or the base), the sides, and the top edge (the opening) which is slightly serrated.
1. Place the unfolded bag on a flat surface, bottom folded flap facing up. The serrated top edge should be nearest you. Aligning your ruler along the serrated edge of the bag, find the mid point. It should be around 6 inches. Make a mark with your pencil.
2. On the closed flap, draw a 4 inch circle in the center. This will become the neck opening.
3. Open the paper bag completely. Find your mark along the serrated edge, then cut a straight line from the edge up to your circle. Cut out the circle. (see picture #2)
4. On the sides of the paper bag, measure down approximately 2 inches. Cut out oval shaped openings for the arms to fit through, they should be at least 6″ long to give the child enough room to slide his arms through
How to decorate your paper bag vest
Since most paper bags have advertising on the front, I usually spray the uncut bag the day before. Popular colors seemed to be metallic silver, bronze, black, red, or white. This is a great way of using up some of those old cans of spray paint kicking around the house!
Some of the ideas our family has used in the past include:
*Turning the silver vests into space jackets by coloring lightening bolts and stars on the front. Or, draw buttons and electronic panels for a robot.
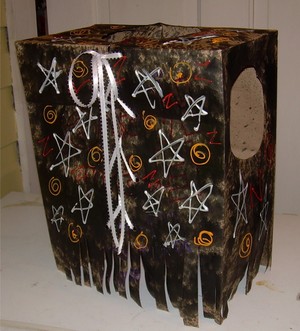
*The white vests are perfect for creating decorated deerskin jackets. Use the scissors to create fringe along the bottom and the front opening. Glue rickrack to the yokes and colored beads in interesting patterns. Or, make a rock star diva jacket with flowers, star bursts, and other interesting designs.
*The black vests make great caveman jackets by cutting deep, 12 inch fringes to resemble fur. Or, use some silver paint to paint a police badge and a row of silver buttons for a police uniform.
*The red vests can be turned into soldier jackets with rows of buttons. Or glue thin strips of colored construction paper in a wovan pattern to create a tartan vest.
To create a lace closure for your vest, punch several sets of matching holes up the front of your vest. Using a 30″ piece of ribbon, thread the fabric through the holes as if lacing a tennis shoe.
Paper bag costumes can be as simple or as fancy as you like. They are also well suited for classroom and day care use, and are a simple way to create costumes for a school play or Halloween party. Best of all, they don’t require any special sewing skills and can be made with things found around the house.