Ah, summer. Hot weather, wearing your swimsuit while laying out by the pool with ice-cold lemonade, kids are out of school…WHAT? When did that happen?
Every year, about late May to early June, parents across the world go into a panic because their children will have a two month vacation. A vacation that is ultimately end up, within a few weeks, as whines and cries of “I’m bored,” and “There’s nothing to do.” Well now you can just whip out the ol’ box filled with crafts and junk items and un-bore them for the summer. Here are some fun things for the kiddies to do instead of watching cartoons all day! (Note: These are mostly for the younger set and may require adult supervision/participation.)
MARBLE MAZE: This cardboard tower has kept my kids entertained from ages 2 up to 11 and they seem to last a good long time.
Supplies: 2 margarine tubs, 5 large gift wrapping tubes, marbles, craft knife, markers/colors, extra large rubber bands or string (opt.)
Construction: Start with the left side first by setting a gift-wrapping tube on end. Draw a line from top to bottom, mark five points along it. (2,8.10,19 and 21 inches from top) With a craft knife (with parents help only), cut a hole around each mark that’s just big enough to place the end of another tube. For the right post, position the holes at 4,6,13,15, and 25 inches from the top, then cut one more hole where the marble will leave the maze in the opposite side of the tube 25 ¼ inches from the top. Make a base for each post by cutting a hole in the bottom of a small empty plastic margarine tub upside down on the floor and pour uncooked rice or packing pellets into the hole, filling the tub. Fit the bottom of the post into the hole in the tub.
Next transform 4 more tubes into crossing. Holding each one horizontally, cut a U shaped opening in the upper wall at one end and in the lower wall at the opposite end. In the lower wall at the opposite end, as shown. For the tower’s lowest tunnel, cut a U shaped opening in one end only of a fifth tube. Then cut peepholes in the tops of each tube. Starting at the top of the tower, fit the tunnel ends into the postholes so that the ends with opening in the upper wall are raised and the uncut end of the fifths tunnel extends to the exit hole. If your tower is a bit wobbly, you can stretch an extra large rubber bands or loop string around the posts for stability. HINT: Through trial and error I learned to use, as the left and right base, mail packing tubes because they’re wider and then use full-length but slender gift-wrapping tubes as the ‘tunnels’ for the marbles. Unless you buy gift-wrapping paper in the more-than-large-economy-size they won’t be wide enough to support the weight.
BACKPACK DANGLERS: This is something girls just love to do. They attach these things to their backpacks, jackets, keychains and anything else attach things to!
Supplies: narrow ribbon, elastic or beading cord, safety or diaper pins, loads of beads in different styles/sizes/shapes, button with large threading loop in back.
Construction: Button Dangler: Fold 8 inches of ribbon in half and thread the loop through the opening of a button. Tie loose ends in a knot beneath the button to hold it in place. Thread the loop through the closed safety pin, then the button through the loop.
Diaper Pin Dangler: Fold 10-inch piece of elastic cord in half and loop onto a safety pin as shown. Thread beads onto the cord, and then knot the cord beneath the last bead. Repeat with 3-5 more strands.
Bead Dangler: Tie a few sort lengths of elastic cord onto the circular joint of a safety pin. Thread beads onto the cords, and then knot the cords beneath the last bead on each strand.
HINT: Use diaper pins instead of safety pins seemed to work better for smaller hands to maneuver. They also stay clasped better than the normal safety pins.
BOX CAR DERBY: Do you have some empty cereal boxes lying about? Boy do I have the craft for you! Little boys who are really into their cars will love this.
SUPPLIES: Lots of cereal boxes, sharp scissors, tape
Construction: Cut straight sections of track from the bottoms and sides of empty cereal boxes. Draw a line all the way about the box. Cut along the line. Cut walls that are about ½ inch tall on the more narrow ends. This takes a lot. Ours took 12 boxes so start saving now! For a curve, use the scraps to cut out a pie slice shaped piece of cardboard and a narrow guardrail. Lipton tea boxes make great tunnels. Use tape to hold your track together for longer wear.
CD ZOO ANIMALS: No, I’m not trying to sell you CDs. These are something that you can do with all those CD’s that you get in the mail (so you’ll buy their internet service most likely). I’ve changed the original directions a bit since we had a few mishaps and I’ve learned from my mistakes. So adult supervisor is needed. This one is a Panda but you can create your own.
Supplies: Old CDs, a couple of sheets of black and white felt, narrow red yarn, white pom-pom, hot glue gun with glue
Construction: The CD is going to be the Panda’s face. Lay the CD down on the white felt and trace around it with a pencil. Cut out circle and hot glue it on the CD. Use the felt and cut out two small black circles for eyes and white for two smaller circles to be placed upon the black circles [for the eyes]. You’ll do the same thing for the ears, black and then white, but the ears needs to be a bit larger. Because, well they are ears! Now find a round object (like a small coffee can) to trace (in black) the panda’s mouth area. Hot glue this at the bottom of the CD (on the side where you glue the white felt that covered the CD). This will be where his face is. Glue the eyes on the top of this black circle to the left and right (position the eyes where you would like them). After this glue dries, turn the CD over and glue the bottom edge of the ears onto the back of the CD in the appropriate location. After this dries, turn it back over and glue the white pom pom in the middle of the black circle that is your Panda’s face. Take the red yarn and cut two pieces about the length of your forefinger. This will be his mouth. Glue one end [sort-of] underneath the pom pom, bring it down and curve it up (like a backwards ‘J’). Do the same with the second piece but in the opposite direction. Let it dry and you now have your very own Panda coaster. You can use this as a wonderful way to turn CDs into plain coasters (sans the animals faces) by covering them in cork sheets or felt. The moisture absorbs quite well into the felt.
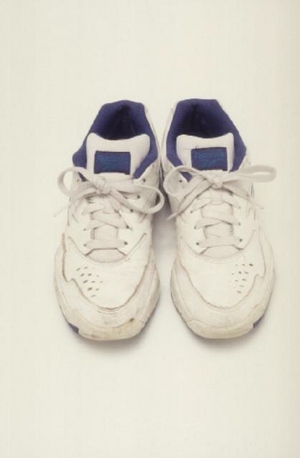
SNAZZY FLIP FLOPS: First of all, learn where your local Hobby Lobby is; you will need it for this craft.
Supplies: white flip flops, E-6000 adhesive glue, 14-6X9mm silver beads, 24-5/8″ wide white grosgrain ribbon, cut in half, 3 yds-1/4 wide blue satin cut in half.
Construction: Find the middle of each piece of grosgrain ribbon and blue to the center of the flip-flop straps. Glue to the top of each strap. Trim ribbon if needed. Add a little glue to the ends and carefully push the white ribbon down into the back holes of the flip
flop where the straps begin. Fold one piece of blue ribbon in half to find the middle. At the mid-point of the blue ribbon, place a little glue and place it on the underneath side of the strap near the back hole of the flip flop. Repeat with red ribbon, gluing red and blue ribbons side-by-side as close to the hole as possible. You now have equal amounts of ribbon coming from both sides of one strap. Fold the left blue ribbon over the strap to the right. Fold right red ribbon over the strap to the left. Fold the left red ribbon across the strap to the right. Fold right red ribbon to the left. Wrap all ribbons to the back and repeat. Repeat that sequence until you are halfway up the strap (about the 5th wrap). Before you wrap the right side blue ribbon, add a silver pony bead. Continue adding pony beads until you have three on each side and one in the middle over the toe piece. Keep working the ribbon until you have reached the back hole of the other side. Secure ribbon with adhesive glue and repeat this technique on other flip-flop.
Well I hope that gets you started into the summer. There are so many ways to keep your kids occupied from homemade bubbles to sidewalk chalk to visiting local craft stores who will have more than enough craft classes for you to be able to shop in peace and quiet. Stay tuned for more boredom breakers….