You can do a lot with polymer clay just by itself. But mixing it with other things can result in some really special effects. Here are a few suggestions for objects to mix in or with clay, and a few tips for how to handle the results.
Other Objects
Polymer clay can be combined with anything that can handle its curing temperature (usually 265-300° F). The two most frequently used choices are probably glass and metal, although paper and pottery are also options.
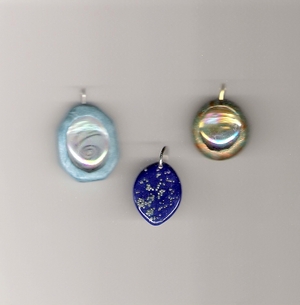
Glass objects can include beads (large or small), mosaic tiles, and marbles. The word “marbles” may have you thinking of the round ones that children play (or played) with, but marbles with one flat side – like the kind used in vases – are even easier to work with. And because they have a small magnifying effect you can glue a tiny picture to the flat side, then surround the marble with clay, and create your own personalized pendant.
Metals include beads, found objects, and even everyday hardware (like nuts, bolts, and screws). And remember that wire is a metal, too; you can add wire to your polymer clay objects, not just for jewelry findings like a loop for a cord, but also for decorative effects.
Inclusions
The items mentioned above are usually placed on the surface of the clay. Inclusions, on the other hand, are mixed into the clay. Here are some examples:
– Sand (colored or plain) will give your smooth clay some texture – and possibly color as well.
– Colored powders, like mica powders and the rubbings of soft pastels, can change the color of the clay or make it look metallic.
– Dried kitchen herbs and spices, like cinnamon, pepper, and oregano, can produce stone-like effects and possibly even an aroma.
– Essential oils are used specifically to create an aroma.
– Glitter produces some very sparkly effects. Most polymer clay experts recommend fine or ultra-fine glitter, but large pieces – like the kind that are sometimes sold in “salt shakers” at the dollar store – can give a whole different look.
– Coffee grounds can introduce both color and texture.
– Dried paint is a great choice, especially for translucent clay. To use it, cover a sheet of clay with acrylic paint (craft paints work fine), let it dry, and then mix the paint into the clay with your hands until you get the effect you want.
– Gold, silver, or copper metallic leaf is usually used on the surface of the clay, but it doesn’t have to be.
– Threads of any kind can make the clay resemble stone.
– Materials that will melt with high heat or dissolve in water, like crayon pieces, rock salt, or cornstarch packing pieces, can be mixed into the clay and then dissolved later (or in the case of the crayon pieces, in the oven). The finished item will have empty spaces where the dissolvable material used to be.
Tips for using objects and inclusions with polymer clay
Remember that just because an item sticks to clay before it’s baked doesn’t mean it will stick after baking. There are two ways to be sure your item stays attached to the clay:
– Surround it with clay.
– Glue the object back on after the clay is cured. This is also the choice for items that can’t be baked in the oven.
When you’re mixing inclusions into clay remember that the smaller the pieces the more subtle the effect will be. If you’re working with something that breaks into smaller pieces when handled, don’t do too much mixing if you want it to be noticeable.
If your clay contains inclusions be very careful when running it through a pasta machine. Some inclusions – for example, tiny glass beads – may damage the machine. The best way to mix materials like these is by hand.
When they’re used in large quantities inclusions can adversely affect the quality of the clay. Powders will dry it out, and large pieces may cause the clay to have trouble sticking to itself. Because uncured clay is usually a bit sticky you may not notice this until after curing, when your carefully made item breaks into pieces and falls apart. To be safe, start with small amounts and carefully work your way up. It might be a good idea to do a test piece first.
And one final tip – do some experimenting with translucent clay. Besides producing some amazing faux precious stones this way, you can also create some interesting illusions with items surrounded by translucent clay.
There are very few things you can’t do with polymer clay. The suggestions given here aren’t complete – there’s probably no way they could be – but they should get you started on the way to some truly remarkable creations.