Some hints, tips, and low cost techniques for polymer clay fun for the whole family.
Have you been to the craft store lately and priced those fancy glossy covered books showing all those easy and fun to build polymer clay figurines and characters? Don’t want to spend all your hard earned dollars on tools you’ll stop using after a few projects are done. Try these tip and hints to help you or your fellow crafter in polymer clay crafting.
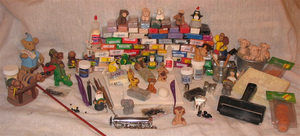
Whether you use Sculpey, Fimo or some other brand name clay the techniques are pretty much the same. I’ll start with the equipment you’ll want to use for your polymer clay creations.
Equipment
Some of the books and magazines say there’s some essential tools to use with clay. This is not true in all cases. You use the things you want to and are comfortable with. I have used some store bought tools and others I have had from other crafts my family has been doing for years.
Some of my favorite tools are the less expensive ones. I use a small clay potters tool that is like a small knife on one side and a curved knife on the other. I have also been using a cheap set of plastic ones that I bought at Wal-mart for a couple of dollars. Whatever you use for the cutting of clay and for tasks like shaping parts using these tools, you do not need to spend much money.
If you are a beginner and unsure if you will continue doing claying, or don’t want to spend much money to start with, you can use some things you probably have around the house.
You can take a plastic knife and sand the teeth off it and use this as a tool to cut clay with. I know it’s not professional but if you don’t want to spend money on a plastic tool kit at a discount hobby craft store this can be used for the time being.
A stylus is used for poking holes in your clay such as for eyes and appendages to go into. You can use a pin, tooth pick or bent paper clip for the smaller holes. I continually use pins and tooth picks in clay projects. The round ones are great for poking and I also use them when attaching arms, legs and tails to bodies. After baking they will stay on better than if you do not have anything else holding them together.
You can also use a round tooth pick to make wrinkles and lines, rolling the pick around as you press into the clay to create the lines. To make body parts such as necks you can roll a toothpick where you want the neck to be and smooth it out with your finger or a tool.
A beaded pin is great for using on eyes and ears of animals and people. The ball end makes a hollow in the clay that you can put an eye into or have a hollow for ears.
I also use many pieces of wire for attaching the ears and smaller pieces onto the figures. Many times I have had small pieces such as arms and legs fall off after baking. If you have some small wire, no bigger than paper clips, you can use these for attaching things. You can cut paper clips or buy some small wire with wire cutters. Wal-mart carries many sizes of wire in both the hardware and floral departments.
You may have to buy a pair of wire cutters that cost a few dollars. If you are going to, get the needle nose kind, you can cut wire with the cutters by the hinge and bend wire with the flat jaws.
To flatten shapes for things like bases and clothing, you will want something like a rolling pin. You can use a kitchen rolling pin with waxed paper on the clay but you don’t want to get clay on the rolling pin or you’ll have to wash it. You can use just about anything that is smooth and round to roll clay as long as you can get clay on it. For any younger people reading this, you will want to get an adult to okay what you are using. Look around the house, a small vinegar or sauce bottle can be perfect. Just wash and clean off the label after the container is empty and roll away.
If you have a small hardware store near you, ask them if they have a small piece of PVC pipe that they are throwing away. A piece three to six inches long any size from ½ inch to two inches can have their own uses. A ten foot piece of ½ inch PVC costs about 2 to 3 dollars, so a piece that is only 6 inches would not be worth selling for the smaller stores. See if they will keep some scraps for you. You can always ask, maybe get them to hold some scraps for you if you tell them what your doing and smile. The worst they could do is give you a funny look when you tell them what its for.
You can go to a local dollar store and purchase several of the things I mention for a low cost. Rolling pin, pins, wire, needle nose pliers, and other things can be had for a dollar a piece or maybe a little more. But the point is you don’t have to shop the craft and hobby stores to buy all your tools.
A cheap hobby knife is a good tool for cleanly cutting clay.
You do not have to buy a name brand one to get one that works.
Many tools you can use are common items around the house. A straw can be cut to give you various shapes on the end such as scallops or scales on a fish. A dull hobby knife blade is perfect for cutting and shaping clay. A small square of plastic can be used to flatten balls of clay into perfect round shapes like pillars or pedestals. Look around and use your imagination, you’d be surprised at what you can use for tools.
One thing I would recommend that you buy for clay baking is a couple of ceramic tiles from a builder supply or hardware store. The tiles are glazed ceramic tiles, I use 6 inch white tiles from a local building supply store. They are durable and you can wash them off in the sink when they get dirty, just let them dry before baking again. I use the white gloss ones to see when they are dirty and the clay doesn’t stick to them very much. You may have to pry them up a little with a tool, just push the edge of a plastic knife or cutting tool under your piece. I have two so that while one is cooling I can use the other for the piece I am working on.
I use a cheap plastic cutting board as my work surface. You can find these at a dollar or discount store. These are perfect for rolling clay and cutting up on, you can buy a white or clear one and see quickly when it needs cleaning. It cleans up with dish soap and water and dries quickly.
Some books and magazines have instructions that use certain sized balls of clay as a starting point for each part. You can just draw circles on a piece of paper or note cards for getting the right sized balls of clay. Use a ruler to get the right sized object, try things around the house. The end of a pencil is about 8 millimeters. A dime is 18 millimeters or an inch. You can buy a template from a hobby/craft store, these are usually just a couple of dollars but you can check out stencils for drawing also. They have them in the school and office supply section in your local store.
After awhile you probable won’t use one of these very often. You will know if you have the right size ball of clay for your project, they are only a guide for following the instructions in different books, magazines or on web sites for projects.
Some of the tools that you see in books or magazines I would suggest buying cheaper versions and see if you would really use them. I have found that some things I just don’t like how they came out so don’t use them very often.
The clay gun, for squishing out certain shapes is fun and gets the right shape for certain things, but is hard to clean. Use q-tips and lots of soap to get out all the clay if you have to. I don’t use this very often as it takes as much time to clean as it does to use. Likewise, the garlic press, to get what looks like hair or piles of worms is hard to clean. You can buy a cheap garlic press at a dollar store to see if you would use one before getting a better one, if you ever want to buy a better one.
One source for some cheap tools to use with clay is a local thrift store. You can get kitchen tools and knives for a cheaper price than buying them new. You can also get knitting needles pretty cheap to use for poking holes and rolling lines and wrinkles, like using a toothpick. I use knitting needles of various sizes bought from a thrift store for less than fifty cents a piece.
The pasta machine is one thing that is costly and you would have a hard time by me to justify buying one. At $30 and up, I would have to be selling my creations regularly in order to justify buying one to make flattened pieces of clay. I just use a roller, I have a few acrylic ones and a rubber roller from my wife’s stamping tools for getting flat pieces.
Now to the actual do’s and don’ts, tips and suggestions of the hobby. I will list tips and techniques that I have done and have stuck to using. I have tried many things in various books and magazines but many I have discarded as being a waste of time or clay.
Like the template for different sized balls of clay, I would not have used one if I did buy one. I have several templates for drawing circles from my fathers drafting kit. I never used them as it was easier to just guess and if needed take off a little clay and start the ball rolling again.
Wash everything you use. When you switch to another clay you will quickly find out if you washed the tools you were using. Especially if you go from black or a dark color to white or a light one. So make a habit of washing or cleaning off stuff right when you use it. I put my piece in the oven to bake and then wash off what I was using. By the time I get cleaned up the piece is done.
I use rubber gloves for working with my clay. I don’t have to wash my hands as often and it keeps my tools from getting too messy. I change them when I am done working with one color. You can buy a cheap pack of them from dollar or hardware, check out the paint section. Using gloves helps with not leaving behind finger prints on your sculptors too. Sometimes though, it’s nice to give some texture to animals and such with your prints.
When putting pieces together use small pieces of wire or tooth picks stuck into each piece. Like this, to have an arm on a body, shape both pieces and stick a piece of wire into the body, then stick the arm onto the wire. After you bake the piece, even if it comes apart a little you can use super glue on it to keep it together. BUT DO NOT BAKE THE SUPER GLUE. Glue it after you are totally done baking the project. Use smaller pieces of wire for things that stick out like ears.
For several smaller pieces try baking them separate before putting them on the larger pieces. Buttons, eyes, pockets and flowers that are pressed onto the larger pieces can be made many at a time.
I usually roll and bake twenty to thirty eyeballs in black and bake them. Then I can pick and choose later from my stock to get the size I like. If you want them glossy you can paint them before inserting them into the head.
Or I have purchased small black beads that were on sale at a craft store. Many stores near me have sale sections and I check them out on a regular basis for things like small beads for eyes, little clay pots, and small tools to use as props for my creations.
I have gotten ideas for my creations from many sources, mostly the internet. You can also check out your local library for books on polymer clay. Just copy the pages you like if you find a part of a book you like but don’t want to buy the book. Or just keep checking it out till you have the projects done out of it you want.
I don’t have that many books on clay but have copied numerous pages from library books that I use to make my creations from.
There are many sites that have tons of advice, projects and ideas. Just do a search on things like Sculpey, Fimo, polymer clay, Etc. Some other things you can do, search the images option for ideas. I have found that after working with clay figures, I don’t need step by step directions on how to make things, just a picture can suffice. I find that with a picture from the web I can try and make my own variation of what I find.
Think of some fun figures, M&M;’s, Chicken Run, Wallace and Grommit and other cartoon like figures that are just a start to get ideas of things you can create.
There are so many sites that I could not list them all but two I will give, these are great for a start.
http://polymerclaycentral.com This site has some excellent ideas and gives many step by step projects to help you. From here you can go to many other sites listed in their hot links section. Although slightly flowery for some peoples taste the site is a treasure trove of information.
http://www.polymerclaycentral.com/castle/home.html This is a section of the above site. It has the step by step projects and some great hints.