Polymer clay is a wonderfully versatile medium for making beads that can be strung together or worn alone as pendants. Here are a few tips to make the bead-making process easier and more creative.
Condition the clay before using it
Polymer clay can’t be used straight out of the package; it has to be “conditioned” first. The simplest way to do this is to slice off a piece of the block and knead it with your hands. Some brands of clay are easier to knead than others; if you have trouble, try warming the clay first by putting it in a bowl of warm water. Don’t overheat it, though; you don’t want to cure your clay before you’ve even used it!
You can also try using a device-anything with a rounded head-to knead your clay. And if you have a large amount to condition, or decide to get serious about working with clay, invest in a pasta machine. You can put thin slices through the machine over and over until they’re completely conditioned.
How do you know when your clay is conditioned? Well, its consistency will change; you’ll be able to stretch it without tearing it. Once it’s reached this stage, it’s ready to be formed into an object.
How to form beads
Most beginners form beads by rolling them between their hands. Polymer clay is such a tactile medium that this is usually a very enjoyable process. But it can be difficult to get perfectly round beads this way; you may find that all your beads are egg-shaped instead!
Try experimenting with different rolling techniques on different parts of your palm, or even rolling the clay between your palm and the surface of the table. And if all else fails, pick up a bead-rolling kit at your local craft store. These kits produce uniformly shaped beads, and usually even include a measuring device so you’ll know how much clay to use.
You can insure that your beads are all the same size by using the same amount of clay for each one. Roll out a thick but flat slab of clay and slice equal-size pieces, then use one for each bead. You can also make graduated sized beads this way, by using two, three, or more pieces for each of the larger beads.
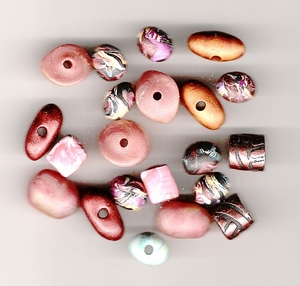
Bead shape suggestions
Here are a few ideas for different shapes of beads:
– round
– egg-shaped
– teardrop (round at one end, egg-shaped or pointed at the other; makes a nice simple pendant)
– tubular (log-shaped)
– square (if flat) or cube-shaped
– rectangular
– triangular (if flat) or pyramid-shaped
– flat square, rectangle, or triangle with two or more ends touching
Piercing your beads
Beads need to have holes so they can be strung, and the easiest way to do this is to pierce them before you cure them. Use a long, pointed device that is of even thickness, like a knitting or tapestry needle, a bamboo skewer, or (thin) nail.
To pierce your bead, very gently insert the needle or nail in the spot where you want the hole to be, slowly push it in, then stop when you’re about halfway through. Pull out the needle, then go to the opposite side of the bead and repeat this procedure. This will insure that you don’t displace too much clay and ruin the shape of the bead when you’re just trying to put a hole in it. (If the bead is very small you can probably get away with piercing it all the way through.)
Curing your beads
Polymer clay is cured by baking in a regular oven. Follow the directions on the package, which will tell you the oven temperature and the time to bake by thickness. For example, if the package says to bake at 275° F for 15 minutes per 1/4 inch, and your piece is 1/2 inch thick, you will need to bake for a half hour.
Don’t ever raise the oven temperature to speed up the baking process. And keep track of the baking time. Polymer clay is non-toxic when baked according to directions, but if it burns it can emit nasty fumes (and ruin your creations in the process). You shouldn’t smell much of anything when your clay is baking, unless you have a very sensitive nose.
A word of caution here: Don’t ever bake polymer clay in a microwave. You’ll never get the clay to cure evenly, and the risk of burning it is very, very high.
Polymer clay does soften when it gets warm. If you’re concerned about your beads’ flattening in the oven, you can bake them on the skewer, with the ends of the skewer propped on the edges of the baking tray. Or you can fan-fold a piece of paper and lay the beads in the channels between the folds.
A lot of these tips can be applied to anything you make with polymer clay. If you get tired of making beads, you can always progress to bigger objects, like sculpted figures. You’ll find that when it comes to polymer clay, you’re limited only by your imagination.
Reference:
- Polymer Clay for the First Time by syndee holt – a useful and user-friendly book by an author with an interesting sense of humor (for example, she doesn’t capitalize the first letters of her name) www.pigsnstuff.com/faq/basics.htmlhttp://www.glassattic.com/ – this site is minimally formatted and can be a little hard to navigate, but there’s a wealth of information here. If you have trouble finding a specific topic, try Google’s Advanced Search, using “glassattic.com” for the domain.
“