Making a whirligig is relatively easy, provided you have the knowledge to use a jig saw.
The idea of watching a whirligig spin in the wind is indeed intriguing and fun to watch. There is not much information about whirligig’s, or where the idea came from. The earliest Whirligigs were most likely made as replicas of the windmill from Europe. Holland seems to be the most logical place where wind mills started. Perhaps the Dutch decided it would be easier for the wind to grind the corn into meal, using the wind for a power source, rather than a mule to walk around a grinding stone.
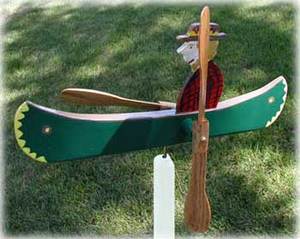
Whirligigs however, are very popular lawn items. They range from a simple weather vane type, to airplanes, to hula girls wiggling. These whirligigs are usually expensive to buy, but if a person understands the money it cost to make these magnificent wind devices, they will come more to understand why.
If you know how to use a jig saw, and are knowledgeable enough to do some wood working, this will be a great project to earn extra money. Whirligigs are based on the same principle as a pinwheel, or a windmill.
There are several sites on the internet that sales them, and no instructions that are even given.
I will explain the simplest way to make the simplest whirligig that is possible. There are more advanced whirligigs that exist, but one would have to study the way it was made by just looking at a picture of it.
The more a person would want the whirligig to do, the more complicated it will be, but it’s the fun and the enjoyment of making them that is great.
The materials you will need to make the very basic whirligig, is a ¼ inch piece of sanded plywood, a jig saw, saw horses, a side view picture of an airplane, some heavy plastic, to make a propeller or a pinwheel, some long screws(approx. 2 inches long), a drill bit (larger than the size of the screw). A piece of ½ inch dowel, (or 1 x 2 wooden strip), and some glass or plastic beads.
Start by drawing a side picture of an airplane on the corner of the plywood. It won’t have to be a perfect drawing. Then with your jig saw, cut your line out, and you should have a close cut of the airplane.
Next, take your drill with the bit that is one size larger than the size of one of your two inch screws. If you drew the plane at one foot long, then you need to take a tape measure, and from the longest point to the next longest point put a mark on the six inch mark, then turning the plane upright you can drill a hole at the six inch mark all the way through the plane.
Now take your plane and turn it up to the engine, and while holding it firmly start another two inch screw into the front. After about five or six turns, back the screw completely out of the wood and insert it into one of the glass beads, and lay it aside.
Take your heavy plastic (that will bend), and begin to make a pinwheel, by cutting the plastic into a square and then drawing a line from corner to the opposite corner (right top-to left bottom), then do the other side, so that you will have an x in the center of your plastic. Now measure 1 ½ inch from the center of the x and make a mark on all four lines. After doing this you can cut the four corners to the 1 ½ inch mark, until you have cut all four lines. Now put a hole in each of the four corners and pull the holes to the center of the x. After you have all the holes lined up you take the screw with the glass bead already on it, and push it into the holes in the pinwheel, then screw that fixture to the front of the plane. Now that you have the propeller to the plane finished. There is only one two things left to do.
Take the 1 x 2 wooden strip or the ½ inch dowel and by putting the other 2 inch screw through the top of the plain and begin screwing it into the center of the wood strip. Do not screw it in too tightly or it will not be able to turn with the wind.
If you would like to make your plane a little more fancy, you could get some paint and an artists’ paint brush and paint your plane. You can even paint a pilot setting in the cockpit.
This project isn’t as hard as it sounds, and it is really fun to do. I hope these instructions will help you and give you some insight to building your own whirligig, and even building better ones. The supporting link below will illustrate different, and great looking whirligigs.