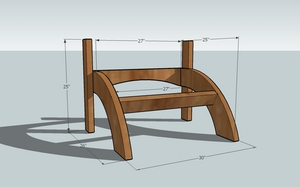
As far as outdoor and patio furniture goes, the Adirondack chair is a classic. With its deep bucket like seat and its fan shaped back, this chairs design makes it completely distinguishable from all other outdoor or patio furniture.
Building your own Adirondack chair from simple pressure treated 2×4’s requires just a few basic skills and you don’t need very many power tools. In fact, a circular saw, jig saw and screw gun are all of the tools that are required to complete this fantastic woodworking project that makes a fine addition to any porch or outdoor gathering.
The materials list for this job is just as short. You’ll need just one ten foot 2×12 and ten eight foot 2×4’s, all pressure treated lumber. Of course you’re not limited to just pressure treated lumber. The more expensive cedar is a great wood for outdoor patio furniture. As long as you treat the wood with some kind of sealant, you should be able to use nearly any wood you want. Don’t forget to get a box of 2 ½” galvanized wood screws to secure the whole project together.
Begin by cutting the 2×12 into three pieces 30″ long. Cut one according to the blueprint for the front, then use a jig saw to create an arch. Use a string, nail and a pencil to trace the arch.
Now use the other two 30″ pieces of the 2×12 to create each leg. Using the same string, nail and pencil, trace another arch on each board, just like you did with the front piece. Turn the 2×12 to a 45 degree angle to match the drawing and make the arches peak hit the top center of the 2×12. Now make a duplicate mark 5 ½” below the first arch. Square up the ends and cut out using a circular saw for the square cuts and a jig saw for the curved cuts.
Cut the remaining 2×4’s according to the measurements listed on the blueprints. You can sand, router or dress up your chair anyway you like at this time. Paint, stain or varnish should also be applied at this time.
Start the Adirondack chair assembly by screwing together the two outside legs and the front face arch with two screws at each point of attachment. Finish the basic structure by inserting the back support piece 13″ from the bottom of the leg to the top of the arch.
Now attach each leg to the structure with three screws in each leg 11″ from the bottom of the leg to the bottom of the arch leg. You may need to adjust these two measurements depending on how steep you may have cut each arch leg.
Next, attach each one of the back pieces that make up the fan shaped seatback using two screws in each board. Start with the center board first attaching it to the center of the back support piece. Add the two back support pieces with one screw into each fan-shaped seatback.
Finish the project by attaching the seat boards and the two armrests. Cut a simple notch on each armrest and using one screw attach it from the side of the armrest into the side of the fan-shaped seatback.