Two of my favorite things in the whole world are sewing and drinking all kinds of tea. For me, nothing is more relaxing than a pot of hot tea positioned near me while I am working on a cozy quilt or decorative cross-stitch picture. As some hobbies do, tea and sewing can intertwine in that I can make things to compliment or add to the pleasures I receive from a special blend of tea such as, quilted coasters, a cloth bowl to hold finger sandwiches or special treats, and even a tea cozy. For those who do not know, a tea cozy is a kind of coat for a teapot. It has two main purposes, one being it is attractive, and two, it prolongs the cooling of your hot tea.
To make a tea cozy you will need:
Two pieces of fabric measuring 12 inches by 13 inches. This fabric will be for the outside of the tea cozy and can be of any print and texture. I like working with cottons, so that is what I will use for these instructions. I find it helpful to mark the top and bottom of the fabric in the seam allowance with a light pencil or tailors’ chalk. (I will use red colored fabric for these instructions.)
Two pieces of fabric measuring 12 inches by 13 inches. This fabric will be for the lining or inside of the tea cozy and you will want it to compliment the outer fabric above. (I will use blue colored fabric for these instructions.)
Two pieces of pellon fabric or quilt batting measuring 12 inches by 13 inches. This will be used for the center of the tea cozy. (I will use quilt batting for these instructions.)
One yard of Braid (cording) for the drawstring.
3/8 inch of elastic cut approximately 10 inches long.
Preprinted design for quilting (optional).
You will also need a sewing machine, scissors, safety pin, 12-inch ruler, and straight pins.
To begin, for each square (front and back of cozy), place the quilt batting on a work area and position the red fabric that will be on the outside of your tea cozy over the batting, right side up. Put a couple straight pins in each square to hold the two layers firmly in place, and using your sewing machine, stitch a pre-printed design or a free-hand design using a large spaced stitch. What I do is just sew lengthwise and crosswise, spacing my lines about two inches apart.
Next, place the blue lining right side down on top of the red fabric. This will create three layers, the quilt batting, red fabric, and blue lining with the last two having right sides together. The wrong side of the blue fabric should be showing and on top. Pin fabric layers in place.
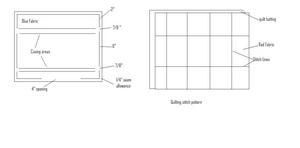
Using white tailors’ chalk or a light colored pencil, mark the stitching lines on the wrong side of the blue fabric in the following way (you may want to use a ruler), starting two inches below the left corner and one-fourth inch from the edge, draw a line up to the corner stopping one-fourth inch from the top. Continue drawing a one-fourth inch seam allowance all the way across the top to the right corner and then down the right side of the fabric for two inches. While still on the right side, skip an area measuring seven-eighths of an inch and proceed to mark approximately six inches downward. After the six inches, leave another seven-eighths inch opening and resume marking until you get to within one-fourth inch of the lower right corner. Continue marking to the left of the lower right corner, stopping after approximately four inches. Leave a four inch opening (this will be used for turning your fabric right side out), and continuing marking until you are within one-fourth inch of the lower left corner. On the left side where you marked the two inches from the top, leave a seven-eighths of an inch opening and mark a one-fourth inch seam allowance downward six inches, leave another opening of seven-eighths inch and continue marking down to the lower left corner.
(Follow the above instructions for both the front and back of the cozy.)
You should now have two 12 inch by 13 inch, layered, pinned, and marked fabrics. Stitch your marked one-fourth inch seam allowance on both sets, being sure not to stitch over the seven-eighths inch openings. Turn fabric right side out through the four-inch openings at the bottom, clip corners, and press flat. You should now have two approximately 12″ by 13″ (front and back) fabric squares.
Using the ruler and tailor’s chalk, mark the two top and two bottom lines across the blue fabric from opening to opening, indicating the casing areas. Use a couple straight pins to hold fabric layers in place and stitch over these markings to form the casing for the drawstring and elastic. You will want to use red thread as the red fabric is the outer fabric that will be showing on your finished cozy.
Attach the safety pin to one end of the elastic, and use it to help run the elastic through the bottom casing of both the front and back squares. Overlap the elastic ends and stitch securely. Adjust the elastic back into the casing so the overlapped area does not show.
Do the same with the Braid (cording), on the top, except do not stitch ends together. Hand stitch the raw edges of each opening using a blind stitch, insert your teapot, draw the cording tight and tie a bow. The spout and handle should be sticking out through the sides.
You are now ready to enjoy your cup of hot tea.
Source: Joann Fabrics


