The main idea in Kitchener Stitch is to use a needle; threaded with the same color yarn as your work, to create a joining row that mimics the previous stitch you were following.
To begin:
If they are two separate pieces, knit them both according to your patterns and leave the stitches on the needles.
If it is a one piece, knit to end up being an arm or hand warmer type item, cast on using a provisional piece of yarn which can be removed from the beginning stitches later. Knit into this provisional cast on as the pattern may call for and, when done, leave the stitches on the needle. Remove the provisional cast on yarn slowly, adding each stitch to an awaiting extra needle as you do so. Make sure you enter the stitches so they are placed in the appropriate “stance” on the needle.
It is also a good thing if you have the same number of stitches on each needle. If you don’t, you can either knit one additional row of your pattern, decreasing by knitting two together as if they were one, the amount of times that you have extra stitches (3 extra stitches on row – space out 3 different knit 2 togethers evenly throughout your extra row – adjust to purl 2 together if you’re doing a purl row), or just proceed and take care of these extra stitches at the end of your Kitchener Escapade.
Now, either way you are using the Kitchener Stitch method, you have two needles with “active” stitches waiting to be stitched together using Kitchener.
Thread your tapestry needle (since you need a needle with a big hole for the yarn to fit in). Assuming you are right handed, hold BOTH needles in your left hand and the tapestry needle will be worked with your right.
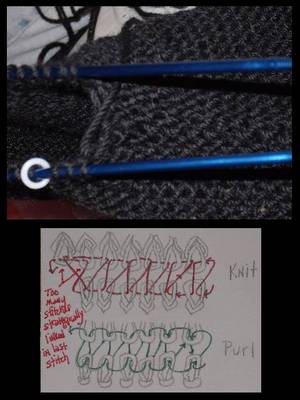
No matter what stitch you were working in or hope to accomplish, it all starts with two setup stitches that are then followed by a sequence of four repeated stitches. It will vary depending on which stitch your pieces were done in. Very advisable to concentrate on what you are doing as you don’t want to have to undo what you just did to fix mistakes. Copy the 6 stitches down largely onto a piece of paper and set in front of you so you constantly have reference to it. It’s only four stitches repeated but believe me, you get lost if you haven’t done it much before.
I have listed here, the sequence of Kitchener Stitch that will work with Stockinette and Garter as a purl row would appear in the pattern. If you need a more complicated sequence, due to Seed stitch or some other stitch, it is advisable to map it out before you do it and closely examine how to enter each stitch to make it fall the right way as a knit or as a purl.
Starting 2 stitches:
-On the front needle, enter the stitch as if to Knit…leave stitch on the needle
-On the back needle, enter the stitch as if to Purl…leave stitch on the needle,also
Sequence to repeat forevermore:
-On front needle, enter the stitch as if to Purl – drop the stitch off needle
Still on front needle, enter next stitch as if to Knit – leave on the needle
-On the back needle, enter this stitch as if to Knit – drop off the needle
Still on the back needle, enter the stitch as if to Purl – leave on needle
Follow the sequence through the last stitch. If you’ve misjudged somehow and find that your last stitch is actually more than one stitch on the last needle, treat these two or 3 stitches as one stitch and merge them together into one stitch with the tapestry needle. Weave your “tail” into your project so it can’t be noticed too easily.
Easy instructions written shorthand…
A row of Kitchener to show up as Purls:
Front Needle … K
Back needle … P
Repeating Sequence:
Front needle … P / drop off st
… K next st
Back needle … K / drop off st
… P next st
A row of Kitchener to show up as Knits:
Front Needle … P
Back needle … K
Repeating Sequence:
Front needle … K / drop off st
… P next st
Back needle … P / drop off st
… K next st


