You’re getting married and are in the midst of planning your dream wedding. You’ve chosen your bridal party, ordered the perfect wedding dress, and now you’re slowly working your way down the long to-do list. As you come to the next item, wedding favors, your mind draws a blank.
Don’t let this matter intimidate you. The most important thing to remember when planning wedding favors is to choose something that reflects you as a couple. This is your way of thanking family and friends for sharing your special day. How better to do this than by making your own wedding favors? Offering handmade and meaningful wedding favors will give a personal touch and leave a lasting impression with your guests.
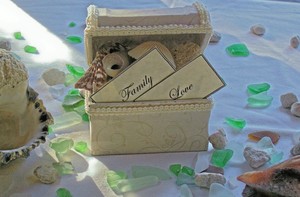
If you choose to make your own wedding favors, reduce your stress by planning ahead. This will give you plenty of time to search for the best materials and prices. (This wedding favor was made for under $5.) It will also prevent you and whoever is helping you from trying to make all the wedding favors at the last minute.
To make this wedding favor you will need the following items:
Paper mache treasure chest (or other object) Scrapbook paper (2 sheets of 12″X12″)
Ribbon (approximately 1 yd.)
Cardstock
Seashells (or other filler)
Container of Mod Podge (decoupage glue)
Scissors
Ruler
Glue gun
Newspaper
Paintbrush
1. Measure your paper. To determine the size of paper needed to cover your object, place the item on the paper (design-side down). It may be helpful to trace the bottom of your object onto the paper so you’re measurements will remain accurate even if the object shifts. When measuring, allow at least ½” extra to fold over the edges. Once you’ve marked your measurements, cut the shape out. Use the same process for the inside and outside measurements.
*When creating your first wedding favor, be sure to trace this cut shape onto another piece of paper or cardstock. This will serve as your template for future favors and will speed up the process.
2. Cover the object. Make sure to cover your workspace with the newspaper. Begin by painting the Mod Podge on the bottom of your object. Place your precut paper on the sticky surface, smoothing out the wrinkles as you go. Apply the glue and paper to the sides, front, and back of the object in the same fashion. (Remember to fold the paper over the top edges of the object.) Cover the inside of the wedding favor (if you desire) by using the same technique.
When covering the object, it may be necessary to make slits at the corners to ensure a better fit. Don’t stress! Make them as straight as possible and they’ll blend in well when the decoupage is dry.
Once the object is papered, apply a thin coat of Mod Podge on top of the paper. This will work as a sealant and will prevent the paper from ripping. It will also cover up any small cuts that were made.
Set the object aside and allow it to dry completely.
3. Make treasure cards. To make these cards, I used a basic Microsoft Word label template. Select the label size that works best with your object. I chose 1.25″ X 2.38″. Choose any font style and color you desire. In each section, type only one word. Print the page on cardstock and when you cut them out, you will have your treasure cards.
The main idea behind these cards is to symbolize the things you treasure most. Some suggestions you might use are: Love, Laughter, Family, Friends, Faith, and Romance. Add any others that are special to you.
4. Trim your object. To add the finishing touches to your dry object, you’ll need the ribbon and glue gun. When using the glue gun, it works best to only cover a small section at a time. The glue dries very quickly. Cut the ribbon to size and apply wherever you choose. This trimming will give your wedding favor a polished finish.
5. Fill your wedding favor. The final step in this process is to fill your object. For my sample, I used seashells (again sticking with the Beach Wedding theme.) You may choose to fill your wedding favor with only treasure cards, candy, polished beads, flowers, etc. Again, be creative!
Just remember, your wedding day will be more memorable because of all the family and friends who’ll be there to share it with you. A thoughtful wedding favor, such as this one, will show them how much you appreciate it. So, don’t waste your money and time on a meaningless favor that’ll be left behind. Give your guest a wedding favor they’ll treasure and display for years.