Google Sites lets you create and manage a free, simple, thoughtful, and elegant website. You do not write or edit any XHTML code. You can instead focus on your subject or business. You can create your website for fun and/or profit. If you create a business website, you can use it sell your merchandise online. This document contains procedures that explain how to:
* Create website pages
* Set up page hierarchy
* Add a logo
* Change font colors
* Add images
* Add internal links
* Add external links
* Add purchase buttons
Although this short document cannot cover all features available in Google Sites, it can help create a powerful website that you can later modify, and add as many features as you need. For more information, see Google Sites Help.
Author’s Note: To verify this document while writing it, I simultaneously used Google Docs to create Dave’s Example Website.
Creating Website Pages
You begin building your Google Sites website by creating its pages. To create your website pages, do the following:
1 – Log into Google Sites through your Google Account, such as your Gmail account, and then click “Create new site.”
2 – Select “Blank template,” and then type a name for your website, such as Larry’s Luddite Laptops. (This might be a great small-business opportunity–very small.)
Note: Choose your website name carefully. You cannot rename it.
3 – Click the plus sign at the left of “Choose a theme.” Select a theme, such as Crystal Panel. Choose a theme according to the purpose of your website and what you think its visitors might like.
4 – Type the displayed code, and then click “Create site” to create your website and display its Home page.
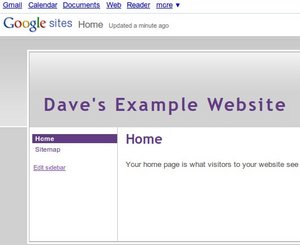
5 – Click “Edit page,” type appropriate text into your Home page, and then click “Save.” You can edit and reformat this text later.
6 – Click “Create page,” type a name for your new page, such as Animals, click “Create Page,” type text into your new page, and then click “Save.”
7 – Repeat step 6 for each new page you wish to add. For example, as shown in the images above, Dave’s Example Website includes pages named Animals, Cats, Lions, Tigers, Bears, Plants, Trees, Grass, Minerals, Rocks, and Sand.
8 – Click “Sign out” to close your Google Sites session. Optionally you can leave your session open if you wish to immediately change your website page hierarchy according to the Setting Up Page Hierarchy section below.
Setting Up Page Hierarchy
To help your website visitors find information more easily, you should set up proper hierarchical levels for your website pages. To set up the hierarchical levels of your pages, do the following:
1 – If necessary, log into Google Sites and then click your website name.
2 – Click “More actions,” click “Manage site,” and then click “Pages.”
3 – Use drag and drop to set up the hierarchy of each subpage by moving it into the Home page or any appropriate page to which you assign greater hierarchy. A page can be a subpage that has its own lower-level subpages. For example, as shown in the images above, Dave’s Example Website includes:
* A Level-1 Home page that has greater hierarchy than its Animals, Minerals, and Plants subpages, which had been dragged into Home.
* A Level-2 Animals page that has greater hierarchy than its Level-3 Bears and Cats subpages, which had been dragged into Animals.
* A Level-3 Cats page that has greater hierarchy than its Level-4 Lions and Tigers subpages, which had been dragged into Cats.
* A Level-2 Minerals page that has greater hierarchy than its Level-3 Rocks and Sand subpages, which had been dragged into Minerals.
* A Level-2 Plants page that has greater hierarchy than its Level-3 Grass and Trees subpages, which had been dragged into Plants.
4 – Click “Return to site,” click “Edit sidebar,” click “edit” under Navigation, set the “Level of pages to show” to “all,” click OK, click “Save changes,” and then click “Return to site.”
5 – Click “Sign out” to close your Google Sites session. Optionally you can leave your session open if you wish to immediately add a logo to your website according to the Adding a Logo section below.
Adding a Logo
A logo enhances your website. To add a logo through Google Sites, do the following:
1 – If necessary, log into Google Sites and then click your website name.
2 – Click “More actions,” click “Manage site,” and then click “Site layout” under Site appearance.
3 – Under Header, in the Height line, click “change logo,” select “Custom Logo,” browse for your logo image file (such as LudditeLogo.jpg), and then click “OK.”
4 – Under Header, in the Alignment line, click “change,” set Vertical to “middle,” set Horizontal to “center,” and then click “OK.”
5 – Click “Save changes,” click “Return to site,” verify that your website header displays your logo correctly, and then click “Sign out” to close your Google Sites session. Optionally you can leave your session open if you wish to immediately change certain font colors on your website according to the Changing Font Colors section below.
Changing Font Colors
Changing certain font colors can enhance your website. Be careful to use no more than a few colors; too many can be distracting. To change font colors, do the following:
1 – If necessary, log into Google Sites and then click your website name.
2 – Click “More actions,” click “Manage site,” click “Colors and Fonts” under Site appearance.
3 – Scroll to and select “Site title color” under Site header, select “Custom,” and then select a color.
4 – Scroll to and select “Content title color” under Content area, select “Custom,” and then select a color.
5 – Scroll to and select “Content text color” select “Custom,” and then select black because black text is the most readable.
6 – Click “Save changes,” click “Return to site,” and then click “Sign out” to close your Google Sites session. Optionally, you can leave your session open if you wish to immediately add images to your website according to the Adding Images section below.
Adding Images
Images can help your website visitors understand the subjects your website presents. To add images, do the following:
1 – If necessary, log into Google Sites and then click your website name.
2 – Select a page into which you wish to add an image, such as a photo or drawing, as an image file. An image file is typically a JPEG or GIF file.
3 – Click “Edit page,” and then place your insertion point, blinking cursor, wherever you wish to add the image. For example, you might wish to place the image between two paragraphs.
4 – Click “Insert,” click “Image,” select “Upload Images,” browse for the image file you wish to add (such as LudditeLaptop1500,jpg), and then click “OK.”
5 – On the image menu, click “C” to center the image, and then click “L” to resize it.
6 – Repeat steps 2 through 5 for each image you wish to add.
7 – Click “Sign out” to close your Google Sites session. Optionally, you can leave your session open if you wish to immediately add internal links to your website according to the Adding Internal Links section below.
Adding Internal Links
An internal link lets your website visitor click on that link to display another page within your website. To add internal links, do the following:
1 – If necessary, log into Google Sites and then click your website name.
2 – On any page in your website, click “Edit page,” select (highlight) any word or phrase that you wish to link to another page within your website.
3 – Click “Link,” select “Existing page,” use the “Site map” to select a page, click “OK,” and then click “Save.”
4 – Repeat steps 2 and 3 for each internal link you wish to create.
5 – Click “Sign out” to close your Google Sites session. Optionally, you can leave your session open if you wish to immediately add external links to your website according to the Adding External Links section below.
Note: To compare an internal link to an external link, see these two Sample Links
Adding External Links
An external link, which is also called a hyperlink, lets your website visitor click on that link to display another website. To add external links, do the following:
1 – If necessary, log into Google Sites and then click your website name.
2 – On any page in your website, click “Edit page,” select (highlight) any word or phrase that you wish to link to an external website.
3 – Click “Link,” select “Web address,” type or paste the URL of the external website, click “OK,” and then click “Save.”
4 – Repeat steps 2 and 3 for each external link you wish to create.
5 – Click “Sign out” to close your Google Sites session. Optionally, you can leave your session open if you wish to immediately add purchase buttons to your website according to the Adding Purchase Buttons section below.
Adding Purchase Buttons
Purchase buttons let your website visitors purchase your merchandise online. Purchase buttons available for Google Sites include PayPal buttons and Google Checkout Buy Now buttons.
For example, if you have a Google Checkout merchant account, you can add Buy Now buttons to your Google Sites website. A website visitor can click on a Buy Now button to display a Google Checkout page and then purchase your merchandise. To add Buy Now buttons, do the following:
1 – If necessary, log into Google Sites and then click your website name.
2 – Go to the page from which you wish to sell a specific item, click “Edit page,” click “Insert,” click “More gadgets,” click “Featured, ” and then click “Google Checkout Buy Now Button.”
3 – Type your Google Checkout merchant ID. (If you do not yet have a Google Checkout merchant account, click “Read This.”)
4 – Select a button type, select a button style, and then describe the item you are selling.
5 – Under Display, deselect (remove the checkmarks from) both “Include a border around gadget” and “Display title on gadget.”
6 – Repeat steps 2 through 5 for each item you wish to sell through a Buy Now button.
5 – Click “Sign out” to close your Google Sites session.
Hopefully, the procedures in this document have helped you create your own simple, but powerful, Google Sites website for fun and/or profit.


