I am enthusiastic to share my mosaic art with you and tell you how you can create your own. I first made mosaic art with my 13-year old daughter when she was 5-years old. My newest mosaic was done with the help of my youngest of three daughters, who is four. Making a mosaic masterpiece with my 4-year old brought back memories of when I created my first mosaic with my oldest daughter. I just love the look of mosaics, they are so whimsical.
Mosaic art dates back thousands of years, when it was created with the use of basic tools intermingled with creativity. The earliest mosaics were constructed with raised pebbles, then placed in a specific manner to create geometrical patterns. The Greeks used this technique in the early part of the 4th century. Near the end of the 4th century mosaic art was beautifully displayed on walls and ceilings of many Christian basilicas.
During the 6th century new tools were used to make mosaics such as ‘smalti’, which is glass covered with metal oxides.
View 10 of the most extraordinary mosaics around the world, before we get started.
Art That Mirrors a Mosaic
We will talk about art that mirrors (or looks like) a mosaic. We will be using card stock and shiny wrapping paper rather than smalti. Mosaic art is done on poster board and can then be hung on walls. Mosaic art can be framed or unframed, depending on the look you are trying to achieve. Art that mirrors a mosaic is a fun craft for adults and children alike. Making a paper mosaic is simple yet it is not an overnight project, it takes several days to complete.
What you need:
Poster board, card stock or other durable paper
Card stock in various colors
Scissors
Shiny wrapping paper
Glue sticks
Pencil
Glitter nail polish in clear, I used Wet n Wild
What to do:
Step 1
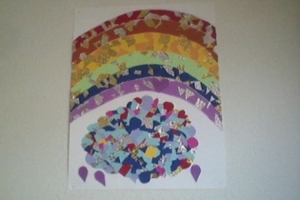
Decide on an image for your mosaic and sketch it onto the poster board. My daughter and I chose a rainbow and cloud. Other exceptional choices for a mosaic include the sun and moon, jack-o-lanterns, lighthouses and flowers.
Step 2
Cut out different shapes using card stock and wrapping paper. Make some shapes small and some large. Using the shiny wrapping paper creates the look of smalti which was used to construct mosaics in the 6th century.
Step 3
Use a glue stick to glue shapes on your drawing. The goal is to cover every inch of white inside the drawing. Glue shapes on top of each other and next to each other to form a unique pattern. Use the wrapping paper sparingly as it is meant to compliment the mosaic without making it too flashy.
Step 4
Add any final touches to your mosaic. I decided to add raindrops to emphasize that the mosaic was of a rainbow and cloud.
Step 5
As an added touch use the glitter nail polish to highlight several shapes. I chose to accentuate the raindrops as well as the violet heart, which is part of the rainbow.
Step 6
Hang it up. I chose to hang my mosaic over my bed using four nails, one in each corner. I contemplated hanging the mosaic on my ceiling as it would look fascinating.
I hope you enjoy making a mosaic as much as I do. Not only are mosaics fun to make, they make for unique home decor.
Happy crafting!
Sources:
Girl Scouts
Personal Experience
More from Rebecca:
2 Fall Hand Print Crafts
Make a Poetry Book
Make a Wedding Card with Translucent Vellum
October Eyeball Crafts to Use as Home decor
Make a Fall Craft: Spider Cider