Outdoor fires are making a comeback. As humans, we’ve been gathering around fires for warmth and protection just about forever. For a short time, we became enamored of things like furnaces and central air conditioning, but more and more people are discovering the almost instinctive sense of comfort and camaraderie that emerges when we gather around an open flame. There are few things more pleasant on a cool night than gathering with friends around a crackling fire, but safety and aesthetics should be a part of this experience. Burning down your home will surely put a damper on the evening, and while a 50-gallon drum might make a fire every bit as functional as a custom chimenea, the drum leaves much to be desired in terms of form. Let’s look at the relatively simple task of installing an outdoor fire pit. While you can purchase fire pits that burn natural gas or propane, these systems are best installed by experts, and will not be addressed in this article.
The first step is to choose a location for your fire pit. You want to have it close enough to the house that folks can easily walk in to use the facilities or grab something from the fridge, but far enough to avoid waking anyone who might want to sleep or pursue other interests during a fire. This is especially important if you’ve got young children who are expected to be in bed while the adults can be seen and heard enjoying themselves outside. You’ll need some distance between the fire pit and surrounding vegetation or buildings. Some folks recommend a minimum distance of 15 feet, but with fire, you’re much better safe than sorry. I recommend a minimum distance of 30 feet between the edge of the fire itself and the nearest vegetation or structure. More is always better. Try to choose a spot with good drainage. If possible, observe your chosen site after heavy rain. Is there standing water on the ground? If you, you’ll either need to build it up a bit, or choose a different location.
The next decision to make is between permanent and portable fire pits. To be honest, if you enjoy a small crackling fire and some conversation, there’s no reason to build in a permanent pit. Portable fire pits are easily available for a wide range of prices to suit nearly any taste at nearly every home improvement center. One of the most popular types is called a chimenea. Chimeneas are typically enclosed, rounded fire pits with straight chimneys projecting up from their centers. These fire pits, as well as other, more open types, remove a lot of concerns regarding fire containment and safety. Fires are completely contained within the units, and fed through an opening in the side. Even though these units are relatively safe, it is still best to place them on a fireproof surface of some sort, extending five to ten feet out from their edges in all directions. What material you use depends on your taste, and the materials you have available. You can use sheet metal – a common choice when installing these units on a wooden deck or patio – crushed gravel, sand, stone, or brick. Anything that will withstand some heat from the fire and separates the fire pit from the earth below it will do just fine.
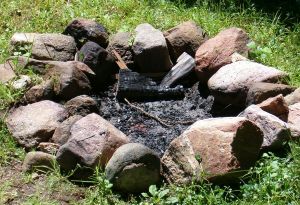
Large permanent pits are best for those who, like this writer, tend a little toward pyromania. If you’ll be having big bonfires in your fire pit, you’re unlikely to find what you need in a single box at Lowe’s. Large fire pits are typically made of fieldstone, but can be made from nearly any local or quarried stone. I’ve seen them made of metal, brick, or even cement. However you choose to build your fire pit, the principals are the same. You’ll need to build a central fire box – the pit itself. These are commonly dug into the ground, but can be elevated as well. Start by digging out the sod from an area large enough to contain your largest intended bonfire, plus enough room for whatever stone or brick lining you intend to use. Line this entire area with 4-6 inches of compacted gravel. The gravel will serve to protect underlying roots and flammable materials within the ground and will provide a uniform surface upon which to lay your stone or brick. These materials are heavy, and unless you thoroughly compact the gravel, they will tend to settle into the ground a bit over time.
If you’ll be using a metal fire pit liner of some sort (these liners will extend the life of your stone by protecting it from the most intense heat), now it the time to put this liner in place. Your stone or brick will lie against the liner. It’s fine to bypass this liner, if you like – you’ll just need to replace your stone or brick a little sooner.
Now it’s time to start laying your stone or brick. Lay this material carefully, course by course, around the outside of your gravel-lined area. Build this material as high as desired – anywhere from six inches all the way up to about three feet. Make sure to alternate your stone or brick, “one over two, two over one,” for strength, and make sure it is stable before your first fire.
When you’re satisfied with your results, it’s time for a fire! Burn your first few fires a little smaller than usual, to give yourself time to get used to the setup, and make sure that your material hold up okay. A carefully-built fire pit should last for many years, and will make entertaining a blast!