Back pain is probably the most consuming of the chronic pain joint issues. Once your back starts to hurt, you can’t think of anything else, it literally makes just breathing and thinking into an arduous task. I know this from experience; when I gave birth to my oldest son, the delivery resulted in 2 fractured vertebrae and a bulging disk. Don’t lose hope, whether you have thoracic pain (shoulder blades level) cervical pain (the neck) or Lumbar pain (the low back) there are some simple tips that will greatly decrease your discomfort and improve your quality of life. This article will address the Lumbar Spine, look for future articles addressing the other areas of the spine.
First I think it’s important to understand 2 things: 1) the anatomy of the Lumbar region, and 2) The definitions of all those technical terms for the sources of the pain.
When I’m dealing with a client suffering from low back discomfort I treat the entire Core Area. This is the dough-nut encasing the midsection from the ribs down to the knees: The Abdomen, Hips, Pelvis, Rump, Low back. This means all the muscles & joints, ligaments & cartilage in the entire area needs to be taken into account. Why? Chronic pain is the result of ‘Imbalance” the relationship between tight and weak muscles. Tight muscles shrink or shorten. Conversely, weak muscles are too stretched (or lengthened). Think of the bicep (upper front of the arm) as you do a bicep curl (or answer the telephone). As you lift your hand the length in the front of your upper arm shortens contracting the muscle. Again thinking of the bicep curl, if you see the length of the back of your upper arm, the triceps, it grows longer as you raise your hand. This is a great demonstration of the relationship between contracted muscles and lengthened muscles. Generally they will be directly opposite each other.
The muscles that are most likely* tight in a person with low back discomfort: the hip flexors (front of the hips), Low back muscles, secondary tight muscles are the tops of the thighs, and the inner thighs.
The muscles that are mist likely* weak or lengthened in a person with low back discomfort: the glutes (rump) abdomen, hamstrings (back of thighs) and outer thighs.
*Most likely is due to the fact that these deal with an over arch of the lumbar, or an exaggerated pelvic tilt. It is possible for there to be an over hunching of the lumbar, which would result in the exact opposites for the tight.weak muscles, it is just much more rare.
Important Definitions:
*Lumbo-Pelvic-Hip (LPH) Complex: all of the muscles, joints, ligaments, and tendons that make up the Core area – the ribs down to mid thigh all the way around the body.
*Tendinitis: A tendon is the end part of a muscle that attaches said muscle to a bone. Muscles are usually quite elastic and soft, but the muscle tapers off at the end to form a more dense and stiff connector (the tendon).
*Tendinitis: While the density of a tendon makes it stronger than a regular muscle tissue, the lack of elasticity and the constant pulling on it’s attachment to the bone with mis-aligned movement, makes is susceptible to a low level of tearing. It’s microscopic. Generally this occurs after extensive repetition of a misaligned joint. Most common areas for tendinitis are the knees, elbows, hips and shoulders.
*Cartilage: This is a protein substance that serves as a ‘cushion’ between bones in a joint.
*Ligament: This is a tough band of connective tissue that connects various structures like two bones. Comes from the Latin ligare which means to bind or tie.
*Bursae: This is a small sack of fluid, often mistaken for the cartilage, that cushions an area of the joint where bones would be prone to rub together.
*Bursitis: When there’s a mis-alignment, the pressure will not be uniform upon the bursae. This can result in inflammation or slight ruptures in the bursae.
*Disc:: This is a tough band of connective tissue that connects various structures like two bones. Comes from the Latin ligare which means to bind or tie.
*Bulging Disk: A severe misalignment between two vertebrae can result on the vertebrae laying at sharp angles instead of flay, the point where the vertebrae squeeze together will result in the disc being pushed and squeezed, further convoluting the alignment, and the squeeze can result in the disc being mis-shapen like a water balloon that is squeezed on one side.
*Slipped Disc: Is the same as a bulging disk in the relationship between adjacent vertebrae, the disc is pushed forward but it hasn’t yet been squeezed into a misshapen bubble like the bulging disc.
*Herniated / Ruptured Disc: If a bulge goes without alignment therapy, the part of the disc that is bulging (like that water balloon) can pop, releasing come of the cushioning fluid, this will further the misalignment be decreasing the amount of space between the vertebrae, causing both pinched nerves and grinding of the bones..
*Sciatica: The Sciatic nerve is an extremely thick nerve running from the spinal column, through the small spaces in the hip joint and down the thigh. The thickness of the nerve itself and the already cramped quarters in the hip and pelvis become more so. A slight misalignment or inflammation can result in squeezing pressure to be exerted onto the nerve, resulting in sharp pain and numbness.
*Fused Discs/Vertebrae: This is a surgical procedure where two or more vertebrae are joined together. This results in a total loss of range of motion between the vertebrae in question.
*Slipped Vertebrae: its very similar to a slipped disc in that one or more vertebrae become staggered or misaligned from it’s adjacent vertebrae. Its technical term is Fracture Spondylolisthesis .
*Scoliosis: This is a sideways curvature of the spine, where the more natural arch should be. The degree of scoliosis ranges from mild to severe. Can result in a degeneration of the discs, resulting in compression of the nerve roots or spinal cord.. This occurs most often in the lumbar spine (in the low back) but also occurs in the cervical spine (in the neck) and less often in the thoracic spine (in the upper back).
Addressing the Issue:
Here’s a shockingly simple fact about the human body, that makes an obscene impact, it doesn’t really matter what the issue is be it a problem with the vertebrae, discs, or nerves: The whole body is connected! So, if you injure your knee as a teen, and it results in a slight misalignment in the lower body, eventually you will have hip pain, then low back discomfort, soon after that, the pain will spread to the upper back, all the way up to the neck. As they say, misery loves company. This is why the term “Alignment” is so very important. Keeping your knees stacked over your ankles, both of which stack directly below the hips, the pelvis tilts at the correct angle and the shoulders remain rolled back, will make it virtually impossible to develop chronic discomfort without an accident.
Sadly, most people have slight to severe misalignments, or poor posture. This results from sitting at a desk, with the shoulders hunched, stressful driving where your fingers flex on the wheel, walking in heeled shoes, etc. These are things we all do all the time, without thinking we may be causing a misalignment that could change our lives forever. So Posture & Alignment of the bodies joints is the first step in decreasing pain. Sadly, once the pain has begun, it can feel, well, weird to try to keep to a proper posture, like you’re a robot. This is a physical representation of the aforementioned muscular imbalances between tight and weak muscles.
Retraining the body is in order. By stretching the tight/contracted muscles, and strengthening or shortening the weak muscles, you’ll decrease the imbalance. Once that’s achieved you can work on the Neuromuscular control. This is the communication between the brain and the muscles. You see, once we develop a misalignment, the bodies protective instincts kick in. They want to prevent as much pain as possible (usually just making the whole matter much worse). So, when you tell your brain you want to move, it recruits secondary muscles to do the job, in order to protect the painful primary muscles. Over time, the brain forgets how to call upon those primary muscles, which furthers the imbalance. So, once you’ve improved the range of motion and decreased some of the pain, you need to re-teach the brain to call upon the proper muscles for the job. This is just done through balance and controlled movements with very little weight and very high repetitions.
The spine articulates like a snake, rolling like a wave. When you have back discomfort you want to limit the amount of movement to a controlled fashion. TO do this, you need to tighten your abs. This is much like sucking in your belly to try on a tight pair of jeans. You’ll notice when you do this, your shoulders roll back and your pelvis tips to a more natural angle. You want to try to maintain this contraction of the adbomenmen throughout the day, as much as possible.
To help your body deal with these issues, you should apply a cold compress just before the discomfort kicks in. Much of the actual pain is caused by inflammation, the inflammation is caused by the misalignment, the misalignment caused by the relationship between tight and weak muscles, etc. Cold, helps limit the amount of fluid building up in the area of the inflammation.
Here is a sample of the types of exercises you should perform to first attack the tight and weak muscles in the complex.:
Flexibility:
Working on loosening the contracted muscles. Breathe deeply. Stretching should not be painful, move slowly into the stretch until you feel a slight pull, then hold the position for a minimum of 10 counts. Slowly release then repeat. These stretches need to be performed every day, I usually suggest right before you leave your bed in the morning and just before bed at night, as well as after any workout. Be careful of getting in and out of each position, if laying flat on your back, use a rolled up towel under your neck, keeping at least one knee bent with the foot flat on the floor. Roll to your side before getting up. To get the most out of each stretch, you can also apply a heating pad to each area for a few minutes just before stretching it. This will help to loosen the muscles if you didn’t just complete your workout.
Child Pose (Stretching the Low Back, Ribs, Arms, Glutes)
Kneel on all fours. Sit back onto your heels leaving your arms outstretched. Lower your chest and head down onto the mat. Use your fingers to walk
your hands as far forward as they will go. Relax and breathe. If kneeling is difficult, you can do this standing about 2 feet before a chair or table. Tip over from your hips to bring your hands flat on the table/chair. Arms should be fully extended. Slowly sink your chest toward the floor, rolling your shoulder blades back.
Seated Forward Bend (Stretching the Low Back & Hamstring)
Sit tall with your legs straight out from your hips, hip width apart. Roll back your shoulders and tighten your abdomen. Bending from your hips, not your waist, walk your hands down your thighs until you feel a stretch up the back of your legs. Keep your spine straight, NO hunching. If this is too intense a stretch for you, sit on the edge of a chair, one foot flat on the floor and the other extended in front of you. With your abs tight and your shoulders rolled back, slowly walk your hands down you leg until you feel a stretch in your legs.
Up Dog (Stretching the Groin & Lower Belly)
Lay on mat on your belly. Place hands directly wider than your shoulders, legs outstretched with the feet hip width apart. Curl toes into the mat. TIGHTEN
YOUR ABS (or you’ll feel discomfort in your low back), you should not be arching your back just lifting your torso. Push through your palms to straighten your arms, lifting your entire torso off of the mat (including your pelvis.). Look up at the ceiling. Relax and breathe.
Wide Fours (Stretching the Inner Hip & Groin)
Kneel on all fours. Widen your knees as far as they will comfortable go, placing the soles of your feet together. Lower your upper body down onto
your forearms. Slowly, bring your body slightly forward until you feel the pull in your groin. Relax and breathe. Again if kneeling is uncomfortable, sit on the edge of a chair. Widen your feet/knees. Tip forward at the hips until your hands grip the inside of your ankles, placing your elbows on the inside of your knees. Slowly exert a bit of pressure with your elbows to spread your knees a bit wider.
Strength:
Again, keeping your abdomen contracted is extremely important. I also suggest you introduce 1 mini set (only 10 reps) of a single exercise, then wait 2-3 days. This will inform you if your body is capable of the movement. If your tight muscles are much too tight it can prevent you from being able to target the weak muscles, in which case, you should continue stretching for about a week then try again. If you can go the 2-3 days without the ‘bad pain’ then you can introduce the next exercise in another mini set. Repeating the process until you’ve tested each exercise on your body. Everyone’s body is slightly different; what works for one person with low back discomfort won’t necessarily work for another. So, testing is very important. Work your way up to full reps/sets which would be roughly 12-18 reps / 2 – 4 sets.
Alignment is also exceedingly important. If you can, stand before a mirror when exercising to ensure you don’t lose some of your posture. Shoulders should be rolled back and down away from your ears, chin tucked slightly, abs contracted, pelvis slightly tilted forward, knees soft and toes straight a head of you.
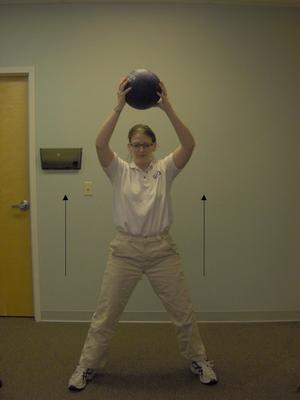
Equipment: I suggest getting a 4-6 lb medicine ball, and a pair of 5 lb dumb bells, as well as a 65 cm Stability ball. These are the most essential of the tools you will require,
Side-to-Side Twist – You can hold a 4 lb medicine ball or a single dumbbell with both hands. Hold the weight in front of your heart. Slowly turn shoulders as for to one side as you can without turning hips. Repeat to the other side. Start with a very short range of motion, turning only a little to each side, as your body becomes more comfortable, and able to perform the motion without discomfort, you can increase the distance of the turn.
Floor-to-Ceiling- You can hold a 4 lb medicine ball or a single dumbbell with both hands. Hold the weight in front of your heart. Tip over at the hip to bring the ball toward the floor – until you feel a stretch in the back of your legs, Keep your spine straight the whole time – NO hunching. Push your feet into the floor, bringing your torso back upright, also bringing the ball to your chest. Once stable and standing tall, slowly push the ball over head.
Squat Swing – You can hold a 4 lb medicine ball or a single dumbbell with both hands. Hold the weight in front of your heart. Slowly bend your knees like your sitting on a chair, bringing the ball next to one knee. Push through heels to straighten legs, as you swing the ball over the opposite shoulder. This is like doing a Golf Swing only your legs are more bent in the beginning.
Lunge Twist – Step one foot back 1.5-2 feet. Lower your rear knee toward the floor. As you do twist your upper body in the direction of your lead leg
(right = clockwise, left=counter-clockwise).Push through your lead heel to straighten your legs as you un-twist to face front. Pelvic tilt is important in this exercise.
Pick-Ups: Place a single weight on a low chair or table in front of you. Bend your knees, tipping forward at about a 45 degree angle to pick up the weight with both hands. Keep abs tight ans you slowly stand up tall and straight. Repeat the process to bring the weight back onto the low table or chair. Eventually you’ll be able to do this with the weight on the floor.
Bench Pullover (Dumbbells) – Lay flat on bench, feet a comfortable distance from rear (on bench as well) Roll your shoulders back and tighten your abs. Inhale as you lift the weight overhead with straight arms. (Do not arch your back) Exhale as you pull the weight toward your pelvis – squeezing hands toward each other – Keep arms extended the entire movement.
Core Work:
I’m sure you’ve heard what everyone says – If you have back pain you need to work your abs. This is partially true as I have said, the abs are weak, but so are the glutes. So you need to work them both. BUT- Contrary to popular belief, you should do NO abdominal work while lying flat on a mat. This causes stress to the vertebrae because no matter how strong you tighten your abdomen, that protective instinct will also tighten the spine. So, for abdominal exercises, you should use an incline bench, or a stability ball. This will take some of the stress off of your spine. Also you should be cautious when getting up, roll to your side and use your arms as much as abs.
Again you want to test each exercise carefully to ensure you’re body is ready. Work your way up to full reps/sets which would be roughly 12-18 reps / 2 – 4 sets.
Floor Bridge: (this works the Glutes and Pelvic Floor Muscles)
Lay on a flat surface, with your hands next to your hips, and your feet flat, knees bent. Roll back your shoulders so you tuck your shoulder blades under you. Tighten your abdomen. Inhale. As you exhale, push into the floor with your heels to press your pelvis toward the ceiling. Slowly release the pelvis back to the floor.
Stability Ball Top Crunch (This is for those who are extremely limited in their range of motion, and can not lay back over the ball)
Sitting tall on the stability ball with the shoulders rolled back, pelvis tucked slightly, and the abdomen tight. Inhale. Slowly, as you exhale, bend forward like you will kiss your knees. Slowly lift the torso back to tall, being carefully not to lean back or arch.
Stability Ball Crunch (this works the abs and balance)
Sit tall on stability ball. Walk your feet forward as you lay back until the ball is under your lower back. Hands behind head. Inhale as you tighten your abs. Exhale as you lift your shoulders toward the ceiling. Inhale as you release your shoulders back toward the ball. When finished with reps walk back up to sitting on the ball.
Ball Crossover Crunch (this works the transverse abdominal – or inner sides – as well as balance) Sit tall on stability ball. Walk your feet forward as you
lay back until the ball is under your lower back. Hands behind head. Inhale as you tighten your abs. Exhale as you lift your shoulders toward the ceiling. Twist one shoulder toward the ceiling then the other. Inhale as you release your shoulders to the ball. Walk back up to sitting after all reps
Opposite Arm/Leg Extension (this is all about re-learning control, as well as alignment) Kneel on all 4’s (or if kneeling is uncomfortable, drape face down over a stability ball). Roll back your shoulders and tighten your abdomen. Tuck your pelvis slightly. Ever so slowly, lift one arm straight out in front of you, at the same time, extend the opposite leg straight behind you. DO NOT lift them very high, this is an extension not a lift!! Slowly, return the limbs to the starting position. Repeat. (This is way more difficult than it sounds).