A look through some of the projects in specialized rubber stamping craft books reveals some amazing imagery and ingenuity. Commercially available stamps have come a long way in a short time. Just a few years ago they were all fairly primitive, cute, and unsophisticated: teddy bears, hearts, daisies, etc. But now there are many with complex, intricate, and inspired designs. Stamping is essentially a contemporary take on the ancient woodcuts, which were some of the first methods used in printing of any sort. Although there are many forms of artistic printing processes, with carrying degrees of complexities, (eg woodcuts, serigraphs, lithographs, etchings) most have the same basic premise–a three-dimensional impression transferred onto another surface, usually via some sort of medium, such as ink or paint.
Because its premise is so easy, and the results so powerful and pleasing, stamping lends itself well to DIY projects. And creating your own, unique rubber stamps takes it a further profound step, beyond that fine line at which the craft can morph into art. The materials used and overall process are so easy, that its an appropriate art project for children as well as adults. Use the easy instructions and ideas here to create your own rubber stamps and art projects.
Materials needed:
Rubber erasers
Linoleum cutter and handle
Paper
Ink
Regular craft or office scissors
Fine point black or dark Sharpie
Optional materials:
Fixative
Small, flat rock or piece of wood
Strong craft glue (such as Mod Podge)
Notes on materials:
Any type of rubber erasers will work, but some are better than others. The traditional pink erasers or gum type erasers are not ideal. The best kind of erasers for stamp making are the kind that can be found in dollar stores and similar outlets, usually in packs of 5-10. They are made for kids and usually have cutesy designs printed on them. Ignore the designs and think shape. The larger and evenly shaped they are (squares, rectangles, etc.) the better. If the only erasers you can find are specific designs like flowers or cars, no worries–remember that these types of erasers are very easy to carve, and can likewise be cut in to any desired shaped with scissors.
Linoleum cutters and handles can be found in any craft store, and craft sections within grocery and similar stores. The cutters look like little calligraphy pen tips. They are relatively cheap-a single one can be purchased for under $2.00, and they are most commonly sold in little boxes, with varying sizes and shapes, for around $6.00. All that is needed are one or two with a finer gouge. Speedball makes linoleum cutters, and any of their #1, #2, or #3 cutters will work. The finer the gouge, the finer the lines will be. Its nice to have a couple on hand, so varying degrees of detail can be created. There are special tool handles these cutters fit into, but if you already have a calligraphy pen, they will fit right into it.
Any type of papers can be used in stamping, and it’s nice to have a few different kinds on which to experiement. A medium weight watercolor paper is always a good and quality choice for printmaking, and this can be found in any art or craft store, along with nice printmaking paper. The rubber stamp is reusable, so it might be a good idea to initially use cheap printer or even notebook paper, just to see how the stamp turned out. The choice of paper is going to depend much on what type of project is being created. Different effects can be achieved with different papers, so experimentation is recommended.
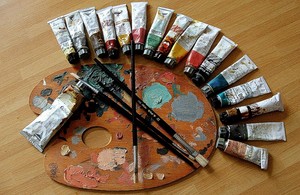
There are many high quality and colorful inks made specifically for rubber stamps, and those are recommended. A craft store will carry an assortment of these, along with proper pads and everything you’ll need. If you would like to use black ink, a cheap office ink pad will work. If this type of ink pad is used, a fixative is usually imperative, because the ink will smear and run. Paint can be used, any type. Acrylic craft paint is a good choice. It must be a very thin layer though, and the stamp must be well rinsed after use, so that it doesn’t become clumped with dried paint. I’ve also experimented using a Sharpie to print-just coloring the design fully and immediately printing onto the paper while it’s still wet with ink. Of course, this method permanently colors the stamp.
Fixatives are usually sprays, and can be found in art and craft stores. A very small amount is needed to fix the stamping project.
If you find you have created a dandy rubber stamp you want to preserve and reuse again and again, then you may consider gluing it to a small, flat rock or piece of wood using craft glue. The rock acts as a sort of handle, and over time will protect the rubber material of the eraser from wear and tear. Erasers by nature disappear, and although you will not be using your stamp to do any erasing, the material is not made to be durable, and can benefit from as much reinforcement as possible. To do this, simply glue the uncarved side of the eraser to the stone. Use a thin layer of craft glue over the entire surface of the eraser’s backside, and place a few books over it for a few hours to dry. Just make sure absolutely no glue touches the book, or it could be quite a mess extracting the book from the stamp, possibly ruining the book and stamp. If your rock isn’t flat enough to warrant leaving a book atop for pressure, the craft glue will nevertheless dry satisfactorily. Just make sure to use some firm pressure when initially applying the rock and stamp together, and perhaps midway through the drying process.
Directions:
Cut the eraser into your desired shape, using regular scissors. You can choose a square, rectangle, triangle, circular, or even an abstract basic shape. Consider your overall design and intent, and determine what overall shape will work best with your design. Cutting the eraser isn’t required, especially if your eraser is already what you would like, but it does lend somewhat of a nice, appropriate feeling of imperfection to the overall stamp, that matches the feel of a hand-carved stamp.
Next, on the blank side of the eraser, draw your design using yor fine point Sharpie. It’s nice to start with a border, even if it is just a one-line frame. A border is a good way to start; it gives you a sense of the actual small space you have to work with, and when printed, adds a lovely idea of vignetting.
Now, it’s time to start carving. One of the most important things to remember in making a rubber stamp is the idea of negative space. It can take some getting used to. You are carving away what you don’t what to show up. Carve around the lines you have drawn. The raised lines that you leave will be the lines that print on the paper. If you have a very intricate design then, it can be confusing while carving. It can be done, but usually after some experience. Once you practice a few times with carving and printing, and make some mistakes, you will ‘get it’, and then you can start developing more intricate design work.
Once you are satisfied with the carving, place the carved side down on your ink pad, and stamp it on some plain paper. You will be able to see unintended defects and mistakes. Simply carve any undesired rubber away.
That’s it. Your rubber stamp is finished, and can now be glued to a rock, or simply used to start making prints.
Ideas and tips
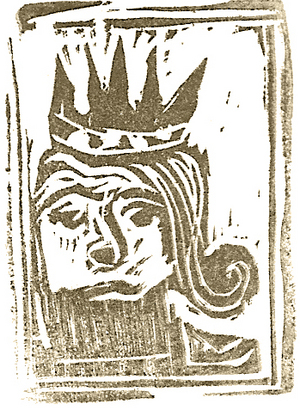
The possibilities in making rubber stamps are endless. You can make full sets, gifts, gift tags, monogrammed initials, literally anything. I have made sets of tarot symbols for homemade tarot decks, court symbols for card decks, a set of rune stamps, alphabet stamps, and even made gifts for children with their carved likeness on the stamp. They make fabulous gifts that people literally go wild over.
If you find yourself having a difficult time with the ‘negative space’ aspect, or if you are helping a child who is finding it difficult, you can simply carve into the drawn lines instead of creating the negative space. The image will of course be reversed when printed, but it can be easily remedied by using a very fine layer of white craft paint in place of ink, and printed onto black or dark paper. When done correctly, it doesn’t look makeshift at all, rather, it adds a bit of depth and looks intriguing.