Birthdays are probably the one holiday, aside from Christmas, that will cost you the most money in terms of greeting cards. However, unlike Christmas, there is never a sale on birthday cards, because birthdays are always “in season”. Why not make your own birthday cards, then, and save yourself some cash in the process? It’s easy, it’s fun, and for a small initial investment of about $35, you can make 75 birthday cards- or more. That works out to less than fifty cents a card!
Here’s the breakdown on the supplies that you will need:
8.5 in. x 11 in. multicolored textured construction paper pad (containing 100 sheets), $7.99
3 stamping pads of different colors (3-pack, $4.99)
3 birthday stamps ($5-$7/piece)
Envelopes ($2/box, and no bigger than 8 x 5 ¼ in.)
Ruler, scissors and glue ($1-$2)
The first thing you will need to do is to determine your card’s height and width. Since you want your card to fit into your envelope, measure the dimensions of the envelope first. Then, double the width measurement, since you will need a card twice as wide as the envelope in order to fold it over (unless you choose to make a one-sided card or postcard). Finally, subtract a quarter inch from both the height and width measurements, allowing the final card to be a bit smaller than the envelope (so it will fit inside).
Use these height and width measurements to outline and, if need be, cut out your card from an 8.5 in. x 11 in. white (or other color) textured sheet of construction paper. Take the cut sheet and fold the longer side over, using a ruler (or even your finger nail) to brush over the fold and create a straight and even edge.
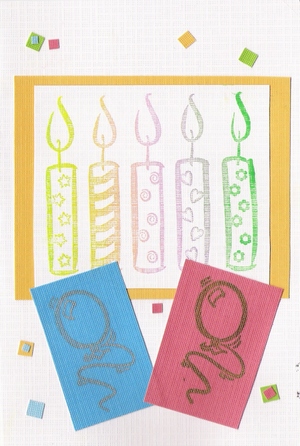
Take the new measurements of your folded-over card, using them as guidelines for cutting out the yellow rectangle that will be affixed to the front of the card. In my example, my card front is 7 in. x 4 ¾ in., so I cut out a yellow rectangle of 4 ¼ in. x 3 ½ in. Basically, you want to end up with a yellow rectangle that is half the height of the card, and ½ in. less than its width.
Once that is done, take the measurements of the yellow rectangle itself, and cut out a smaller white rectangle, which will end up on top of it. Depending on how big your central birthday stamp will be, you may want to make this rectangle bigger or smaller than what is portayed in my example. However, it is recommended that you leave at least ¼ in. of height and width border on each end, allowing the underlying yellow rectangle to “frame” the central whit rectangle.
Finally, cut out two 2 in. x 1 1/2 in. rectangles from different paper colors. If there are any paper leftovers, use your scissors to cut out a few square confetti pieces (optional).
Now you are ready to start stamping. Ideally, you should have a central, bigger, birthday stamp (such as my candle one), a smaller stamp (like the balloon one), and a message stamp for the inside of the card. Open up your ink pads and ink the stamps fully, making sure there are no dry spots. Then, stamp the inside of your card, the white rectangle cut-out, and the two smaller rectangles of different colors. Let the stamped papers dry (this should take about a minute).
Take out your glue and affix the yellow rectangle to the card, leaving an inch of white paper at the top and about 2 inches at the bottom. Affix the white stamped rectangle on top of the yellow rectangle, centering it. Let that dry. If the papers start curling up, place a heavier object, like a book or a cup, on top of the rectangles. Then, affix the two smaller multi-colored rectangles below the two larger rectangles. Again, if they start curling up, use a heavy object to keep them down. This is also important for the card itself, since otherwise it will end up wavy.
As a final (and optional) touch, affix the small confetti squares onto the front of the card. Use your imagination on where to place them. In this example, I even placed confetti squares on top of each other. Be careful to not use too much glue, as this will show up from behind the confetti pieces. Let the card dry for at least several hours before writing your birthday message on it.
Depending on how ambitious you want to be, you may make just one card from these materials, or about 75. Not all 100 papers in the pad will go for making the actual cards themselves, since you will need sheets for the rectangles too. However, on average, for the $35 you spend on materials, you should end up with around 75 cards as your final tally. That’s rather impressive, considering that American Greetings and Hallmark charge $3-$6 for just one card!