I ran out of money while decorating my garden this month – but, I was still determined to have a bird bath. So I came up with this quick and easy way to create a gorgeous water feature for my little feathered friends. From start to finish, it only took me 15 minutes to put it all together. And the best part was all the pieces cost me less than $10. Here’s how you can make a beautiful bird bath for your garden this weekend.
• Look for Bargains
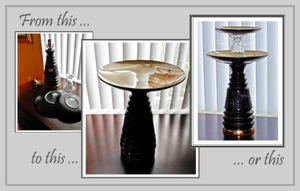
Depending on what you have available, your bird bath should cost you less than $10 or it could even be free. That’s right – before you spend a penny, take a good look through your basement, attic, garage, cabinets and closets. Raid your neighbor’s cast-offs or go on a scavenger hunt at your mom’s house. All you need is a large lamp base and a large plate or bowl for a simple bird bath. And if you find a smaller matching plate, grab a clear glass to sandwich between them and you’ll have a two-tier bird bath in a jiffy.
The parts for my bird bath came from a local Good Will Thrift Shop. I paid $5.06 for the lamp, $2.06 for a large plate, $1.06 for a small plate and $1.06 for a sundae glass that made the perfect connection between the two tiers. I looked for color-coordinated pieces. Although I’ve seen some folks buy mismatched pieces and spray paint the bath once assembled, I’m not keen on that. It worries me that the paint may harm the birds, so I located matching items. That also saved me a lot of time because there was no finishing step.
• Gut the Lamp
Once you’ve got all the pieces you need, cut the electrical cord and remove the guts from the lamp. Most lamps come apart really easy – just twist the socket from the base until it releases. Pitch the cord and the socket assembly – you only need the bottom piece for a pedestal.
• Glue the Plate
Next, center and glue the large plate to the old lamp base. I used Liquid Nails – but, any heavy duty construction adhesive will do. Just read the label and make sure it works on ceramics. If you wanted a simple bird bath, you’re done!
But, if you want to take your bird bath to the next level, glue the small plate to the large plate with the small glass in between as a connector. I used clear Crazy Glue on the bottom where the glue could be seen and more Liquid Nails to connect the top plate. Congratulations – you just created a two-tier bird bath.
• Let Dry Overnight
The hardest part of this project is waiting for the glue to dry. To make sure you’ve got a solid seal; don’t handle your pieces once you’ve put them together and allow the unit to dry overnight.
That’s it – 15 minutes and $10 (or less) gets you a bird bath for your garden and a whole lot of praise from friends and neighbors for being so creative. Now all you have to do is sit back and relax as you watch the birds flock to your yard to bathe and play.
Enjoy more home decor ideas from Terry Mulligan:
10 Tips to Take Your Next Decorating Project Over the Top
Fabulous Choices for Decorating with Throw Pillows
Budget-Friendly Dollar Store Finds Anyone Can Decorate With