There are many wonderful Web sites out there that give beautiful and well-thought-out instructions on how to build urban chicken coops. I can’t hope to match their plans, ingenuity, or craftsmanship. I’m not an engineer, and I am certainly not a carpenter; I can barely find my way around a tool box. So if you are a person who has the skills, time, energy, and money to build an elaborate chicken coop, I encourage you to search those web sites and find a design to your liking.
However, if you are like me, and you really like the idea of keeping a flock of chickens in your urban or suburban home, but you lack the technical know-how or time to build a more elaborate chicken coop, do not fear! I managed to build a decent chicken run in a single day for under $75. I am writing this to give hope to those of you who shy away from keeping a flock because of the technical aspects of building a coop for your birds. If I can do it, you can too!
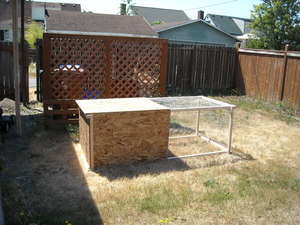
Like I said, I don’t really know my way around a tool box, so the idea of building something was a little intimidating. Once I made up my mind to build a coop, I was excited to get started. I searched the web and found some neat ideas, but I wanted my coop to have a personal touch, and many of the designs were clearly out of my league. I sat down and drew a basic sketch of the coop, keeping my building limitations in mind. I decided to used a rectangle as my design model. I thought about it like a shoe box. Half of the coop would be covered, and the other half would be wire mesh. This would allow my hens to have a dry space and an open space.
I put the egg boxes (places where the hens will feel comfortable laying) against the rear of the covered area, and I put a 1.5 inch roosting bar across the width of the covered area. I also needed a lid so that I could reach into the coop to collect eggs and give the birds food and water. Now, this article is not designed to give you step-by-step instructions on how to build the coop that I built. I am relaying the steps I took in order to show you that, with a little thought, anyone can design and build their own coop. That being said, let me throw a few dimensions at you: Length, 7.5 feet. Width, 3.25 feet. Height, 2.5 feet.
After making a list of the features that I wanted in my coop, I made a list of the materials I would need: two sheets of plywood, eight 10 ft long and 1.5 inch thick boards, two 10-foot rolls of chicken wire, two hinges,1.75 inch nails, and U-nails. I picked a nice, sunny day, borrowed my neighbor’s truck, and drove down to the local HomeDepot. The total price was around $70, which was great, considering Washington State’s sales tax is around 10%.
I measured and sawed the boards and plywood according to the dimensions I had written out. I had to pause a few times and scratch my head and think about how the final product was supposed to look, but the whole time, I kept the shoebox image in my mind, minus the bottom of course. I built the two long sides first and then connected them at the front and the rear with the 1.5 inch boards. The the egg boxes were perched up on the skids of the two long sides so that whole coop could be easily slid from location to location.
I had some trouble with the egg box dividers. I am sure that if I knew a little more about construction, they would have been no problem, but I used some basic problem solving skills and made it work. After sweating under a hot summer sun for the better part of the afternoon, I finally finished my coop. I felt a strong connection to what I had built, even if it wasn’t fancy. My sweat, quite literally, had gone into its construction, and I felt pride in my design.
After using my coop for a while, I have noticed some of its design flaws. Perhapse its biggest flaw is that the roof is flat. Water tends to pool up on top when it rains, and now the roof is a little bowed and is less air-tight then it was before. If I were to build another coop, I would build a slanted roof so that the water would run to one side or the other. Not all boards fit together seemlessly. I used a hand saw to cut the boards and plywood, and I would now recommend using a power saw; cutting to your measurments is very important. I had to add an extra piece of plywood to my coop in the winter across the opening to the exposed area to keep my birds extra warm. Remember to take into account your climate. If you live in a cold place, make sure that your walls are thick enough to keep your birds warm in the winter. A good coop needs to keep your hens safe!
Still, the chickens stay dry when it rains (and it rains frequently in Western Washington), and the coop is easy to pull around the yard. It is perfectly functional, and I learned a great deal about tools, construction, and creation. Don’t let inexperience keep you from starting your own urban flock. Here are a couple of excellent sites that provide quality designs that you can follow or will inspire you to create your own designs:
backyardchickens.com/
urbanchickens.org