If you have ever had a bag, curtain or some other item that an eyelet has come out of, you may be ready to mourn the loss of the item. No worries. The eyelet (also known as a grommet) can easily be replaced with little effort and at a much cheaper expense than buying a new item.
Things You Will Need:
Purchased eyelets w/ attaching tool
Heavyweight fabric scrap
Scissors
Household cement
Small, sharp-pointed scissors
Hammer
Step 1
Purchase eyelets the same size as the one that has worked loose, become damaged, or is missing. Make sure you purchase a package that has the attaching tool included. This is pretty much the norm, but there is always a chance you may find some that require you to purchase the tool separately.
Step 2
If the eyelet still has an edge attached, cut the fabric as close to the eyelet as possible to remove it.
Step 3
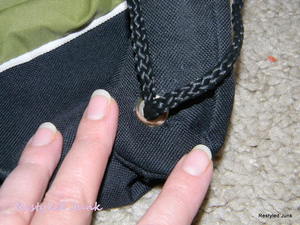
Choose a scrap of heavyweight fabric that closes matches the fabric where the eyelet was attached. For the bag I was replacing an eyelet on, I used black denim from an old pair of jeans. Cut a square from the fabric approximately three times larger than the hole. Example: If your hole is a 1/2-inch in diameter, cut a 1 1/2-inch square. This does not need to be exact. Eyeballing and cutting the fabric free-hand is sufficient.
Step 4
Apply household cement to the “front” side of the fabric square. Place the square on the back of the hole left from the eyelet. Press the front of the fabric against the back side of the hole. This will provide a stable foundation for the new eyelet.
Step 5
Some eyelets/grommets have only one part, but mine had a front and a back. The front has a center ring that is taller than the back piece. Using small, sharp-pointed scissors, cut a small “X” in the fabric where the eyelet will go. Keep the “X” tiny.
Step 6
Burrow the tall ring of the eyelet’s front part through the cut “X”, from the front of your project to the back (or inside). Position the back part of the eyelet over the tall ring of the front part. The fabric is now sandwiched in between the two parts.
Step 7
Place the stacked parts on a cutting board or sturdy surface with the front side facing down. If the back is inside a bag, such as the project I used for this tutorial, you will need to maneuver the fabric out of the way so that the back of the eyelet is exposed. Set the attaching tool on the back half of the eyelet. Firmly tap the tool using a hammer. Check to see that the pieces have squeezed together. If not, tap the tool again.
Eyelets or grommets usually come with several in a package, saving you from having to buy more when the need arises again.
Reference:
- voices.yahoo.com/refurbish-old-rocking-chair-7427384.html?cat=6
- voices.yahoo.com/ribbon-organization-craft-room-11630342.html?cat=30
- voices.yahoo.com/organizing-fabric-stash-11616730.html?cat=30


