The digital scrapbooking craze has certainly made its mark. Practically everywhere you turn online has some kind of scrapbooking page, or design, or word art. With so many options already out there, why would you want to create your own stuff?
Although there are many digital scrapbooking freebies around, a lot of the really cute products cost to download and use. Some companies place restrictions on the rights given to consumers when they download products, limiting the numbers of times individuals can duplicate the items and prohibiting the sharing of them as well.
When you’re making a newsletter for the school, or bookmarks for the ladies at Church, the concept of “personal-use-only” becomes gray and having your own collection of designs to choose from can become more and more appealing.
Another reason you’d want to create your own digital scrapbooking accessories is simply the freedom of customization. The ability to get exactly what you want is obviously a nice thing. You’re looking for something with this exact color of blue, or a pattern that will go perfectly with the background you’ve already selected. Or maybe it’s the text itself you’re looking to customize.
If some obscure quotation would be the perfect fit for a page you’re scrapbooking, the likelihood of finding a premade word art is slim. Being able to create your own scrapbooking materials is an extremely convenient option to have, even if it’s simply to use in conjunction with other accessories that you didn’t make.
I’ve previously published an article detailing How to Make Your Own Digital Scrapbook Papers, and now I’d like to discuss the three keys of creating your own customized word art.
Starting with an appropriate font is the first step in creating a successful piece of word art. Programs like Adobe Illustrator, or the public domain version Inkscape, can be used in creating your own fonts, but those programs can be hard to learn and more involved than some want to get in the digital scrapbooking process.
I prefer to download free fonts from sites like 1001fonts.com. There’s a great variety of styles and emotions within the catalog of offerings-perfectly compatible with a number of different end results you could be going for with a specific scrapbook page. (You can click here for a slideshow of my ten favorite free fonts downloaded from 1001fonts.)
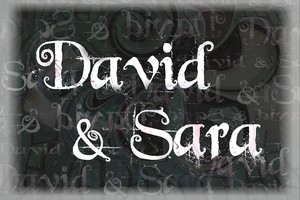
Text Arrangement
Some of the cutest word art designs use a good combination of fonts and a good employment of space. It’s easiest to insert one text box and be done with it, but for the best results, try splitting up your text, rotating some boxes and enlarging others. Use one font here and another one there, creating unity throughout while still making it interesting as well.
Text Designs
Even the best fonts and the nicest arrangements can get boring over time if the actual letters have no design other than being one solid color. But, programs like Adobe Photoshop, and its free counterpart GIMP, make designing text manageable and fun. These programs, along with other image manipulators, allow you to maintain multiple layers within the same workbook.
After you’ve arranged your text to make your perfect word art, you can insert a separate design layer, for example, let’s say a .jpg scrapbook page. After having clicked on your word art layer in the layers toolbar, you can use the “Select by Color Tool” to select the text and nothing but the text of that layer. Then after clicking on the design layer in the layers toolbar, the workbook will now have highlighted the same area that the text occupies but the design layer is what is actually selected. Copying and pasting will give you the text of your word art with the decoration of your design layer, transforming what could otherwise be a dull image into a vibrant word art.
Additional accents can be added by layering the original text scooted slightly over from your new designed text. Giving some layers a certain opacity that differs from other layers can also add depth and interest. Saving your completed design with a .png extension will preserve the transparency of the space surrounding your word art, making it easy to insert into future scrapbooking workbooks.