Inexpensive decoupage decorating ideas are limited only by your imagination. Anyone can create original, one-of-a-kind decoupage décor using Mod Podge. It glues, dries clear, seals and finishes – all in one process. Here are some decorating ideas for using Mod Podge to decoupage décor for your home.
First, it doesn’t take any special skills or talent to decoupage. In fact, decoupage is a great crafting technique children may enjoy. And yes, you don’t have to use Mod Podge to decoupage your projects; you could use regular white household glue to decoupage. Mod Podge just produces better results.
If you can cut and paste; you can decoupage. Use your imagination. Ask yourself where a decoupage project might be best utilized? What color would best accent your décor? What do you already have on hand that could be used to decoupage a project? Questions like these help get your creative juices flowing. Sooner or later you’ll develop a mental picture of possible decoupage projects.
Look for colored paper, pictures, fabric, or other items to cut up for your decoupage project. Magazines, calendars, and old greeting cards make perfect items to decoupage. Finished wood is my favorite medium to decoupage. But, metal, plastic, fabric, and paper can all be used to decoupage, too.
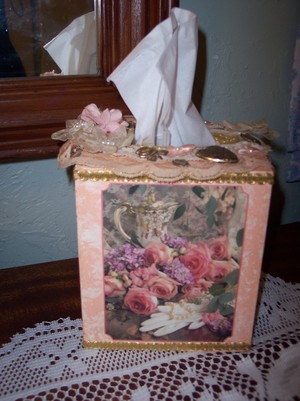
I found a wooden tissue box cover at a yard sale for a quarter. When I first saw it, I thought it had potential for a future decoupage project. Later, I decided to decoupage it with “Victorian” greeting card cut-outs. This decoupage tissue box now sits on my dresser and would be an easy project for someone wishing to try decoupage for the first time.
Garage sales and dollar stores are perfect places to look for potential decoupage projects. I found two napkin holders adorned with very ugly corn pictures at a local dollar store. I painted them to match my kitchen walls and used Mod Podge to decoupage scraps of wallpaper trim. These decoupage kitchen accessories now hold my wooden spoons and utensils.
I did the same thing to decoupage a plastic flower pot that holds a hanging plant in my kitchen window. I painted it and then used Mod Podge to decoupage it with left-over kitchen wallpaper trim.
Another simple decoupage project I enjoyed was a wooden bank for collecting pocket change. Again, it was just an old item picked up at a second-hand store. I used Mod Podge to decoupage it with greeting card cut-outs. It coordinates with my decoupaged tissue holder and the two sit across from each other on my dresser.
The secret here is to look for inexpensive items with creative decoupage “potential.” You don’t have to know exactly what you’ll do with an item the moment you first see it; just recognize its decoupage potential. Frequently, these bargain items have been the inspiration for one-of-a-kind gifts or attractive decoupage décor for my home.
I love vintage and Victorian decoupage décor. I bought an old army ammo trunk for $5 at an auction and painted it flat black. I used Mod Podge to decoupage cut-out pictures from a Victorian desk calendar and turn my old trunk into a “vintage” storage chest. I used Mod Podge to decoupage gold foil paper doily pieces and then used gold metallic paint to cover the trunk’s metal edges. I even decoupaged gold rick-rack around the outside edge of the lid to hide the fact it was plywood. It took several coats of Mod Podge to completely decoupage the rick-rack onto the lid’s edge. Then I sealed my decoupaged storage chest with two coats of polyurethane to thoroughly seal it . Usually, it is not necessary to use a sealer with Mod Podge. I just wanted my storage chest to be well-sealed for added durability. The polyurethane also yellows with age and gives my decoupaged chest a more aged “vintage” look.
If you are using thinner paper or magazine pictures on a decoupage project always ensure anything printed on the backside doesn’t show through. Sometimes, decoupaged pictures show through when wet, but dry fine. If in doubt, test a sample decoupage piece first.
Old Victorian style greeting cards were the inspiration for my decoupage tissue holder. I had cut pictures from several cards and experimented until I found ones I liked best. I painted the tissue holder with peach acrylic craft paint to coordinate with my bedroom décor. I used a small sponge-style brush and let it dry for a few minutes.
Next, I took cream-colored acrylic paint and squirted a little onto a sheet of wax paper. I crumpled up a piece of plastic saran wrap and dipped it in cream-color paint to create a mottled two-tone affect. I patted the excess paint onto the wax paper until barely any paint was left. Then I dabbed it randomly all over the peach tissue holder until I was ready to decoupage my greeting card cut-outs with Mod Podge. Reload with a little paint if necessary being sure to remove any excess before dabbing onto your decoupage project.
Mod Podge was applied to the back of each paper cut-out and glued to the peach box. I re-applied Mod Podge over the top after carefully smoothing each picture first to remove any air bubbles underneath.
When Mod Podge dried, I applied gold rick-rack around the upper and lower edges and applied a sealing coat of Mod Podge. If your decoupage project requires overlapping pictures in multiple layers, use the same process of sealing in between each layer for best results. Your decoupage project can be as simple or ornate as you choose.
The pictures decoupaged onto my tissue box were nice, but I felt it still needed more pizzazz. I experimented with miscellaneous items from my craft scrap box for ideas and finally decided to flue lace around the tissue opening on top, leaving it hanging loose over the edge. Several old buttons and charms were added by encasing them in Mod Podge, but not sealing over their tops. Then I used Mod Podge to attach ribbon and silk flower accents. My new decoupaged tissue box was ready for use.
Reference:
- Mod Podge source and decoupage ideas: www.plaidcraftexpress.compurchase


