Cleaning the Apple Pro Keyboard: Remove Keys to Get Rid of Dirt
If you have not purchased the new Apple keyboard and are still using the old white, pro keyboard, chances are that over time you have watched as dirt, hair, food and other “crud” have found their way under your keys. The clear base of this keyboard makes all of that stuff visible and can really hinder the slick, clean-line look of your Mac set up. Cleaning it is possible and easy if you know the right steps and precautions to take.
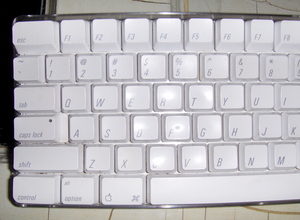
The first step you want to take is to photograph your keyboard before you remove the keys. This way it will be easier for you put the keys back in their correct slot after cleaning. Another option, if you do not have a digital camera, is to use the keyboard viewer in Mac OS X. To access the keyboard viewer, go to the International menu within System Preferences.
There is something you should know before you start removing the keys. The larger keys (e.g. space bar, both shifts, enter, return, zero on number pad, and delete) employ a small clip that helps the entire button to go down evenly when pressed. You will remove these keys in the same way as others, but take great care so as not to bend the then metal clip upon removal.
Now with that knowledge you are ready to remove the keys. The easiest ones to begin with are the ones that have space on one side. Namely these would include the F13, help, control, arrow keys and the like. The left-hand keys of the number pad are also good ones to begin with. Once you begin to remove some, others will become more accessible. Do not try to rush the part of the process. You do not want to break any of the small white clips on the bottoms of the keys. These are necessary for holding the keys on the keyboard. For removing each key, slide your index or middle fingers under either side of the key and gently lift up with a small amount of force. If that does it free, apply more force until it pops loose. Upon removing each key, check the underside to insure that you it has come off without any damage to the clips. If it is difficult to get your finger(s) underneath any given key, the use of a small spoon or dull knife will aid you in putting the necessary upward force in order to remove it.
As you remove the keys place them in a Zip-Lock resealable bag. This will later be filled with water for cleaning the keys themselves. Whenever you remove one of the keys with a metal clip, remove the clip from the key and lay it aside. Do not put the metal clips in the resealable bag. The metal clips can simply be wiped clean with a paper towel or a cloth. Also it will be handy to find some way of identifying which metal clip goes with which key. One way of doing this is to take a piece of paper, write the names of the keys on it, and then lay each metal clip beside the name of its respective key. There may be other ways of marking these that you could use. However you choose to mark them, just be sure you do so and you will not find yourself trying to figure it our by trial and error later.
Once all of the keys are removed and are all in the Zip-Lock bag, fill the bag about 3/4 full of water (or enough to cover all of the keys). As the water is running into the bag, add some soap (either gel or foaming). Be sure to use lukewarm water. This will be warm enough to clean the keys, but will remove the risk of getting the keys too hot and causing them to warp. Once the water and soap have been added, seal the bag and gently shake it for about one minute. After shaking it is a good idea to let the keys to soak in the water for about 3-5 minutes. While they are soaking you can clean up the now key-less base of the keyboard.
Depending on how dirty your keyboard is you may be able to simply wipe it clean at this stage. If so, just use a damp paper towel or other cloth to remove dirt particles. Be sure not to get any water into the key slots because this moisture could make its way into the keyboard’s electronics underneath. If you have any kind vacuum with a light-duty brush attachment, it may be useful at this point.
Now that you have cleaned up the base of the keyboard, it will be time to return to the keys that are in the bag. At this point open the bag just a little and begin pouring out the water being careful not to let any of the keys come out as they could fall down the drain of your sink. It may also be necessary, once the water has been poured out, to run more water into the bag and then drain it out again so as to remove all of the soap suds. You now want to dry the keys. Pour them out onto a towel (a small dish towel works well for this) and fold them up in it to remove excess water. Now lay the towel back out flat with the keys still on it and spread the keys out and let them sit and air dry for at least an hour. You may speed this process up by drying them with a hairdry set on a low setting.
When you are sure that all of the keys are dry, you can now start remounting them to your keyboard with the aid of the digital photos you took earlier or Mac OS X’s keyboard viewer. It will be easiest to reapply the metal clip keys first. Simply re-attach the clip to the bottom of the key. Set the clip in its slot on the keyboard and then push the key back into its slot. After it snaps in place you can look at the key through the keyboard’s clear base to insure that the clip returned to its appropriate position. After all of these keys are in place, then begin attaching the other keys. Simply line up the key with its slot and push down with a light amount of pressure until it snaps into place. It is a good idea to use two fingers whenever possible so as to apply even pressure. After you have replaced all of the keys, reattach your keyboard to your computer and do some simple typing to make sure that all of the keys are functioning properly.
If all is well, then you may reach around and pat yourself on the back for a job well done. Your keyboard is now squeeky clean and you may even notice that some of the keys respond better. I hope this helps and good luck!