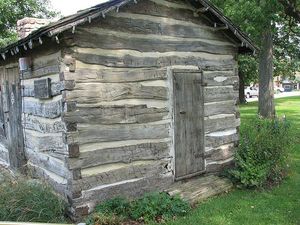
Have you ever dreamed of living off the land by building a little one room log cabin in the woods? Building a log cabin is a simple concept. Doing so, however, involves skill and quite a bit of strength. You’ll also need directions, supplies, tools and tips. That’s where this article comes in.
Selecting a site
Before building a log cabin, a proper site should be selected. To prevent flooding, the log cabin should be built on high ground. The building ground for the log cabin will need to be level. To prevent fire, trees and brush should be cleared from the immediate area, before building. Leave some trees close enough to form a wind break for colder weather.
Logs needed
The main supply needed is of course the logs. To begin building a 10×12 dirt floor log cabin, you will need equal amounts of logs in two sizes (12 feet and 14 feet). The number of logs is determined by the thickness of the logs you are using and the height you wish the cabin to be. Consider using logs cleared from the building site to save money in building the log cabin.
Start by preparing the first layer of logs to form the outline of the log cabin.
This is done by cutting equal size notches into both sides of two 12 foot and one side of two 14 foot logs. The notches should be one foot from the end of all the logs. If you haven’t the required skills, this can often be done where the logs for the cabin are purchased.
The two 14 foot notched logs are laid side by side. The two 12 foot logs are then laid across them with notches lined up. Tap the logs into place until secure. The rest of the logs for the body of the log cabin will require notches in both sides of the logs.
Building the rest of the log cabin body is done by laying the notched logs atop one another, alternating the 12 and 14 foot logs. Tap each layer into the next until the proper height is reached. Windows and a door are cut out of the main log cabin body. They are lined with flat wood “jams” for door and window shutter hinges.
Building the roof is done by gradually shortening the 12 foot logs and bringing the 14 foot logs together until the roof peak is formed.
Waterproofing of the roof is accomplished by nailing bark or boards to the timber of the log cabin roof. A pole that has been routed into a triangle seals the roof center of the log cabin.
After building the main part of the log cabin, finishing touches may be added.
Windows and doors in a rustic log cabin are made of simple hinged plywood. Blankets are hung over them in winter months for insulation.
A wood burning stove for cooking and heating may be centered in the log cabin and vented through the roof of the building.
Mud and grass may be blended and daubed in the cracks between the logs as insulation.
Plywood may be nailed to the inside of the cabin walls for added heat retention.
A floor may be added by simply laying logs in tightly across the dirt floor, and nailing boards across.
Note: The wood stove should be kept as low as possible for comfort to prevent fires. It should sit on the dirt portion of the floor and a reasonable distance between the stove and the wood of the floor.