Break up your boring routine of tried-and-true printmaking lessons with some fresh new ideas. Teach your students about the traditional Japanese art form of “gyotaku“, as well as introduce them to a new technique of printmaking (and integrate a little bit of science as well).
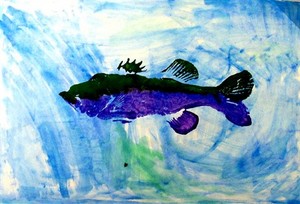
The History of Gyotaku Fish Printing – In Japanese, “gyo” means “fish“, and “taku” means “rubbing.” Gyotaku was an art form originating in Japan in the mid 1800’s, originally as a practical way for Japanese fishermen to record the fish they caught. Unlike photography, a print can retain the specific texture, proportions and details of the fish. As time went on, these gyotaku prints developed beyond just a method for record-keeping into an art form, as artists began to take into consideration the composition, colors, backgrounds, and other artistic decisions of the print.
Required Supplies for Fish Printing – To teach a gyotaku printmaking lesson, you will need the following: fish (dry and fresh, or rubber replicas available from catalogs), soft printmaking brayers, inking plates or roller trays, paint or printing ink, printing paper, newspapers, cleaning supplies. You will also need access to a sink, a reasonably-sized workspace for printing, and a drying area. You may also want examples of gyotaku prints in order to show students (see links at the end of the article).
Gyotaku Lesson Procedures – The following is a suggested list of steps to teaching this art lesson:
1. Begin with a class discussion on the history of gyotaku fish printing, showing examples.
2. Demonstrate the printing process to students.
3. Set up student workspaces for printmaking.
4. Place fish or rubber replica onto newspaper.
5. Select color(s) of paint or ink and squeeze onto inking plate/tray.
6. Roll soft brayer across inking plate until it is evenly coated by paint.
7. Roll inked brayer onto fish, creating a light, even, smooth coat and making sure all the edges and details are covered.
8. With clean fingers, pick up blank printing paper and place on top of fish – keep in mind the image will be reversed.
9. Keep one hand in the middle of the fish, holding the paper in place (so that it doesn’t smear). Use fingers on other hand to gently (but firmly) press the paper all the way around the fish, being sure to transfer all the edges and unique features.
10. Gently lift the paper from the fish.
11. Set the print aside to dry, then clean/rinse the extra ink off of the brayer and the fish replica.
Art Lesson Options and Alternatives – There are an infinite variety of options for teaching gyotaku. Here are just a few alternatives to this lesson:
1. Rather than printing onto plain paper (although this is good practice), students can create colorful backgrounds for their prints using watercolor paints.
2. Students can create ‘alternative’ backgrounds (rather than just water), such as aquariums, frying pans, fishing hooks, dinner plates, etc.
3. Students can print more than one fish to create a ‘school’, or try printing different varieties of fish.
4. You can try finding other sea-life creatures to print with. Art supply catalogs also carry rubber frog replicas, turtles, seahorses, starfish, etc.
5. Students can create their own ‘name stamp’ to sign in the corner, typical in many Asian artworks.
6. You can have students write narrative stories to be displayed along their fish prints.
7. Teach students the biology and anatomy of fish, and have them diagram their fish prints with labels.
For more information on teaching Asian art, read10 Asian Art Lessons for Elementary or Junior High.
Sources:
http://www.gyotakuart.com/
http://www.gyotaku.net/
http://en.wikipedia.org/wiki/Gyotaku