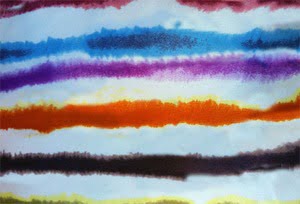
My first experience of tie dying a shirt was when I went to Girl Scout camp. Since that time, I have experimented with different techniques to create unusual and unique tie dyed designs. A simple stripe pattern is easy to create using cotton yarn and fabric dye. The cotton yarn also makes it possible to create shapes and squiggles with ease.
Things You’ll Need:
Large plastic garbage bag
Scissors
100 percent cotton T-shirt
Tie dye kit
Water
Several weights of 100-percent cotton yarn
Scissors
Small plastic containers
Craft sticks
Latex or rubber gloves
Plastic bucket
Plain salt
Measuring cup
Instructions:
Step 1 – Cover a flat work surface with a large plastic garbage bag. When working with large fabric items, cut the plastic garbage bag apart along one side seam and the bottom edge to create a large piece of plastic.
Step 2 – Mix the fabric dye according to the directions on the package. Place the small plastic containers on the plastic covered surface. Fill half a small plastic container with each color of fabric dye.
Step 3 – Cut 18-inch lengths of various weights of 100-percent cotton yarn. It does not matter what color the yarn is as long as it is 100-percent cotton. Cotton blends or acrylic yarns do not hold the dye as well so look at the fiber content of the yarn.
Step 4 – Place one strand of each weight of yarn in each plastic container. Press the yarn into the dye with a craft stick. Allow the yarn to soak up the dye for approximately one minute.
Step 5 – Place the 100-percent cotton T-shirt on the plastic surface. Smooth out all wrinkles. Spritz the T-shirt with cool water until saturated. If you do not want the dye to go through both layers of the T-shirt, place a large piece of corrugated cardboard between the layers. Cardboard T-shirt forms are available at hobby and craft stores.
Step 6 – Put on latex or rubber gloves. Pick up the first strand of yarn from a cup of fabric dye. Pull the yarn through your thumb and forefinger as you pull the yarn from the container to remove excess dye. Do not squeeze the yarn during this process.
Step 7 – Position and place the cotton yarn on the wet T-shirt. The dye will spread from the cotton yarn into the fibers of the T-shirt. Allow the yarn to sit on the T-shirt for approximately 15 seconds. Pick up the yarn and move to a new location if so desired. The second placement of the yarn will create a lighter color on the fabric. Place the yarn back in the dye to achieve the same intensity of color.
Step 8 – Continue to place the fabric dye soaked cotton yarn on the T-shirt until the desired design is achieved.
Step 9 – Place a piece of plastic over the completed project. Allow the fabric to dry 24 hours before washing.
Step 10 – Pour one cup of plain salt and eight cups of cool water in a plastic bucket. Mix thoroughly. Place the T-shirt in the water and allow it to soak one hour. Remove the T-shirt and wash separately with mild soap. This process will set tie dye and prevent color running.
Washing: Once you have learned the process, practice making shapes on a scrap piece of 100-percent cotton cloth.
Tip: It is also possible to make solid shapes such as a flat circle, rectangle or square by gluing the cotton yarn together on one side. Create the shape. Brush or squeeze white glue over one side of the shape. Allow the glue to dry thoroughly. Place the shape in the fabric dye for 15 seconds. Remove the shape and place it on the cotton fabric with the glued side facing up.