No matter what room of your house you look in, baseboard covers the gap between the walls and the floor. Baseboard comes in a plethora of design options, sizes and materials ensuring you find the perfect baseboard design for any room in the house. Whether you’re remodeling, renovating or adding a new room, baseboard can be a great way to add accent to your new or old design. But without the right tips and tricks of the trade, you can bet some serious mistakes will be made. Use these three must-know tips and techniques for installing baseboard, and you’ll be sure to get the perfect baseboard installation for any home improvement project.
Tip One: Cope the Inside Corners
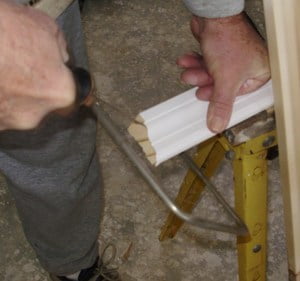
I’ve done a ton of baseboard repairs where the homeowner or last contractor improperly installed the corners of the baseboard so gaps and odd angles are visible. This is because no wall is a true 45 degree angle! You’ll need to use a coping saw on the ends of the baseboard to make a perfect fit with inside corners and angles.
Start your baseboard from the right side of the door and work your way left around the room. The first piece of base should be cut flush on the ends and attached wall to wall. Cut the next piece by measuring wall to wall. Cut the far end of the base flush. The end that butts against the first piece of baseboard will need a 45 degree angle cut so that the long point of the angle is on the back side of the base and the face of the angle is open on the profile or front of the baseboard. Now use a coping saw to cut the 45 degree angle out of the profile face. Follow the lines where the 45 degree angle meets the face to cut out a “shadow” of the profile that fits snugly and seamlessly against the first piece of baseboard.
Since no corner is a true 45 degree angle, it’s important to test cut all outside corners before making the final cut. Begin by allowing your first 45 degree angle cut to overhang past the corner. Put the piece in place and use a pencil to mark the exact end of the corner. Make a 45 degree angle cut and attach the piece to the wall.
Now use a scrap piece of baseboard about 2-3′ long and make an opposing 45 degree angle on the end. Butt the end against the recently attached 45 degree angle and test the fit. If it looks good, cut your next piece on a 45 degree angle. If not, adjust the saw; remake the cut on the scrap piece until it fits correctly. Once you have a match, cut the real piece to the now correctly set miter saw angle for the perfect fit!
Tip Three: Caulk your Baseboard
Loose gaps on the tops, corners and bottoms of baseboard collect dust and debris and leave unsightly gaps. Caulk your baseboard to help it stay in place for good, especially smaller pieces that can crack or break when using conventional nailing methods. Use another piece of baseboard sandwiched in between the walls to help keep stubborn pieces of baseboard in place and tight against the wall until it has a chance to dry.
Caulk and not nail all baseboards that butt against a bathroom or kitchen wall! This way, no loose nails accidently penetrate sensitive plumbing pipes behind the wall without your knowledge a cause a leak.