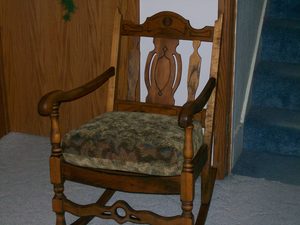
A client of mine had an antique rocking chair that was in serious need of repair. The chair was a family heirloom that dated back several generations. My husband and I determined it would take teamwork to bring it back to working order.
The chair had a missing slat in the back, a broken slat and a broken side seat brace. The wood, the slats and the brace needed to be duplicated to match the natural color of the chair. The chair was also missing it’s cushion. I had free rein with that, as none of the family members could remember what it had originally looked like. Lastly, the wood was extremely weathered and dry.
As a whole, the chair seemed like an overwhelming repair job. The following instructions that follow are how we tackled one problem area at a time to bring the chair back to it’s former glory. One or more of these tasks may be the answers you need to repair your own damaged family heirlooms.
Repairing the Structure
Step 1
Remove the broken slat and side seat brace. The slats on our chair were inserted into grooves in the top and bottom braces of the chair back’s frame. In order to remove the slats, we had to move the braces. The ends of the top and bottom braces were inserted into grooves on the sides of the chair back’s frame. The “this” connected to “that” can go on and on, but for us, we were able to stop at the side braces. The chair structure was just loose enough for us to work the sides away from the top and bottom brace. We were then able to remove the slats. We did the same with the seat brace. If the pieces of your chair need a little coaxing to loosen, carefully insert the blade of a putty knife between the joints and wiggle. Do not force it or you may cause cracking or breakage, adding to your list of repairs. Most older pieces will come apart without much effort.
Step 2
Find a close match to your wood. Our chair was made of oak. Since we only needed a small amount, and we wanted an aged wood so that the colors would match, we recycled. We have a pile of scrap wood that eventually finds a home sooner or later. We found a scrap of oak from an old house that had been torn down.
Step 3
Reconstruct new slats and a brace. We needed to replace the missing slat, the broken slat and the brace. We measured the thickness of each original piece, set the table saw to this measurement and ripped the length of the wood. Using the broken pieces as our patterns, we placed them on the ripped wood and traced around them. The shape were then cut out using a jigsaw and sanded smooth.
Step 4
Replace the pieces in the chair the same way they came out. Inject wood glue into the grooves and any loose joints on the chair. Tightly clamp the joints while the glue is drying. Wipe off any glue that oozes out of the joints while it is still wet.
Clean and Oil the Chair
Step 1
Scrub the chair using Murphy’s Oil Soap, a soft-bristle brush and a rag. Removing decades of dirt will help the new wood of the slats match the rest of the chair.
Step 2
Liberally apply lemon oil to the chair. Allow the oil to soak in for an hour or two and repeat. Continue until the rich moistness of the wood surface is reborn.
Step 3
Allow the last application of lemon oil to set for 24 hours. If any oiliness remains, wipe the chair down with a clean soft rag.
Make or Repair the Cushion
Step 1
The cushion was missing, but my chair had a wood panel bottom. I placed a sheet of wrapping paper over the seat bottom of the chair. Using my fingers, I pressed the wrapping paper along the edge of the seat bottom. This created a crease in the paper. I cut the paper along the crease lines for my cushion’s pattern.
Step 2
I chose to make my cushion 4 inches thick. You can buy 4-inch thick foam, but I already had 2-inch thick foam. I simply cut two cushions from the 2-inch foam and stacked them. Trace the pattern onto the foam using a permanent marking pen. Cut the foam using an electric meat carving knife. It cuts through foam like butter.
Step 3
Wrap the cut foam in quilt batting. Cut away the excess. Do not overlap the edges. Use a large-eyed needle and crochet thread to sew the edges of the batting together. The batting softens the pointy edges and the surface of the foam.
Step 4
Layer two pieces of your chosen upholstery fabric with the right sides together. Center the cushion pattern on the fabric and pin. Trace around the pattern using a permanent marking pen, adding 2 1/2 inches on all edges to compensate for half the thickness of the 4-inch cushion and to accommodate a 1/2-inch seam allowance. Cut out the traced fabric.
Step 5
Sew around the pinned cushion fabric using a 1/2-inch seam allowance. Start at the back edge of the cushion fabric, 3 inches from the corner. Backstitch the beginning of the seam. End at the back edge of the cushion fabric, 3 inches from the other back corner. Backstitch the end of the seam. You will have a large opening on the back edge of the cushion.
Step 6
My upholstery fabric was a heavy chenille that frayed easily. To minimize the fraying, I separated the raw edges of the sewn seams and zigzag stitched along their edges.
Step 7
Create the cushion gussets. Cut a 2-inch square from each corner on the cushion cover. Open one cut-out square and squeeze it together diagonally. Match the side seams in the center and pin. Sew across the pinned edge using a 1/2-inch seam allowance. Repeat with the remaining corner cut-outs. These corner seams will line up along the thickness of each cushion corner. Turn the cover right side out.
Step 8
Insert the cushion into the cover. It is a lot like trying to insert a square peg into a round hole, but it can be done. Once inserted, wrestle the edges, corners and seams until they are properly arranged. You will feel like you have been to the gym when you are done.
Step 9
Hand-stitch the back opening closed using a strong thread (I used a carpet thread) that matches your fabric.


