After over 160,000 mile’s worth of driving during the last four years, I’ve saved thousands of dollars on fuel costs by making and using my own biodiesel – all without seeing any damage to my VW Jetta TDI’s engine or fuel system.
My other stories on controversial biodiesel fuel include some coverage on the scam about biodiesel engine conversion and the impact of the unethical use of feedstock grains in producing biodiesel.
BEYOND TINKERING: BIODIESELPRE-HEATING
In recent months the old biodiesel processor I was using started to wear out. So I began designing a new biodiesel processor to make the fuel for my Volkswagen TDI Jetta and mini-camper.
Any success in making a biodiesel processor is usually preceded by no small amount of tinkering with all sorts of equipment. Among this equipment is one piece I wanted to share with you: an amazingly simple gizmo called a “heat exchanger”, which can be used for at least twobiodiesel-related processes that I will discuss later:
· Making biodiesel: Pre-heating of unprocessed biodiesel feedstock (namely, the goop you start with before converting it to biodiesel) and
· Using biodiesel: Pre-heating your biodiesel fuel just before it goes into your fuel injection system.
I go into the why and how for both these methods later. But first, for those who don’t know what a heat exchanger is, we have a little background.
HEAT EXCHANGER: WHAT IT IS – HOW IT WORKS
The heat exchanger I bought some months ago is an ingenious, small and relatively inexpensive gizmo (I got mine for about US $65).
Basically this kind of heat exchanger has a series of thermally conductive plates (usually made of copper) interleaving together to allow the heat from one fluid to pass over to another relatively cooler fluid. The plates are bonded together so as not to allow the two fluids to mix together.
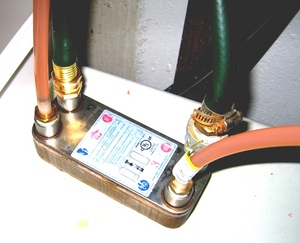
In my Kaori heat exchanger (see IMAGE 1), hot fluid flows through an opening on one end of the exchanger, passes over the plates within and exits through the other side. Likewise, the colder fluid (in this case, biodiesel) passes into another aperture on the exchanger, and flows over the opposite side of the exchange plates, picking up heat from the hot fluid on the other side. The now-hot feedstock fluid exits the exchanger, ready for its next step.
APPLICATIONS
A simple heat exchanger like my Kaori can be used for at least two biodiesel-related processes:
· #1 – Making biodiesel: Pre-heating of unprocessed biodiesel feedstock (namely, the goop you start with before converting it to biodiesel)
· #2 – Pre-injection heating of biodiesel: Pre-heating your biodiesel fuel just before it goes into your fuel pump and/or injection lines.
Now, into both of these processes in further detail.
#1 – FOR MAKING BIODIESEL: PRE-HEATING FEEDSTOCK
Some home biodiesel manufacturing processes (such as acusorb or similar chemically charged nylon-based media) require pre-heating of the raw (unprocessed) biodiesel feedstock before sending the liquid onward into a small processor or reactor system.
By pre-heating (after first pre-filtering) the feedstock, the fluid will react more readily in its next phase of processing, such as flowing through a tank of acusorb beads or sitting in a reaction tank for mixing with chemicals. In this situation, a feedstock pre-heater would come in handy.
What do I use as a heat source? Simple: plain old tap hot water in the house.
IMAGE 1 shows that I deliver hot tap water through a regular garden hose into and out of the fittings flowing through one side of plates on my exchanger. Before allowing the feedstock to flow through the exchanger, I first run hot water through the exchanger quickly to prime the exchanger for heat. After that I run the hot water through at a trickle depending on how quickly I allow the cold feedstock to flow through my biodiesel mini-factory.
Conservation Tip: In order not to waste the hot water exiting the exchanger, collect this still-useful tap water for use in the home garden.
SAFETY NOTE: PRE-HEATING USING ELECTRIC ELEMENT HEATERS
In previous incarnations of oil pre-heaters, I have used hot water heating elements (see IMAGE 2) made originally for electric home water heater tanks. I would dip one or two of these into my unprocessed feedstock tank to pre-heat the feedstock oil before sending it through my processor.
In deference to safety and a desire to be able to walk away from your processor fully confident that it wouldn’t burn or blow up, I suggest using a small fluid-based heat exchanger, like the Taiwan-made Kaori exchanger (see IMAGE 1) I am now using.
Most modern diesel autos use fuel injection to deliver a fine mist of fuel to the engine immediately before combustion. The reason for this misting (atomizing or atomization) of fuel is to ensure powerful, smooth, and complete burning of your fuel each moment it is delivered to your engine.
Because biodiesel is so thick, it is arguably more difficult to atomize when injected into an engine by the fuel injectors. Depending on various factors in your car, this may effect your engine’s performance, and in turn can effect fuel consumption.
In order to ensure better atomization in your car’s engine, you may wish again to consider pre-heating the fuel. By pre-heating the fuel it atomizes into smaller droplets, which in turn deliver a more complete burning of your fuel, more power, and better efficiency.
Again, in this situation a heat exchanger would come in handy.
In my case, I mounted my Kaori heat exchanger under the hood of my car (see IMAGE 3). In the picture, I have removed the pre-heater from under the hood of my car to show the simple wooden plate (on left of IMAGE 3) onto which to mount the pre-heater. I use my car’s radiator coolant to heat my biodiesel to a consistent 190° F to achieve superior atomization.
For another idea on better biodiesel fuel atomization, read my suggestion at the end of another article I wrote: click here.
Warning: While pre-heating may work great for biodiesel fuel, how does it work when you burn regular diesel fuel? My suggestion: give it a try. On my car, I observed a loss of power and efficiency due to what I think may have been pre-detonation of the regular diesel fuel when it was sprayed into my car’s engine. While my car was able to compensate for this pre-detonation, I think sustained operation in this condition might have led to damage on my engine. For this reason, I installed a ball valve on the radiator side of my heat exchanger to limit the heat or shut off the heat altogether.
An amazingly simple “heat exchanger” gizmo can be used both to help you make biodiesel faster in the production phase, and pre-heating your fuel may possibly lead to better efficiency and more power under the hood.
If you decide to try out a heat exchanger, please share your experience with it in the COMMENTS box on this page.
To see the slideshow accompanying this article click here.
Have fun!
– John
To subscribe to these articles, email me by clicking here
To read other cool articles:click here
For RSS feed:http://www.associatedcontent.com/rss/user_76423.xml
Legal stuff: Disclaimer & Safety Notice: Author does not warrant or assume any legal liability or responsibility for the accuracy, safety, completeness, or usefulness of any information, apparatus, product, or process disclosed or referred to. Information is provided for informational purposes only. Any actions or assumptions taken on the reader’s part as a result of any information disclosed by Author are taken entirely at the reader’s own risk. Author shall not be liable for any errors in the content, nor for any actions taken in reliance thereon. Furthermore, Author shall not be liable for any loss of profits, contracts, opportunities or any direct, indirect, consequential loss of any kind (including death and/or injury), business interruption or loss of property arising out of or in connection with the use of the information herein. News items, opinions, and/or statements posed by author may be unsubstantiated and should be considered also as such. Unless where expressly stated, Author claims no express or understood association with any person, entity, or third party mentioned. “Cibola International” is a service mark (SM) and trade mark (™ ®) belonging expressly to John Melendez with all rights reserved worldwide.