I was introduced to Sculpey clays when my daughter was given a set of their eraser clay for a birthday. That is some cool stuff, for sure. Sculpt something, bake it, and you have a neat and ready-to-use eraser. Having little need for erasers myself (computers have woefully little need for any such things), but in love with the whole rediscovery of the joys of clay, I went on to find polymer clay.
Most crafters are familiar with Polymer clay in some form or other. If you’ve used Fimo beads, or made beads from the Fimo canes, you’ve dealt with Polymer clay. Sculpey is a fun one. It’s non-toxic, stays soft until you bake it in the oven, and once you’ve baked it you can polish, sand, drill, carve, paint with water-based acrylics or coat with Sculpey brand glaze. How cool is that? No need for a kiln to make things like pretty vases or Christmas tree ornaments that have all the look of porcelain. And for the purposes of this guide, an even cooler thing about polymer clay is that – once fully baked – it’s waterproof without any extra chemicals.
In this guide, I’ll show you how to make a very simple bud vase from Sculpey Clay. The same process can be used to sculpt from any clay medium, but the baking instructions are specific to Sculpey. And don’t worry – you don’t need any skill or experience to come up with something fabulous.
Materials & Goal
Our goal is pretty simple: to make a bud vase.
The materials you’ll need are also simple: Sculpey Polymer Clay (any of the brands will work, but I recommend Original because it’s the least expensive and is easy to work with), a work space, two – 2 fl. oz. bottles water-based acrylic paint (I’m using metallic sequin black and metallic blue sapphire), a paint brush, aluminum foil, and electric tape.
Although Sculpey is non-toxic, always wash your hands after using it and make sure that any tools you use are not used for food handling/storage/preparation after you’ve used it on the clay. Safety first. Never use Sculpey clay pottery for food, either.
Prepare the Clay & the Guide
First, you’ll need to prepare the clay. In the illustrations, I’m using the Original Sculpey brand that is white in color once it’s baked. The only reason for my decision is that it makes a nice, clean canvas for me to start with. Preparing the clay is the same, though, regardless of the brand you choose.
Clean your hands well with soap and water to remove any dirt or oils, and dry them off. Then, set up a little work spot on a table. You’ll want a flat area with room to move around, and protection for any woods. I’m just using a plastic place mat covered with a towel I use often for crafts so it’s already covered in paints and who-knows-what.
Now, break off part of your clay if you’re working with a larger brick, or open one of the small individual packages. Knead the clay until it is soft and smooth. This can take a while – to start, the clay will be extremely hard and seem to develop hand muscles where you never knew you needed them before. Just keep with it. This is called “conditioning” the clay. You’ll know it’s ready when you can easily form the clay into a soft little ball.
Next, you’ll need to get the guide ready. Some people would call the guide a mold, but a mold is really something you put stuff in, not on. So, we’ll call it a guide – and our guide is one of our bottles of paint.
What we need to do is make sure that the clay can come off the bottle, so we’ll wrap the bottle in aluminum foil. The only trick here is to make sure that the foil goes higher than you’ll be wrapping clay so that you have room to grab the foil, and that it’s just loose enough that you can wiggle the bottle back out.
Refer to Illustration 01.
Sculpt the Vase
To start sculpting (which is really easy using a guide), first roll your clay into long coils. They need to be about �” thick so that when you start pinching and pulling them, they don’t thin out too much.
With your clay coils made, start at the bottom of the bottle and spiral the coils up the bottle. Keep going until your spiral is just below the top of the paint bottle – not the lid, but the top of the plastic part. Now, the fun begins. You’ll want to pinch the coils together and start pulling the clay (I usually wrap my hand around the vase and pull in a circular motion). It will be lumpy and uneven at first, but don’t worry. When you’ve got most of the look of the coils gone, you can use a butter knife or something else with a straight edge to start smoothing the sides out. This can take a little while, but don’t stress too much on perfection … handmade isn’t perfect, which is part of the beauty of it.
Once you have all the sides smoothed and their thickness pretty even (aim for about �” thick), cut along the rim of the vase – the top of the paint bottle – to make a crisp, sharp rim.
Refer to Illustration 02.
Bake the Vase
To begin baking, you’ll need to remove the paint bottle from your vase. To do this, gently loosen the aluminum foil that is above the vase’s rim and then tug the bottle out. Fold the excess aluminum foil to the inside of the vase but don’t try to remove it until it’s done baking. Trust me.
Next, line a cookie sheet with aluminum foil and place the vase rim-side down on the sheet. Warm your oven to 275 F and place the vase in. You’ll need to bake it for 15 minutes per �” thickness … which is why we aimed for exactly that thickness on the vase sides.
If you go a little over on time, don’t worry – it won’t hurt anything. Overcooking can cause cracking, but not often. Generally, the only thing that happens is that the rim which is touching the aluminum foil will yellow a little.
Refer to Illustration 03.
Paint the Vase
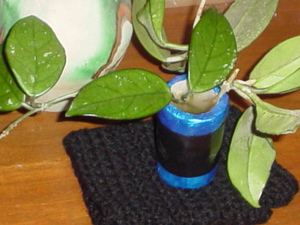
All that’s left is to make your vase beautiful. To create the 2-tone effect I’ve used, first cover your vase with a thick coat of the accent color (use only water-based acrylics or Sculpey glaze) once it has fully cooled from baking. Pay special attention to the top rim.
Allow the accent color to dry for at least an hour, and then tape off the top and bottom of the vase using electric tape. Use at least two thick coats of your main color on the space in the middle, allowing at least 1 hour drying time between coats.
Refer to Illustration 04.
Once it’s dry, fill it with water and use your new skill as an excuse to buy a pretty bouquet or grab some plant startings from a friend … to reward yourself, of course!


