Most Unusual Pumpkin Carving Designs and Decorations
Tired of carving the same old pumpkin for Halloween every single year? Here are a few fresh and imaginative ideas for carving a very different Halloween pumpkin.
Before You Begin
Always mark out the areas you plan to carve in pencil before you begin carving your pumpkin. This way, if something doesn’t look right or doesn’t fit on the pumpkin, you’ll know ahead of time. Then all you have to do is erase a little, and make some changes until everything is in the right place. You can use the handy patterns which I have provided as a guide.
To use the Halloween pumpkin carving stencils included with this article, print them out from your computer. You’ll want to be sure that the print-out is large enough so that the design can be transferred to the pumpkin you are using. If it is large enough, hold it over the pumpkin, and use a needle, pin, or other sharp straight instrument to poke through the lines which indicate the holes in the pumpkin. If you can’t get it to print large enough to transfer in this manner, simply print it out and set it beside the pumpkin. Then refer to the design to draw a similar design directly onto the pumpkin.
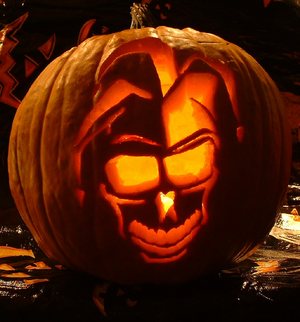
Scary Halloween Court Jester
The scary Halloween court jester can be created by carving a skull design, then placing a jester’s hat on top of it. Use the included picture and stencil as a guide. Use fine tools to carve out the more slender slices. These indicate the cheekbones, the chin, and the brow. Carve the eyes in a sunglass shape. Create the mouth by carving two tooth ridges, one on top and one on bottom. The nose is shaped somewhat like an extracted tooth. Carve the portion of the hat above the left brow, but do not carve the area above the right brow. This gives the impression of the hat being two different colors. The hat has three floppy points, each of which has a jingle bell at the end. The point on the right is carved in a slightly more complex way. However, don’t get confused. These are not two separate points, but two parts of one point. Be sure to leave a “bridge” between each hole, or your design may fall apart or collapse inward.
Start with a relatively large, round pumpkin. Carve the eyes as triangles, but leave a small triangle of pumpkin at the bottom of each eye to represent the eyeball. Carve the mouth jagged and crooked. Find a large carrot for the nose, then carve a hole just large enough to fit the carrot in. Use a small piece of fruit, such as a cherry or a raisin to indicate a wart on the nose. Use corn husks, dry grass or straw for hair. Make a witch’s hat out of felt or velvet, then cut out small white and orange felt stars and moons. Paste these on to the hat in a decorative pattern.
Halloween Pumpkin Cat
You can add your own flair to the project, and give the cat a little personality. Decide who your cat is before you begin. Is he a scary cat? Is he a cute cat? Is he a silly cat?
You’ll want to use fairly fine tools for this project. As in the previous project, begin with a round pumpkin, and carve the outer corner of the eyes, leaving a cat shaped pupil in the middle. Carve the mouth in a smooth, crescent arc, leaving two pumpkin “fangs” on top. Carve the nose as an upside-down triangle. Then create the whiskers by carving out slender slices on the right and left of the mouth. Carve two more slices just above and on the outside of the eyes, in a triangular pattern. When you’re done, the ears should look almost like little boomerangs.
Halloween Hobo Pumpkin
Create circles for the eyes, and a crescent shape for the mouth. But instead of carving all the way through the pumpkin, just gently carve out the top layer of the pumpkin rind. Attach a cork for the nose. Attach buttons in the middle of the eyes. Use a 15 ounce battered tin can spray-painted black for the hat. Use a cut-out from a pie plate or the lid of a coffee can for the brim of the hat. (Take care nobody cuts themselves on the can lid.) Spray paint this black as well. Cut out strips of blue construction paper, and crumple them. Stick this under the “hat” for hair.
Start with a long pumpkin. Carve a long, ovular open mouth. Carve an oval for a nose, and then carve long, ovular eyes. Leave a little bit of round pumpkin at the bottom of each eye to indicate an eyeball looking to the side. Make small holes in the top of the pumpkin, and insert straw or dry grass into the holes to indicate hair standing on its end.
Don’t Carve the Halloween Pumpkin
There are lots of ways to decorate a pumpkin without carving it. Get creative. Attach gourds to the pumpkin with toothpicks, choosing gourd shapes which look like a nose, a mouth, and eyes. Or paint your pumpkin with your own original design. Be sure to use nontoxic craft paints, especially if children will be helping. Cool ideas I’ve seen on the web include a scarecrow, a Frankenstein, a gravestone, and a green witch.
Check out the additional resources area for more ideas.