When you are trying to find crafts for little girls to do you can go broke with all the possibilities! But finding entertaining craft projects for little girls does not have to break the bank! When my niece comes over she always heads right to my craft closet where I have a little girls craft corner set up just for her. I have a selection of little girls craft beads, jewelry findings, yarn, colored paper, glue, glitter and tons of other odds and ends. The usual crafts for little girls are nice but my niece’s favorite little girl’s crafts have been the ones she has made form the remnants of our home remodeling projects!
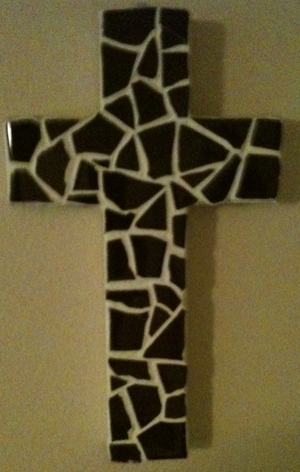
Our most recent home remodeling project involved re-tiling the bathroom. We had lots of great supplies left over for my niece to do some great little girls crafts with. We had leftover tiles, grout, and a few spare pieces of wood. My husband used his band saw to cut out a cross for her to craft with. She covered it with tiles, grouted it, and it was wonderful!
Here are the basic steps to help your niece (or your favorite little girl!) create a great little girls craft she will treasure for years!
Supplies:
Wooden form (hand made or purchased)
Tile Grout
Damp sponge
Glue
Goggles
Tempera paint (optional – several colors if desired)
Small kid’s craft paint brush (optional)
Picture hook (optional)
Grout Sealant (optional)
Directions:
1) You can purchase a simple wooden form at the dollar store or any local craft store in the kids craft section. You can also do as we did and cut your own wooden form for the kids craft base.
2) We had several broken tiles that we saved for my niece to use in a little girls craft project. She used a small hammer (wearing protective goggles) and broke them into smaller more uniform pieces.
3) Using glue to anchor the pieces, have your little girl place the tiles around the form in a pleasing pattern. Take care to make the spaces between the tiles big enough for grout yet not too big.
4) Let the glued tiles dry according to package direction.
5) The next day you can continue to work on your little girl’s craft. Mix some grout according to the package directions and work it into the spaces between the tiles. If you prefer to have a more colorful little girls craft you can mix in some tempera paint at this point to give the grout some color. Wipe away the excess with a damp sponge.
6) Let the grout dry according to package directions.
7) When your little girls craft has dried you can further enhance it by painting the grout with tempera paint. Even if you added paint to the grout when you mixed it you can further embellish it if you like!
At this point you can add a picture hook to the back of your little girls craft and hang it on the wall or use it as a drink coaster or even as a plant trivet! Avoid getting it wet if at all possible. If you think your little girls craft will get wet seal the grout with grout sealant.
By saving the little bits and pieces you have left over from home improvement projects you can provide the supplies for some awesome little girl’s crafts! You are only limited by your imagination!