Perhaps you’ve just created a beautiful sculpture out of polymer clay and would like to copy it. Or maybe you want to make a lot of cabochons for your jewelry, but forming them by hand is time-consuming. Or you’d like to do more stamping but can’t find the designs you like. What do you do? Make your stamps or a mold from polymer clay itself.
You don’t need a lot of supplies (unless you’re creating a very intricate design) and the clay is easy to get. Making molds and stamps is a great way to use up “scrap clay” left over from other projects. The color of the clay doesn’t matter; actually, it’s best to mix the scraps completely until you have a solid color. It’s easier to see your design with a solid color than if you’re looking at stripes, marbled effects and bits of canes.
Making Molds
(Note: These instructions assume you already have the object you want to copy.)
Once the clay is mixed, make sure you have enough for both the planned object and at least a half inch of surrounding clay. Form the clay into a lump and flatten the top with a roller or piece of glass. Apply cornstarch to the top of the clay and/or the object, then press the object gently but firmly into the clay as far as you need it to go. Then slowly and gently remove it, taking care not to damage the impression you’ve made. If you do damage it, just reform the clay and start over. Once the imprint is the way you want it, cure the clay as usual.
To use your new mold, cover the inside liberally with cornstarch. Prepare the clay you’re going to use for the object by conditioning, mixing, marbling – whatever you want. Then press the clay carefully into the mold, making sure it goes all the way in. If the mold has any very pointed or sharp areas twist a section of the clay and insert that part first. Once the mold is filled, trim the extra clay from the top, then cure as directed and finish however you like.
The above instructions will make a mold for an object with one flat side. If your intended object is three-dimensional just make two halves, making sure they fit together perfectly.
Making stamps
There are a couple of different ways to make stamps. The first uses an existing stamp and works just like the mold process – you press the stamp into the formed scrap clay. After the mold is cured you can use it to make copies of the original stamp. If you’d like a negative image – you want the raised areas of the stamp indented and the indented areas raised – you’d just use the mold itself as a stamp. If you’re planning to use the mold as a stamp keep this in mind when you’re making it; for example, keep the sides minimal and add a handle if you think you’ll need one.
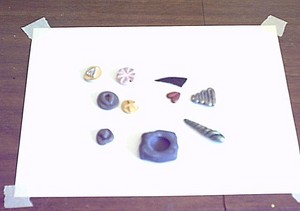
You can make stamps from scratch one of two ways. The first is to set up the base, then form the clay into the image you want either by removing clay – for example, using a needle to make lines in the clay – or by adding clay (which is what I did with most of the stamps in the photo). Once the stamp is cured it’s ready to use. The second method involves carving your image into already-cured clay. It may or may not be easier, depending on your tools and carving skill.
Using polymer clay stamps and molds
I’ve mentioned this in another article, but I think it’s important to repeat it here: Always coat your stamps and molds with a release like cornstarch before you use them. If you use a stamp without a release the stamp might stick to the clay and you could ruin the image trying to get it out. If you use a mold without a release there’s a good chance the object will bond with the mold during curing, and you’ll never get the two apart.
Polymer clay stamps are great for stamping into clay because you can make them deeper than most ordinary rubber stamps. They may also work on paper and other non-absorbent surfaces, but you’ll need to be careful to make the surface of the stamp as even as possible. Also, regular clay doesn’t have the flexibility of rubber, so if you’re making stamps for paper consider using the elastic clay made by Sculpey.
Stamps and molds can help you create both one-of-a-kind pieces and copies. You can make your objects unique by using stamps you’ve designed yourself. But if you don’t want a “one of a kind” you can make more like it using a mold. Or you can compromise – use different formulations of clay or different finishes on objects made with the same mold or stamps. Then you can have cabochons that are all the same size and shape, but otherwise look completely different.