Tools:
Fabric Pen
Scissors
Glue gun and sticks
Hatbox
2 Fabrics (1 solid/1 patterned)
Ribbon
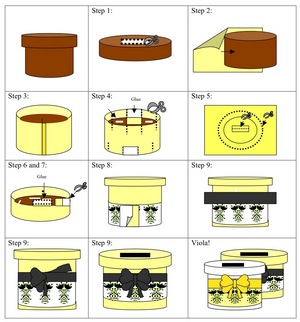
First, take the top of the hatbox off and cut a wide rectangular hole in the middle. Set the top aside for later.
Second, take the base of the hatbox and a solid colored fabric. Wrap the fabric around the perimeter of the base. Cut a line where the fabric meets the other end leaving a little excess fabric to fold over.
Next, glue the uncut side of the fabric to the base. Now fold and glue the rough edge of the free end to the inside of the fabric. Then glue that clean edge slightly overlapping the other end of the fabric onto the base.
After you have finished wrapping and gluing the fabric around the base. There should be some excess fabric overlapping the top and bottom of the base. Take your scissors and cut several vertical slashes in the fabric around the top and bottom. Now take the flaps around the top of the base and glue them to the inside of it. Then take the flaps on the bottom and glue them to the bottom of the base. Place the base aside for later.
Then, take the reminder of the solid fabric and lay it a flat surface. The place the top of the hatbox face down onto the fabric. Take the fabric pencil and trace an outline of top onto the fabric. Now draw another line a few inches away around the perimeter of the outline. And finally trace the rectangle hole you cut out earlier on the fabric as well.
Now, cut the shape you made out of the fabric. And cut a horizontal slash inside the rectangle you drew as well. Now cut several vertical slashes around the outer line, stopping short of cutting into the actual outline. Place the top face down on the fabric again. And glue all the flaps you created around its perimeter to the inside of the top.
From the rectangular slot of the box. Using the slash you created in the fabric as a guide. Cut four vertical slashes on the width of the rectangle’s end. Now take flaps you just created and pull them through the hole and glue them to the inside of the top. The top portion of the box is now complete.
Now take the patterned fabric and the base of the box. Place the patterned fabric halfway down the top of the base and wrap it around. Cut the fabric where both ends meet and glue them onto the base like in step 3. Then cut and glue the fabric overlapping the bottom like in step 4.
Finally take the ribbon and wrap it around the base covering where the two fabrics meet Cut the ribbon leaving enough excess to tie a bow. The glue the middle of the ribbon to the back of the base. The tie a bow onto the front of the base. Once finished place the top onto the base and your card box is complete!