The Color Purple
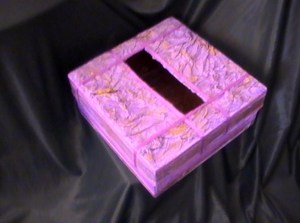
Everything’s set for your wedding, but what about a wedding card box for the envelopes you’ll receive at the reception? (Most have money in them, you know.) In old movies they slipped cash into the bride’s fancy beaded handbag; but that’s a movie thing. Your real life wedding calls for a card box on a gift table, a purple wedding card box, not generic white like in a wedding store.
You can make one yourself in about an hour, a little longer if you want it fancy. Actually, as the bride, you’ll have way too much to do; so pass these instructions along to a crafty friend, and let them make it for you. Here’s what you’ll need.
Tools
-Scissors
-Utility knife
-Paint brush
-12 inch Ruler
Materials
–A Box – Square, round oval, the size and shape are up to you. A plain white gift box is best; but shoe or boot boxes also work well.
-Purple Paper – Search for heavy, opaque wrapping paper. I checked a few stores and found only purple tissue paper at 1.49 per pack. It’s got all kinds of design possibilities.
-Tacky glue
-Purple ribbon – I used Offray budget 50 cent rolls from Michael’s.
-Plain white paper, copy paper will do.
-Gold craft paint 99 cents – optional
-Small dish of water
Prepare Your Wedding Card Box
Hole or no Hole?
Some wedding card boxes have slots; some don’t. For those that don’t, you can leave the lid in place until a guest wishes to make a deposit, or lay the lid on top at a jaunty angle and close it when the gifting is over and done.
If you prefer a slot, cutting it should be the first task.
-Create a 1&1/4 by 6 inch rectangular template. (The demo box slot is bigger)
-Trace your rectangle on the inside center lid.
-Cut out your rectangle with a utility knife, using a ruler as a guide.
Prepare the Sides
– If you’re reusing a box, cover the sides with white paper to hide logos and print.
Cut the hole…. again
-Flip your lid over. Where the white paper shows through the first hole, draw a “double y” pattern (See illustration 2 )
-Cut, fold and glue the white paper to the inside lid.
Add Purple Paper and More
-Brush box sides with watered down glue as you go, and wrap your box top and bottom like a birthday gift.
-Trim edges and glue into place.
-If using tissue paper, add a second layer for a deeper purple color. Re-cut the hole.
-Paper the inside of your box if you choose.
-If you want a no frills Purple box, you’re done!
Box Options
-Add rows of ribbon
-Create a textured look with tissue by painting a thin layer of glue over the box top. Rinse tissue paper with water. Squeeze it out. Open up, scrunch and glue into place on box top.
-Add a gilded look with hints of gold paint on the inside, lid and edges. Use a dry brush.
-Use purple fabric for a different look and feel
-Glue batting to the top before papering for a puffy look.