Kids often get bored during cold, rainy days. They want something to do that will be fun, entertaining, easy, and fast to do. Kites is one of the craft projects kids can make with a little help from their parents. On a slight to moderatly breezy dau, the kids can take their homemade kites out and fly them.
As a parent, you can give your kids a whole new meaning to “Go fly a kite.” Making homemade kites fall in the easy to hard categories of craft projects. The ranges of kite making range so widely dut to how much time, materials, and construction the kids want to put into their kites.
Basic Parts of a Kite
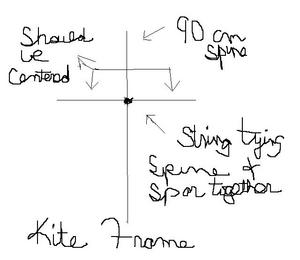
Spine. The spine is the vertical stick that supports the length of your kite and is the basis for the kite’s height.
Spar. The spars are the supports which are placed across or at a slant over the spine of the kite for support. The spars can be curved or bowed.
Frame. The frame consists of the spine and spar support sticks being tied together with string or plastic connectors to make the kite’s internal frame network for the shell of the kite.
Cover. The cover is the outer shell of the kite that is made from cloth, plastic or paper and covers the frame of the kite.
Bridle. The bridle is used to control the movement of the kite and are attached to the spine or spars.
Flying line. The flying line is the string attached the bridle of the kite. The flying line is what the holder of the kite uses to keep the kite attached to the person.
Tail. The tail of the kite is the string attached to the bottom of the kite to help keep it balanced. However, not all kites will have a tail.
Reel. The reel is used to wind the flying line around. The reel also helps the kite from getting tangled or from flying away.
Diamond Kite
Materials for A Diamond Kite
Butcher or garden twine
Scotch tape or glue
Sheet of strong paper (40 inches x 40 inches)
2 wooden dowels one dowel should be 40 inches and the other should be 35 inches.
Ribbon, paint, markers to decorate the kite.
Instruction for Making a Diamond Kite
Step One: Making the Kite Frame
You will make a cross using the two dowel rods. The shorter dowel rod will be placed horizontally across the longer dowel rod. The cross piece of the frame should be centered across the spine.
You may want to place a touch of glue on the vertical dowel where you want the horizontal dowel to be placed to help keep the two dowels stable. Tie the two dowels together with the twine. The dowels will need to be at right angles.
You will want to cut a notch at the ends of the dowels next. The notches will need to be deep enough to hold the string while you are stretching the string around the frame.
Starting at the top of the kite, make a loop around the top of the frame. You will fasten the loop by winding the string around the top of the dowel. Stretch the string onto one cross bar of the kite and continue to the bottom rod of the kite.
You will place the string in the notch of the bottom part of the frame. You will next create a loop in the same manner you did for the top of the kite frame. Continue on with stretching the string around the kite frame. Tie off the string by winding the string around the top of the spine rod and tie or glue the end off. The string should be tight around the frame, but not so tight the frame will warp.
Step Two: Covering the Kite
Lay the outer covering for the kite face down and place the frame on the wrong side of the covering. Trim the material leaving one to one and a half inches of material for the margin. Fold the material over the string wrapped around the frame of the kite. You will tape or glue the edges down so the material used is tight.
Step Three: The Bridle and Tail
While this may sound like the front and back of a horse, it is actually the final steps of making your homemade kite.
Cut a piece of string 43 inches long and tie each of the ends to the top and bottom loops of the spine. You will now need to tie a loop on the loose string just above the cross section of the two dowels. This is where the flying line will be attached in order to fly the kite.
Cut a string approximately 20 inches long and tie ribbons around the string. Tie the tail to the bottom loop of the spine.
You can now decorate the front of your kite.
You have just made your first homemade kite. Enjoy and have fun!!