Easter is a time of reflection, rich with symbolism. A powerful Christian symbol of Jesus Christ’s sacrifice are the nails used on the Cross. The projects outlined here will bring those symbols of peace into your home and close to your heart to celebrate this season and remember what was given. One is a touching piece of wall art. The other is a special Nails of the Cross jewelry set. Wear these to church or to other special events during this special time of year. I crafted these for faithful friends to wear and cherish. They were simple to create and the recipients were overjoyed to receive a hand crafted piece with such deep meaning.
Nails of the Cross Wall Art:
Age Group: Teens, Adults
Time for Project: 20 minutes
You will need:
- 2- 3 1/2″ long masonry/flooring nails with tapered bodies
- 2 – 2 1/2″ long masonry/flooring nails with tapered bodies
- Florists wire, jewelry wire or other thin, flexible wire in silver tone
Step One:
Lay two 3 1/2″nails vertically, so they touch and one head is pointing up and the other head is pointing down.
Step Two:
Wrap the nails in the wire snugly about three quarters up the length of the nails.
Step Three:
Lay two 2 1/2″ nails at the wrapped point horizontally. Wrap in an x-pattern around the nail, securing it to the vertical nails.
Step Four:
When the nails are secure, wrap the wire up the top section of the Cross. At the very top, create a long, thin loop in wire on the backside of the nails. Twist the base of the loop slightly to bring some stability. Wrap one more time around. Cut the wire. Tuck the end, looping it to secure around the wrapped wire.
Use the project as artistic decor on your wall or door. It is perfect to give as a gift.
* * * * * * * * * * * * *
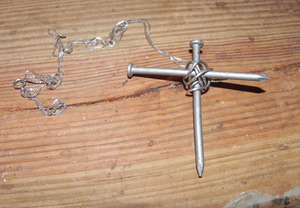
Nails of the Cross Jewelry Set:
Age Group: Teens, Adults
Time for Project: 45 minutes to 1 Hour
You will need:
- 2 – 1″ long paneling nails
- 2 – 1 ½” long paneling nails
- Florists wire, jewelry wire or other very thin, flexible wire in silver tone
- Two French wires
- One necklace cord
Step One:
Lay one 1 1/2″ nail vertically, and lay one 1″ nail on top of it horizontally about three quarters of the way up, forming a cross.
Step Two:
Wrap the nails in the wire snugly.
Step Three:
When the nails are secure, wrap the wire up the top section of the Cross. At the very top, create a long, thin loop in wire on the backside of the nails. Twist the base of the loop slightly to bring some stability. Wrap one more time around. Cut the wire. Tuck the end, looping it to secure around the wrapped wire.
This will be the base connect your jewelry findings to.
Step Four
Repeat two more times. You will need a total of three nail crosses.
Step Five.
Attach two nail crosses to French Wires. Attach one to a necklace cord.
Place in a jewelry box to give as a special gift or wear for your own enjoyment.
")