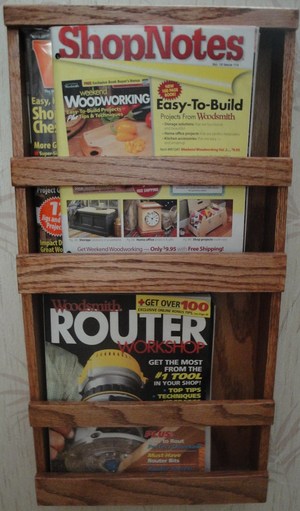
I enjoy reading my magazines in my spare time, but they do pile up while they are waiting to be read. To keep my magazines in order I made this wall hung magazine rack. This rack can be placed anywhere you want them including next to your bed, in the family room, a home office or even in the unofficial library, the bathroom. Wherever you place it, your magazine rack will be a project you will be proud of for years to come.
The minimal tools you will need are a handsaw, hammer, and brad nailer. If you have power tools, you will be able to make this rack much quicker. The type of wood you use is up to you, oak, walnut or cherry are all good choices. The dimensions of the magazine rack are 12 ¼” W x 24″ L x 3″ D.
Materials: ½” thick wood, wood glue, 18 gauge 1 ¼” brads, wood stain, wipe-on polyurethane and wood filler.
Cut list:
Sides: 2 each, 24″ x 2 ½”
Top: 12 1/4″ x 2 ½” x ½ ”
Bottom: 12 1/4″ x 2 ½” x ½”
Center shelf: 11 ½” x 2 ½”x ½”
Front crosspiece: 2 ea. 12 ¼” x 1 ¾” x ½”
Front crosspiece: 3 ea. 12″ x 1 ¼” x ½”
Bottom cross piece: 12 1/4″ x 1 ¾” x ½”
Back panel: 23 1/2″ x 11″ x ¼ inch plywood (optional)
Step 1 Cut top, bottom and sides to dimensions on cut list. If you have a router, use an 1/8″ inch router bit on front edges to soften the edges.
Step 2 If you are going to add the back you have two options, to make a back that fits over the entire frame or if you have the power tools to make dado’s use the 23 ½ by 11 panel. For the dado’s, cut 1/4 by ¼ inch on back inside edges on top, bottom and sides pieces.
Step 3 Glue the top, bottom, and sides together, with top and bottom overlapping the sides, using glue and brad nailer. Add the center shelf, centered equally between top and bottom.
Step 4 Attach back to frame using brad nailer to square the frame.
Step 5 Locate the center shelf in the middle of the frame and attach using glue and Brad nailer.
Step 6 Attach 1 ¾” cross piece flush with the bottom of the bottom shelf and the sides using glue and Brad nailer. Attach the center 1 ¾” cross piece flush with the bottom of the center shelf.
Step 7 Attach one 1 ¼” crosspiece flush with the top edge of the shelf. Add the two remaining 1 ¼” crosspiece 2 inches above the lower and center crosspieces, using glue And Brad nailer.
Step 8 Sand magazine rack beginning with 120, 180 and 220 grit sandpaper. Remove the sanding dust using a tack cloth or micro fiber cloth, and then stain the rack with the color of your choice. Allow the stain to dry overnight.
Step 9 Apply wipe-on on polyurethane with a sponge brush and then wipe off any excess finish. Apply At least three coats and this manner.
Tip: When you hang the magazine rack, try to attach it to the studs of the wall.