This article features instructions for creating a scrapbooking layout using camping and outdoors-themed scrapbooking supplies by Reminisce. The article will give you ideas for re-creating, or “scraplifting”, this layout using your own photos. The article also includes suggestions for how you can use these papers to create your own variations of this theme including themed scrapbook pages for hunting, fishing, RV travel, going on vacation and more.
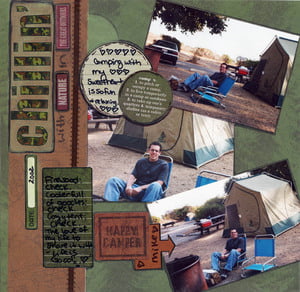
My husband and I enjoy camping, and this is a layout that I created to document one of our many camping trips. This layout is extremely versatile, and the design could be adapted for use in many different types of outdoorsy themes.
This layout features three 4×6 photos; this format is ideal for use by scrappers who don’t like to hassle with making enlargements of their photos. My photos were cropped in order to get this effect.
Supplies Used in this Scrapbooking Layout:
Patterned Papers From the Great Outdoors Line:
Happy Campers
Into the Woods
Stickers
Great Outdoors 12×12 Journaling Sticker Sheet
Camping Stickers
Camoflage Alphabet Stickers
Other Supplies:
Brown Ribbon
Adhesive of your choice
Pens and markers of your choice: the one I used in this layout is a black Sharpie.
Green Chalk
Step by Step Instructions For Creating This Layout:
Choosing photos for the layout:
The first thing you want to do is choose photos for your scrapbook layout. If you want to make a page that looks just like this one, pick three 4×6 photos and crop them slightly as needed to get the effect you want. Choose outdoors themed photos showing people participating in activities such as camping, hiking, fishing, boating, or outdoor sports.
Analyzing the colors in the photos:
Next, you’ll want to choose the papers and embellishments to use. You’ll want to analyze the colors in your photos to make sure that the papers coordinate. In this layout, I used papers and embellishments from Reminisce’s “The Great Outdoors” collection. This particular paper line is fantastic for using with outdoor photos, because the colors coordinate so well with the blue skies, green trees and earth tones that you usually find in outdoor photos. Make sure the papers look good with the photos you want to use. Keep in mind that you can always substitute papers if you need to. There are plenty of other choices available.
Creating the Layout:
Next, lay out your photos and papers and choose the embellishments you want to use. You can use the same stickers I used if you want to, or you can choose different ones, depending on the look you want to achieve.
Creating the Title:
I like to cut out the stickers I am going to use, but I leave them on the backing until I am ready to stick them down. I cut them out so that I can lay them on top of my papers to see where I want to put them, and move them around if necessary before committing to the final layout. I suggest that you do this too. It will help you to make sure everything fits on your layout correctly. If your title is too long for the area where you want to put it, it is helpful to figure that out before you have stuck half of it down.
Decide on the title you want for your layouts and cut out the correct alphabet stickers to spell out your title. Lay it all out on the page to make sure it will fit.
For the title on this particular scrapbook page, I used a combination of different stickers plus my own handwriting for variety. My title reads “Chillin’ With Nature in the Great Outdoors”. I used the Camoflage letter stickers to spell out “Chillin'”, and the “Nature” and “Great Outdoors” stickers were from the Reminisce sticker sheets listed in the supply list above. The title was also accented with black marker to make it stand out more.
Embellishing the Layout:
Cut a strip of paper and a strip of ribbon to form the accents for the left hand side of the page. The strip of ribbon measures 12×12 long. The width of your patterned paper strip will depend on how much space you need to fill to make that area on the page look attractive; if you cropped your photos very small it will be wider than if you didn’t crop your photos much.
Journaling:
Write out your journaling on scrap paper before you transfer it to your journaling stickers. I used 2 separate journaling stickers to complete the journaling for this layout, plus I also wrote a date and a name on a couple of the other stickers. Keep in mind that you can write, doodle, draw or journal on any area of your layout you please, including stickers and papers and on nearly any other embellishment too.
Finishing the Layout:
When you are content that everything matches, fits correctly, and looks the way you want it to, adhere it all down to the page. Add the layout to your scrapbook album, and enjoy!
Suggestions For Varying the Theme of This Scrapbook Layout:
If you wish to vary the theme of this layout, there are many ways to do so. The easiest way is to change out either the paper or the stickers. Reminisce has updated the “Great Outdoors” collection to include lots of new supplies in a variety of outdoor themes. You’ll find hunting, fishing, camping, hiking, adventure and RV themed supplies in “the Great Outdoors” collection. You do not have to limit yourself to using supplies by Reminisce, though. Check out the “Mr. Campy” collection of scrapbooking supplies by Cosmo Cricket, Adornit’s “Back To Nature” line, Debbie Mumm’s “Rustic Retreat” collection by Creative Imaginations, Karen Foster’s “Outdoors and Nature” Collection, Sandylion’s “Camping” product line, Rusty Pickle’s “Under the Stars” product line, and Moxie’s “Roughing It” product line. There are lots of creative possibilities!


