While Apple does give you the option to customize how much RAM you want in your MacBook, there are several reasons you may want to install your own RAM instead, such as preferring a different brand, decided you needed more after you already bought your MacBook, or simply because it’s a cheaper alternative.
Although many people prefer to not mess with the hardware in their MacBook, replacing the RAM is actually a very simple and easy process, and in this guide I’ll take you through all the necessary steps required for you to replace or upgrade the RAM in your MacBook.
What you’ll need
You will of course need a MacBook, either a normal MacBook or a MacBook Pro will do. Sadly, you cannot replace the RAM in a MacBook Air because the RAM in the MacBook Air is soldered onto the motherboard.
To install new RAM into your MacBook you’ll need a Phillips head screwdriver that is small enough to take out the screws on the back of your MacBook’s casing and of course the RAM you intend you install in your MacBook.
Make sure the RAM you’re installing is specifically RAM for laptops as desktop RAM will not fit into your MacBook.
Removing the bottom
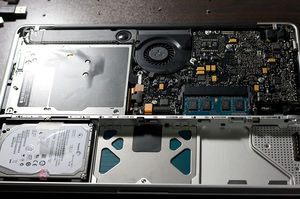
First things first, you’ll need to remove the bottom of your MacBook’s case so that you can access the hardware inside.
Before you remove it, make sure your MacBook is completely powered down and all cables are removed from it.
To start removing the bottom of the case you’ll need to take out 8-10 different screws. Be sure to remember which one goes where because a few of the screws are different lengths.
Once the screws are removed, gently separate the bottom of the case from the rest of the MacBook.
Installing the RAM
Once you have removed the bottom of the case you can now access the hardware inside your MacBook. Before you begin you’ll want to discharge any built-up static electricity by touching a metal surface inside your MacBook (That isn’t any hardware), this will keep you from accidentally frying the RAM when you touch it.
Now you’ll need to remove the RAM that is already installed in your MacBook, to do this simply push the levers on the side of the RAM apart, this should make the memory modules pop up. Now just gently pull out the RAM by holding onto the notches on each side of it.
If you have two memory modules then just repeat the same step for the second one.
To install the new RAM, you’ll need to align the notch in the gold edge of the memory module with the notch in the memory slot. Then, tilt the card and gently push it into the memory slot, making sure to apply even pressure across the entire module. Y0u should hear a slight click, indicating you’ve installed it correctly.
After the RAM is installed, replace the bottom case and secure it with the screws you took out earlier.
Final test
Once you’ve installed the RAM and put everything back together, you’ll want to turn on your MacBook to ensure everything was installed correctly.
If your MacBook successfully boots up, you can check your RAM by going to the top menu and clicking on “About this Mac.”
If your MacBook doesn’t turn on, or ‘About this Mac’ isn’t displaying the correct amount of RAM, then either the RAM wasn’t installed correctly, or the RAM is defective and you’ll need to replace it.