With the iPod, iTunes, Front Row and many other products and features, Apple Inc. has changed the way consumers find, purchase and enjoy media. And now other services such as Hulu have added even more functionality to our computers. However if you have an Apple laptop such as a Macbook or Macbook Pro then you know that sometimes watching video content on that small screen is not always ideal. But if you have a high-definition television with HDMI connections then you can enjoy that same content (on your hard drive or online) right on your TV. Or maybe you just want to use your television as an extra large monitor. In either case all you need is the right cables, which are not hard to come by.
In this tutorial I want to help you get a handle on how to go about connecting your Mac laptop to an HDTV. Now the procedure may vary from television to television but for the purposes of this article I will be using a Vizio high-definition LCD television. Two cables and one adapter will be used for this project. I will however mention along the way other options for accomplishing this task.
What You Will Need to Get the Job Done
1. Apple’s mini-DVI/DVI adapter
2. HDMI-DVI cable
3. 1/8″-to-RCA audio cable or adapter
4. HDTV with HDMI and RCA inputs (most will have this)
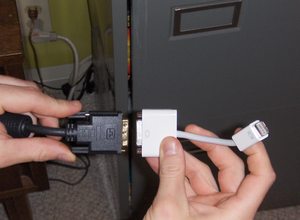
Step 1: Mini-Dive to DVI
The standard Macbook has an Apple proprietary port called a mini-DVI for the purpose of connecting monitors. Unfortunately not many monitors support this and an adapter is required. So to begin hooking your Macbook to your TV you will first need the mini-DVI to DVI adapter from Apple. At only $19 this handy piece of hardware will provide you with the more standard full-size DVI connection. Begin by shutting down your Macbook and turning the power of your television off. Once the Macbook is shut down, connect the adapter to the mini-DVI port on the side. This is the first step toward watching your computer content on your television.
Step 2: DVI or HDMI? Which Should You Choose?
At this point you have a determination to make. The next step after you have the adapter hooked to your computer, is to get the right cable for going from the adapter to your television. Some HDTV’s have DVI inputs. If this is the case, then the next thing you need is a DVI-D cable (not a DVI-I cable). A DVD-D cable is for video sources where only a digital video signal is being sent, which is the case in this scenario. You should connect one end of your cable to the adapter coming out of your Macbook and then other end will plug into the DVI port on your television. But the Vizio HDTV with which I am working only has HDMI. So in
this case we will use an HDMI to DVI cable from Cables Unlimited. There are many different companies (such as Monster) who make this type of cable but Cables Unlimited seemed to be the best deal on Amazon.com. There is a 6-foot and a 10-foot version so that you can make sure you have plenty to work with without the worry of coming up short. Again there are other companies besides Cables Unlimited that produce this type of cable so find the one that is the right price and the right length for you. But do yourself a favor and do not skimp on quality. Get something that at least has gold-plated connectors.
So in the case of the Vizio connect the DVI end of your cable to the DVI end of the mini-DVI to DVI adapter. The HDMI end will connect to your television.
Step 3: Connecting HDMI to Your TV
The Vizio LCD TV supports two types of HDMI. On the input panel they are marked as HDMI 1 and HDMI 2. HDMI 1 is for HDMI connections that carry audio and video within one cable. This requires a single HDMI cable connection. However the Macbook sends video and audio via different channels. Video output from the Macbook comes from the mini-DVI port and audio is sent via the headphone jack. This is where the HDMI 2 connection comes in. The HDMI 2 input of the Vizio television has separate red/white RCA audio jacks. We will talk more about the audio in the next step. For now plug the HDMI end of your cable into the HDMI connector of the HDMI 2 input on the back of the Vizio. You have at this point completed the video connections necessary to get your Macbook video signal to your Vizio television.
Step 4: Getting the Sound
For this step a very specific cable or adapter is needed. The Macbook only sends audio out one way: through the 1/8″ mini stereo headphone jack. The HDMI 2 input panel on the Vizio television only receives audio one way: through red and white RCA jacks. You can reconcile this one of two ways. The easiest way would be to purchase a cable that has a 1/8″ stereo jack at one end and the Y-shaped red/white RCA connectors at the other end. You can simply plug the 1/8″ connector into the headphone port of your Macbook and then RCA connectors into your TV. The second option is an adapter. Purchase a short adapter that has a 1/8″ stereo connector on ones side and RCA jacks on the other side. From here you can run a standard red/white RCA cable from the RCA jacks on the adapter to the RCA jacks on your television. Simple.
Step 5: Pulling It All Together
Now that your hardware connections are made, boot up your Macbook and log into Mac OS X. Next turn on your Vizio and set the Input to HDMI 2. You should see your computer desktop on your television screen. How does it look? If it is squished or stretched you will have to adjust the monitor resolution of your Macbook. To do this go into System Preferences and select Display. However it should automatically adjust to the current size.
Now by default Mac OS X will treat your television screen as a second monitor with your Macbook’s screen being the primary monitor. So to view applications or documents on your television you will open them on your Macbook’s screen and then drag them all the way to the right where they will appear on your television (it’s difficult to explain but try it and you will what I mean). If you would rather the television to mirror what is happening on the Macbook screen you can check a box to do this by going to the Display section under System Preferences.
I hope this tutorial has been helpful in getting your Macbook’s video signal over to your HDTV. Happy viewing and happy computing!