This tutorial is an hand drawn tutorial written and composed by me. For more tutorials visit http://alvinsart.wordpress.com.
Drawing the female body is a lot like drawing the male body, only with a few changes, so I advise you to read the How to draw anime/manga 7: Drawing the Male Body tutorial first if you haven’t already read it.
So let’s kick off!
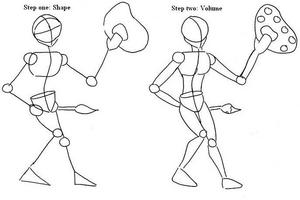
Step One: Shape
Start off by drawing a stick figure in the correct pose and proportion that you want. Also remember to add perspective, which simply is that things that are closer to the reader will appear larger than things that are further away from the reader.
Step Two: Volume
Add volume to your stick figure. When drawing the female body, remember that unlike the male body, the waist is a lot thinner than the shoulders. Also the body parts of the female curve a lot more than the male. Applying these two rules will help you draw more realistic and believable female figures.
Step Three: Anatomy
When defining the muscles of the female body in anime/manga, most people decide to leave them out. So when drawing females, remember that you don’t have to go and draw the details of the muscles. But don’t forget to add the calf muscles, because everyone has those :).
Also when drawing the breast, no matter how large they are, they are usually one head down from the head. (The neck to bottom of the breast = one head). It probably sounds confusing, so look at the Body Proportions Tutorial on this site.
Remember that getting a book about the human body from your school or public library will help you draw more realistic human bodies.
Step Four: Clothes
Hats, shirts, jackets, shoes… anything you want. A good idea is to look at costumes on TV, or look at fashion magazines, or even watch anime to generate some ideas on how you can dress your characters.
Step Five: Shadows
Choose a position for your source of light, and use your judgement to decide which areas should be shadowed and which areas should be highlighted.
Note that because this is a bright and happy piece, go easy on the black.
Step Six: Finishing touches
Just because we have computers, scanners, WACOM tablets, Photoshop etc… doesn’t mean we can’t go back to using coloured pencils and acrylic paints.
I used coloured pencils because it has a soft yet bright finish, which is good for drawing happy, peaceful scenes.
Coloured pencils are a great medium, for beginners and professionals. Easy to learn how to use, yet hard to master. They are clean, easy to use and there is a huge variety of colours.
If you decide to buy coloured pencils, I advise you not to buy the cheap brands. Investing in a set of Derwents will pay off in the end. Faber Castel is also a good option if you’re short on money.
Well that’s it for the second tutorial on drawing the human body. I hope you enjoyed it. Just like I said before, drawing the human body takes a lot of practise and experimentation. So practise, practise and practise!
Thanks for taking the time to read my tutorial. Hope you’ve learnt something. Bye or now!


")