Today laptops are not only as powerful as most consumer level desktops but also they have become very affordable creating a new level of ubiquity. In the same way that consumers began to ditch their home phone service and going “all cell phone”, more and more people are leaving their desktop computers in the dust in favor of going mobile with a laptop.
Now if you are like me you keep your laptop not in an office somewhere at the back of the house but in your living room with you so that it is there when you need it. But it is not a good idea to have a laptop sitting out on a coffee table, or chair, or sofa where it can get damaged. In this article I want to show you how to make an interesting side table for your laptop. This is a table style that I designed and built and I believe it will be as useful to you as it has been for me.
Determine Dimensions
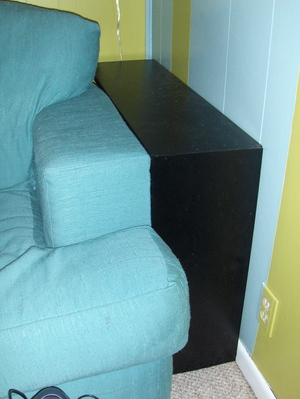
This laptop table, in its basic form, is designed to fit between the end of a sofa and the wall. The table should be built so that the top of the table is level with the arm of the couch creating a seamless surface from the sofa arm to the table. This allows a large enough surface for the laptop to rest on so that it can easily be accessed while seated on the sofa.
Begin by measuring the height and depth of the sofa. These will be the basic measurements required to determine the height and depth of your laptop table. To determine the height that your table will need to be measure from the floor up to the top of the arm of the sofa. Remember: measure twice, cut once! Make a note of this measurement.
Next measure for the depth of the table. To get this measurement, measure from the back wall (the wall that the back of your sofa is against) out to the front of the sofa. Write this measurement down. Once you are certain that you have the correct measurements, it is time to begin cutting.
Cutting and Joining the Pieces
The type of wood that is used for this table is not terribly important since it will not be supporting much weight. My table is made of pine and it has performed wonderfully for me. The size wood that is best is a piece that is one that is at least 1 inch thick. The width of the piece will have to be determined by how much space you have between the end of the sofa and the wall.
Cut at a 45 Degree Angle
Begin by cutting one piece according to the height measurement you took. However do not make the cut straight across. This is because in order to make the proper 90 degree fit between the two pieces each piece will have to be cut at a 45 degree angle (45+45=90).
So measure from the end of the piece of wood and make a pencil mark on the wood at the appropriate measurement for the height. Using a miter saw (or table saw) set at 45 degrees, cut the piece of wood at that measurement.
Now repeat the process for the piece that will be used for the top. In the same way, measure from the end of the piece of wood to the point of the measurement. Then draw a line to mark the measurement and cut with a 45 degree angle blade at that point. You should find that the two pieces’ 45 degree angle cuts fit together to form a nice 90 degree angle.
Joining the Pieces Together
Joining the two pieces is easy with the use of a couple of “L” brackets. Have an assistant hold the two pieces together and connect the first of the two “L” brackets to the underside of the table. One end of the “L” bracket will screw into one of the pieces of wood and the other into the other piece of wood. Be sure to use brackets whose screws are short enough that they will not screw through to the top side of the wood. If further reinforcement is necessary, use a 1×1 piece of wood with 45 degree angle cuts at each end to brace the two pieces of the table.
Finally, for this step, add a single leg to the back of the table by attaching a 1×1 to the back of the underside of the top of the table.
The final step before installing your new laptop side table is to put a finish on it. The finish can be paint or wood stain. There are a few tips to keep in mind.
Begin by rubbing the entire surface with sand paper. This is simply to “rough up” the smooth service so that it might take stain/paint better. After sanding clean away any sawdust and debris.
It is possible to apply stain with either a brush or a cloth. I prefer applying stain with a cloth especially on a small project like this. Applying stain with a brush is not 100% equivalent to applying paint with a brush. It is much easier for stain to streak and leave lines requiring much care and attention to come up with an even, clean result. Therefore I would suggest using a lint-free rag to apply the stain. Simply fold the rag and dip it into the stain and rub it on. Be sure to do so uniformly and without allowing dripping or excess stain to build up.
If you decide to paint, be sure to use high gloss furniture paint. It takes this type of paint longer to cure however it is also more durable and has a better sheen than standard wall paint. It will need to cure anywhere from 24 to 48 hours. See label for detailed instructions.
After the finish has completely cured you can now install the table. If you measured correctly and cut correctly then the table should fit snuggly between the end of your sofa and the wall and it should come up to a height that is even with the arm of your sofa so that you can set it on the table and it is easily accessible when seated on the couch.
You can now use your table to help you keep clutter from accumulating and you can be stylish while doing so. Good luck!