Ths month, my small apple tree is bearing about 30 pounds of organic apples. That’s much, much more than my family of four will eat fresh before they spoil. Because I’m out of freezer space, I’ve been experimenting with home canning and some old-time recipes.
Not many people can apples–peaches seem to be far more popular. But if you, like me, find yourself with too many apples, canning some at home may be worth a try. Expect canning apples to be an all-day project, best reserved for a weekend if you work full-time.
When canning apples at home, it’s extremely important to read and carefully follow expert guidelines. Those from the USDA, the Ball Blue Book, or the Ball Complete Book of Home Preserving are especially detailed and helpful. Don’t just take my word for it, look up and follow instructions from the experts!
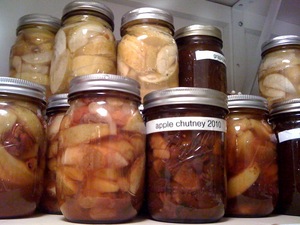
I canned plain sliced apples and sliced apples with cinnamon and dried fruits, both found in the Ball Blue Book. The canned apples with dried fruits called for cinnamon, raisins, and dried cherries. I found that I needed slightly less apples, by weight, to fill each jar than was called for in the Ball Blue Book. For the plain canned apples, I followed Ball’s basic recipe using a medium sugar syrup and adding lemon juice.
Many vintage cookbooks, such as my 1979 edition of the Fannie Farmer Cookbook, which contains a section on home canning, stress the importance of using only perfect, high-quality fruit. The Ball Blue Book also emphasizes this. This means canning only apples unaffected by insect damage, bruising, or other blemishes. Some years, this would mean giving up half the crop. This year, I am, fortunately or otherwise, able to can most of my apples.
I own a large pot (canner) for sterilizing and sealing the jars. It’s not necessary to spend more than $30 on this piece of equipment, which is available at hardware stores, discount stores, and Amazon.com. Heating up such a big pot of water takes a really long time. Therefore, I always start heating the pot, filled about half full with water (the jars take up a significant amount of room) when I begin preparing the fruit. If your stove, like mine, has a high-output burner, put the canner there. If the filled canner is too heavy to carry to the stove, place it on the burner and fill it with water using a large pitcher.
Besides the canner, you will need jars, a canner rack, a jar lifter, a thin spatula or chopstick, brand-new lids, bands, a food scale, and ordinary kitchen equipment such as pots and ladles. You can reuse only jars that were specifically sold for home canning. Don’t save old jars from the supermarket, even if the lids fit. And check your jars carefully for chips or cracks.
For canned apples, the Ball Blue Book requires a sugar syrup. I chose a medium syrup (5 cups sugar and 6 cups water). To make it, I heated water and sugar until they boiled. I then kept the syrup hot until I needed it.
I heated the lids for sealing the jars in a pot of water on very low heat. It’s important not to boil them. I preheated the jars in my oven, set on warm (about 150 degrees F). You can also use a dishwasher to preheat the jars.
For the spiced canned apples, the Ball Blue Book recipe called for mixing 8 to 10 pounds of sliced apples with sugar, water, and the dried fruit and heating them to boiling. For the regular sliced apples, the Ball Blue Book said to heat them to boiling in a sugar syrup. I added the juice and zest of 1 lemon to each batch. The acidity helps preserve canned fruits and the lemon added a nice flavor.
I packed the hot apple slices into the hot jars and ladled over the hot sugar syrup. It’s important to do this job carefully, so that you don’t burn yourself or spill hot syrup on the counter. I did place a towel under the jars to absorb some of the spillage. I should also note I found it much easier to pack the jars with the wide opening, rather than the regular opening.
The Ball Blue Book and the vintage cookbooks stress the importance of using a thin, non-metallic spatula to remove any air bubbles trapped between the fruit. Lacking one of these, I used a chopstick. Moving it around did release a significant amount of air. Changes in the head space, which is the space betwen the top of the liquid and the top of the jar, affect the seal and how well the canned apples keep.
Once the air bubbles were released and I had the proper 1/2 inch of head space at the top of the jar, I wiped the lids carefully with a damp cloth, placed on a hot lid, and screwed the bands down tighly. Any dirt, grime or syrup trapped on the rim of the jar can break the seal. Thus, cleaning the jars was really important.
I processed my pint jars for 20 minutes in a boiling water bath. The proper, rigorous way to do this is to place the jars in the rack in the canner, bring the water to a boil, and start timing the processing time when the pot boils. When the time ends, I turned off the heat and waited 5 minutes before removing the jars of canned apples.
As my jars of canned apples cooled, I heard that reassuring “pop” as the seal formed. Even so, I checked the seal on the cooled jars to ensure that each one was good. I did find one jar that did not seal. Rather than reprocess that jar of canned apples, I put it in the refrigerator and ate it within a few days.


