I developed this method for making gravy after several years of trial and error. It’s now so good that people ask me to make extra for them to serve with their Thanksgiving turkey that they’ve made instead of making their own!
There are two tricks to making this gravy come out so tasty and smooth. The first lies in the cooking of the turkey, and the second lies in the actual process of making the gravy.
A list of the ingredients you will need is as follow:
Ingredients
• 3 15 oz. cans chicken broth
• 1 stick of butter
• ½ tsp paprika
• ½ cup water
• 4-5 tbsp flour
When Making Your Turkey
To begin, pour the cans of chicken broth into the bottom of your roaster pan. Place the turkey in and cook as you normally would. I cook mine covered and every 30 to 45 minutes after the first hour I baste the turkey with the juices/broth from the pan and I rub butter over the entire turkey after that. Towards the last hour of cooking, after basting and buttering, I then sprinkle a small amount of paprika (about a ½ teaspoon) over the entire turkey. This gives the skin a nice dark roasted color and imparts a little bit of flavor into the juices.
After the turkey is done cooking, allow it to cool enough so that you can remove it from the pan.
Getting Ready and Making Turkey Gravy
The pan may have bits of stuff on the bottom (skin, meat, stuffing, etc). Remove as many of the big pieces as possible then pour off the remains through a large colander into a bowl or pot. Take the strained juices and then pour them through a wire strainer into a pot you can cook in. Set aside.
Take a small sealable container (I use a 1 quart Ball jar) and add 1 cup of the juice from the pan (warm, not hot), ½ cup of water, and 4-5 tablespoons of flour (I use Wondra Flour – it’s a lighter flour made by General Mills and is especially good for gravy making). Close the container tightly and shake until the contents are well mixed.
Take the pan with the juices and put on the stove on high heat. Bring to a near boil and then reduce heat to medium-high. Begin slowly pouring in the flour mix while constantly stirring the contents of the pan. Do this in small batches to allow the flour mix to incorporate with the juices in the pan. Continue until the gravy is the thickness that you desire. If it is not getting as thick as you would like, add a bit more flour to another ½ cup of water in your container, shake and then pour in as before. The trick here is that patience and proportions are never precise because you never know just how much juice you will get out of your bird. So, play around a bit, keeping in mind that the higher the ratio of flour is to water, the thicker your gravy will be.
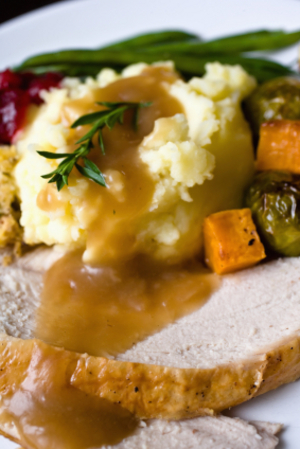
Once you have a nice, thick pot of gravy, you will want get rid of any remaining lumps that may be there. Take your wire strainer and pour the gravy through into another bowl in small batches (about a cup or two at a time). Use a spoon or spatula to stir the gravy around in the strainer, slowly pressing it as well to expel and juices through the strainer. Knock the lumps into the sink and continue until you have nothing left in the bowl but velvety-smooth turkey gravy!