An easy way for first time container gardeners to get started with growing and caring for bell pepper plants in pots is to start with a very young plant referred to as a seedling. Go to your local home and garden store to pick up a couple of pepper plants that have not gotten very large yet. Ask a store employee for assistance in selecting a plant or two that appears healthy and has not yet begun to flower or produce fruit. Look for plants that have been grown in biodegradable plant pots.
Purchase a long plastic or ceramic pot that is at least 12″ deep. You will also need a large bag of potting soil and a few common gardening hand tools such as a rake, shovel, and a trowel. Pick out a few watering cans, spray bottles, and a pair of gardening gloves. Also consider purchasing any one of the popular plant foods on the market. Once you have everything that you need, pack your young bell pepper plants carefully in plastic bags or in a box so that they will not get damaged on the trip home.
Re-Potting Seedlings
One of the first steps when growing bell peppers plants in pots is to prepare the soil. Open the bag of potting soil and use a hand trowel to scoop soil into the pot that you have purchased. Continue to add soil until the pot is filled about three quarters of the way. Use a hand rake to loosen and separate large clumps of soil. Dig holes large enough for your pepper plants using a hand spade. If you plan to grow and care for more than one pepper plant then you must make the holes at least ten to twelve inches apart from each other. This allows space for the root system of each plant to branch out nicely.
It is a good idea to re-pot your bell pepper seedlings soon after they arrive home. The instructions for re-potting will most likely be on the pot labels. If you have purchased bell pepper seedlings in earth friendly pots then you will be able to place the pots directly into the soil and not worry about throwing anything away. Biodegradable pots can be peeled so that most of the roots are exposed. The roots will be wrapped around the soil and may be quite long. Handle the roots very carefully. Be gentle as you loosen the soil around the roots before placing the pepper plants inside the container. Add more potting soil so that the roots become fully covered and gently pack in place. The soil should come up to about an inch from the top of the container. Mulch the top of the soil using straw and dried leaves. Water thoroughly and allow it to drain out of the bottom of the pot. Place transplanted bell pepper seedlings outside in a sunny spot.
Nurturing Young Bell Pepper Plants
Sunlight Needs
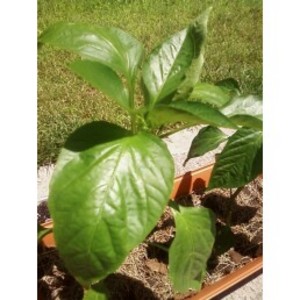
According to the September 2001 edition of Flower and Garden Magazine, bell pepper plants love heat and sun! They need 6+ hours of direct sun each day. All danger of frost must be over before you can place these plants outdoors and temperatures need to be warm. They do not like to be exposed to extreme temperatures though. Your plants may be getting too hot if you notice that their leaves are beginning to feel dry and brittle and appear to be curling inwards. If daily temperatures are reaching 85 degrees and above, you may want to place your bell pepper plants in an area where they can receive shade during the hottest parts of the day. A happy bell pepper plant outstretches its leaves to the sun.
Watering Needs
Bell pepper plants also love water! They need to be watered fully at least once every two or three days. When it rains frequently you may find that you do not have to water as often. Check the feel of the soil to help determine if the plant is getting enough water. Try not to let the soil get bone dry, but also be careful not to over water. A bell pepper plant that is getting too much water may have leaves that are beginning to turn yellow, while limp green leaves may indicate that the plant is getting too little water. Achieving the right watering balance takes time and patience. Your bell pepper plant will communicate its needs to you so be very observant. Baby these plants while they are very young!
Plant Food Needs
Add plant food according to the package directions (which is generally once a week) and also consider adding your own organic materials to the soil such as freshly used coffee grounds (which add nitrogen) and crushed egg shells (which add calcium). Flower and Garden Magazine also states that adding fertilizer to the soil will keep your plant’s quality and yield high. Read up on these types of soil enhancing techniques before trying anything new. The leaves of bell pepper plants can develop burn spots when given too much fertilizer.
Once the Bell Pepper Plant Flowers
Pretty soon you may notice that your bell pepper plants have begun to get taller and bushier and tiny green bulbs have appeared all over. These tiny green bulbs will begin to get larger and eventually a white flower bud should appear on each one. The flowers usually begin to open revealing the male part of the flower called the stamen and the female part of the flower called the pistil. These are the parts of the flower that attract and benefit from pollinators such as bees and butterflies.
You may not notice many bees or butterflies swarming around your plants initially, but don’t worry too much. You can always place other flowering plants nearby that are known to attract bees. You can also help the process along yourself by gently tapping on the stems of the bell pepper plants (daily) causing the flowers to vibrate. These vibrations can help pollination to take place. You may also notice that the main stems of the bell pepper plant have gotten thick and strong in preparation to bear the load of the fruit that will, hopefully, be soon to follow!
Flowering Problems
Sometimes a bell pepper plants’ flowers will shrivel up and fall off before producing fruit. This condition is known as “blossom drop” and is a sign that your plant is unhappy in some way. One common reason for this happening is extremely high temperatures. Your plant may be getting overheated during the day. Make some adjustments with the plants’ sun exposure and watering frequency and see if the problem ceases to persist.
When the Bell Peppers Finally Appear
Bell peppers may take several weeks to go from ‘flower to fruit’ and it takes patience to get through this period of time. Pretty soon the first flowers to have appeared on the plant will begin to turn brown and shrivel up. If you look closely, you may notice a tiny green ball sitting behind the flower. That tiny green ball is the green pepper! Get up and do a little dance if you’d like because this is a very exciting moment for first time container gardeners! The tiny green ball should begin to swell, the flower will drop off, and the pepper will get larger and larger. Lean in and you may notice a strong green pepper scent! Water the plant extremely well during this phase and get ready to harvest your very first bell peppers!
Congratulations! You are now officially a successful container gardener!
Sources:
Personal experience
Flower and Garden Magazine, 2001