Art at our house was a daily activity when our four oldest children were little. And through the years, I’ve collected art and craft ideas for every season. Fall offers a great opportunity to explore art in nature as the golden colors of fall surround us.
Art also offers an opportunity for young children to acquire mastery and skill at manipulating their environment and materials. They learn to cut, paste, punch, and draw lines and simple figures. This Tile Fall Art Project is one of my favorite fall art projects for young children between the ages of 3 or 4 and 10. Older children bore with easy craft projects and are ready for more demanding activities.
Fall Tile Art Project
Materials needed:
Plain white tiles in various sizes and shapes
Colored paper in fall colors
Black permanent marker
Plasticine (Plasticine is a great modeling clay like substance for kids to use, because it retains it shape and can be remolded as needed) For this project, it won’t dry or harden, but you only use a small amount of it and the tile is really an art project that can be displayed not have hot items sitting on it.
You can purchase white tiles of various sizes at most home improvement stores like Lowe’s or Home Depot to use for art projects. It’s durable art that kids can take a great deal of pride in displaying or using around the home. For younger children, I help them choose a simple outline design from various pattterns. You can go online to Creative Design where the designer has given permission for parents and teachers to use her fall leaf templates for a great example. You can also use the child’s own drawings to create a pattern for their tile art.
Advance Preparation by the teacher and parent for this fall art project
Once you have chosen a design for the size of tile you have, it’s helpful for the parent or art teacher to do some advance preparation. Children get frustrated by waiting, depending upon their age. And this is important to note for all art activities done with children. Adapt to their age and ability to ensure they have a positive experience and see results. As they mature in their art experience you can increase the difficulty of the steps they take to arrive at a finished art project.
Using the template or design you’ve chosen, trace the outline on your white tile. Draw in key features like leaf stem, or leaf lines or pumpkin curving lines. Do this especially for different colored areas of your design.
For younger children, you will want to cut some small square or rectangle pieces of various colored papers, about ¼ inch in to ½ in in size. You can vary the shape and size. It’s easy to do by just cutting some long strips. If the child you are working with is old enough to be using scissors and depending on their age, you could cut the strips and then let them cut them into pieces, or you could draw out the lines for the strips and then could do both the strips and the pieces. Remember, adapt for the age and ability.
Using the Plasticine
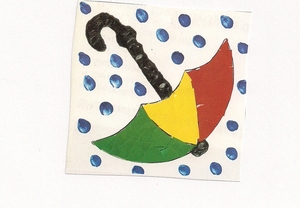
The Plasticine will give depth and texture to the art tile. Choose an area that would look good raised on the design you’ve drawn onto the tile. And then set in a small amount some of the plasticine in a color that works for the design. For instance, I did an umbrella design one spring and we used the plasticine for the umbrella handle. On a tree design, the obvious place for it might be the stem, or a vase holding several leaves, or a tree trunk with the leaves above it. Be creative, but keep is adapted to the age of the child. The younger the child, the simpler the design.
Now that you have done advance preparation, begin the fall art project.
First step: Have the child fill in the stem or area you have set aside for the plasticine with their fingers, pressing it down to cover the area, using their thumbs or their pointer finger.
Second step: Put some white glue in a small bowl, just a small amount, you can add more or you can use a glue stick.
Third step: Have your child glue small pieces of the colored paper to the areas of the design. For variance of color on the leaves, you might help them divide the leaf out or perhaps they just want to glue an assortment of colors on the one glue in the fall colors you have chosen.
Fourth step: Let the colored paper dry. When doing art with small children, sometimes it’s a good idea to come back to the project after a break.
Fifth step: Add some detail to your white tile with fall colors of paint or perhaps with blue to signify raindrops in the fall. Or perhaps you make a line of green to signify grass that the leaves are falling on. Any area that you can allow the child to dip their finger in the paint and then dotting on the design.
That’s it. You can adapt this project to make more complicated designs on larger tiles. Or you could even make more than one tile and have a mosaic fall tile art mural!
Other ideas for template designs for fall tile art project:
apples, pumpkins, fall trees, scarecrows, witches, jack o lanterns, fall flowers, squirrels, nuts
There are many ways to use tiles in fall art projects. Have fun and explore some today with your “art student.”